How to Make Vocals Sound Fuller: Vocal Mixing Using Channel Spliting to Improve Weak Vocals
What Is Channel Splitting?
In our last article we looked at how panning can be used to help fatten an otherwise thin rhythm instrument such as an acoustic guitar. This article takes the idea a step or two further, applying a similar principle to a lead vocal. If you are using new generation software like REAPER, it is also a very good example of when, how and why you might want to use channel splitting. If you are using an older generation program, you might still be able to achieve a similar outcome, but you will need to create multiple tracks in order to do it.
Channel splitting is a technique which lets you process the one track in several different ways at the same time, as if in fact it was three, four or more separate tracks. After processing each stream, we then join the tracks up again. The effect of this technique can be stunning.
In this instance, we are going to split our vocal track into three stereo paired streams. By using EQ and by panning each stream differently we will create a full, present, powerful vocal effect, without the mushy or echoey feel that you can get from using delay effects. The instructions that follow are very much REAPER specific. There are notes at the end of this article that should assist users of other programs.
Channel Splitting In Action
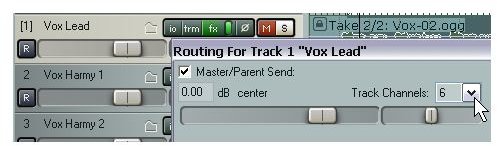
First, define the six channels that you will need for the vocal track. To do this, click on the track’s I/O button and set the number of channels to six, as shown in the first illustration.
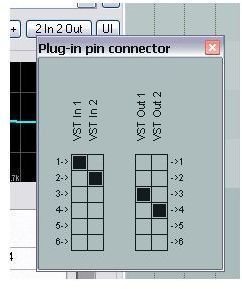
Now open the track’s FX window and add an instance if your preferred VST EQ program. Display the pin connector for this plug-in and set the output to Channels 3 and 4 (as shown in the second illustration).
Make such adjustments as you want to the EQ for this track.
Add another EQ instance, display the pin connector and set the output this time to Channels 5 and 6. Adjust the EQ as you wish, most likely to compensate for the adjustments you made for channels 3 and 4.
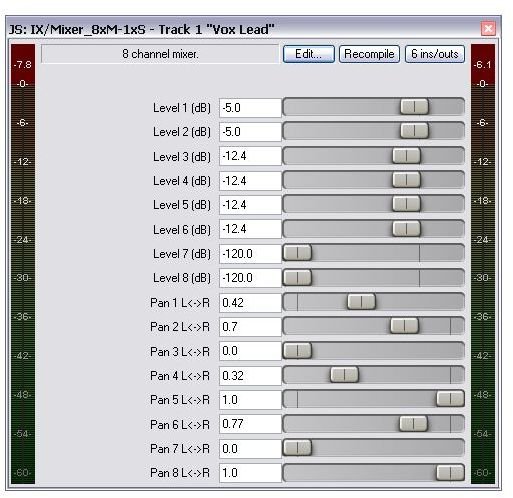
Now add the IX/Mixer_8xM-1xS to the FX chain. This will join the channels together again. Move the faders for channels 7 and 8 all the way to the left (there is no audio stream in these channels). As you play the song, experiment with volume and pan settings for the other channels. An example is shown in the third illustration.
As you play the song, toggle the FX bypass on and off. You should notice quite a dramatic difference in the power of the vocal track. If you are familiar with compression, try adding a little gentle compression at the end of the FX chain for this track, just to smooth off some of the peaks and edges,
Users of other DAWs should be able to partially produce this effect by creating two copies of the original vocal tracks (including copies of the recorded items themselves) and by adjusting the pan, volume and EQ settings for these tracks. Unfortunately, depending on which program you are using you may not be able to add compression to the overall output of all three vocal tracks combined unless you create a submix specifically for this purpose.
Images
This post is part of the series: Develop Your Mixing Sense
A series of articles intended to help you develop your mixing sense. Includes tips and tricks on finding the right balance in your mix, fleshing out thin sounds and more.