
Here is a step by step guide on how to upload photos from the iPhone to Facebook and how to troubleshoot problems that may arise.
Bridging the Camera and Facebook
Facebook’s social networking service is built not just by its ability to comment and message other friends, but really the way that profiles can be built around uploaded and tagged photos. Here you provide a visual network between friends where each event is captured and then shared in a true social networking environment. Now that the smartphone has brought a digital camera into the pockets of so many Facebook users, the rate at which you can take a photo and then get it onto Facebook is increasing exponentially. With the Facebook iPhone app you have the ability to link together the iPhone’s camera and your Facebook account by uploading directly from your iPhone. Here is a look at how to upload photos from the iPhone to Facebook easily.
The iPhone Facebook Upload Process
The easiest way to begin to upload photos from the iPhone to Facebook is to take a photo so that it will be saved onto the Camera Roll. You could also try to do a screenshot from an app in your iPhone or you can save a picture from your Safari web browser .
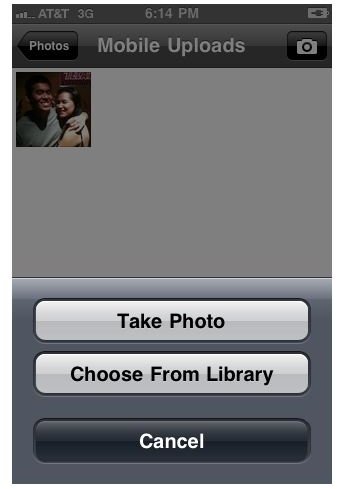
Open up the Facebook iPhone app , head to the nine paneled section, and then select Photos. Once your different photo albums become available go into one of them. The Mobile Uploads album tends to be the standard, but you can also build on other albums that are in your Facebook account. When you do open it you will see that there is a button in the upper right hand corner with a camera image in it. Press this button and you will get a prompt that asks you either to Take Photo or Choose From Library. You will want to select Choose From Library to select the image that you already

captured, unless you want one spontaneously. This will open up your iPhone’s Photo Albums, and you can then go to your Camera Roll, Photo Library, or anywhere else you have available to you. Find the photo you want, choose it, and then select the blue Upload button in the lower right hand corner. This will then automatically upload the

photo from your iPhone to your Facebook account in that album.
If you want to upload photos from your iPhone to Facebook into a new album you can do this by creating a new album right from the start of the upload process. Back in the Photos main page where you choose albums you will need to press the “+” button in the upper right hand corner. Here you will add a name, location, and description for the new album you are creating. You can then upload photos from your iPhone to this new Facebook album.
Troubleshooting
Issues that could arise when you are uploading photos from the iPhone to Facebook are usually related either to errors in the Facebook iPhone app or your internet connection itself. If you find that the Facebook iPhone app is closing at some point during the process, or that you receive an error message, the first thing to try is to uninstall and reinstall the Facebook iPhone app. If your iPhone Facebook app is not up to date then an update is going to be in order, so it may be worth observing incremental updates if you plan on uploading photos from your iPhone to Facebook regularly.
Second to this, you may need to troubleshoot an interruption in the iPhone photo upload process by checking your internet connection. First, you should check out your service for the area. Try to switch to an available Wi-Fi network for a better upload speed and reliable upload rate. Uploading a single photo from the iPhone to Facebook should be very quick and if it takes more than a few seconds then this is an indication that there is some kind of interference.


