
The third step in our tutorial of building your house with SketchUp. Here, we go over how to create your floor plan in SketchUp with the tips and tools that you’ll need.
Creating Your Floor Plan in SketchUp
After you have drawn up the basic sketches of your floor plan and gotten acquainted with the tool bar, the fun with SketchUp begins.
Drawing your floor plan in SketchUp is simple and quick. You’ll need the following tools to get started:


The Select (Space Bar), Line (L), Eraser (E), Tape Measure (T), Offset (F), and Pan (H) tools
You’ll also need the building measurements and your floor plan sketches for reference.
To start, you’ll go to the Menu bar, and select Camera –> Standard –> Top. This will show you an overhead, or bird’s eye view, of the ground. Next, go back to Camera, and select Parallel Projection from the drop down menu. This will give you an accurate 2D-like view. Because SketchUp is more intuitive in this angle, Parallel Projection also helps you draw precise lines.
Using your Line tool and your physical measurements, begin drawing your floor plan. Remember, to draw a line; do not drag the mouse. Click point A and then point B because SketchUp performs better this way, and you receive more accurate results. As you are hovering the mouse, you will notice the Value Control Box (VCB) in the lower right hand corner recording your measurements. You can choose to physically control the VCB with your mouse. Or, you can click an approximate point B, and then type the precise measurement and select enter. The line will automatically reconfigure itself to match your precise measurement.
After you have drawn all the outer walls of your house, it’s time to draw the inner walls. First make sure that all the lines are connected and closed. The lines will transform from a thicker line to a thinner line once closed. Now, select all the lines of the outer walls. Click on the Offset tool (or F on your keyboard), and create an identical inner wall inside of your outer wall. Type in the exact measurement of your inner wall offset in the VCB. Outer walls are generally no thicker than 12 inches.
Now, go in and section off individual rooms like the living room and kitchen. Create walls with the Line tool, being careful to snap from the inner wall and not the outer wall. Also, create inner walls for each room. You’ll do this by having parallel lines several inches apart. A room’s walls will be thinner than outside walls, but no thinner than four inches. This is necessary if you want to create a realistic rendering and if you plan on resurrecting walls. In order to push/pull, you’ll need a face, not a line. A face is an area between three or more lines, but more on that in an upcoming article.
After creating walls, make room for doors. You’ll need a door or entry way for all of your rooms. Create doors by drawing two parallel lines that intersect the walls. Draw from wall A to wall B, creating a rectangle. After you have made this rectangle, use the Eraser tool to delete the entry way.
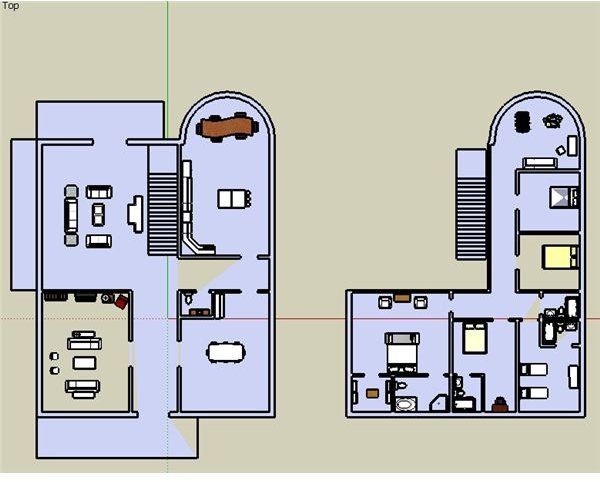
Now, it’s time for the fun stuff. Go to Window –> Components, and start moving your furniture in. You have a large furniture library at your disposal. You can also click on the Details button next to the drop down menu and click “Get More”, which allows you to download more models for your floor plan. The SketchUp community has a lot of enthusiastic members who like to share models for free use. Putting furniture in your house is a great idea because it provides scale (sometimes measurements can’t be visualized) and interactivity.
When you’re done, you should have something similar in nature to this picture. Be sure to save your floor plan, and take a well-deserved break.
This post is part of the series: Creating a House with SketchUp: Start to Finish
A basic tutorial series for you to create a dream house with free 3D modeling Google SketchUp. Learn what you need to know, to get you started quickly!
- Preparation: The Basics of Designing Your House with SketchUp
- Getting to Know the Tool Bar in SketchUp Part 1
- Getting to Know the Tool Bar in SketchUp Part 2
- Creating Your Floor Plan in SketchUp
- Google SketchUp: Raising the Roof and Erecting Walls to your 3D Dream House
- Beautifying and Presenting Your House Using SketchUp


