Digital signatures on Microsoft PowerPoint presentations offer a level of reassurance to others concerning the authenticity of the files being viewed or downloaded. We’ll take a look at how to add and create digital signatures on presentations you plan to share online.
Purpose of Digital Signatures
In Part 1 of this series, we talked about the importance of removing hidden data from a PowerPoint presentation before publishing online. Sometimes, though, you want to do just the opposite and provide just enough data to reassure people that you really are the person who created the presentation file and that it is safe to download.
One way to provide this assurance is to include a digital signature on your presentation. Digitally signing a PowerPoint presentation is similar to manually signing a written document. The digital signature will include some basic information about you, but only as much as you choose to divulge.
It’s important to note that digital signatures, just like written ones, can be forged, so you still have to exercise caution before simply accepting them at face value. Part of this problem can be alleviated by using third-party verification for your digital signature. We’ll talk more about that in Part 4 of this series.
How to Create a Personal Digital Signature
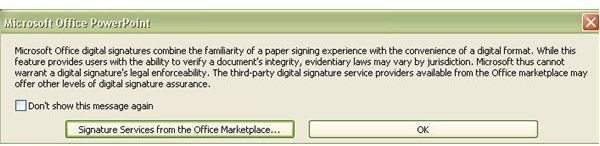
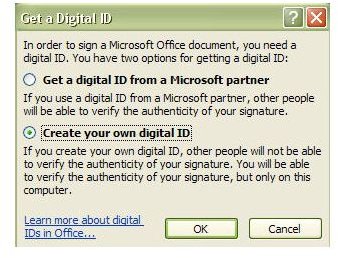
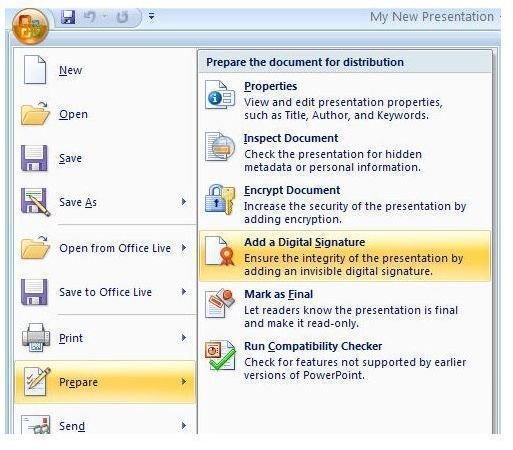
Click on the Office button, select Prepare, and then choose Add a Digital Signature. A message box containing general information about digital signatures will appear on your screen. To create your own digital signature, click OK to continue. After doing this, you’ll be presented with the Get a Digital ID box. Select the Create your own digital ID option, and click OK.
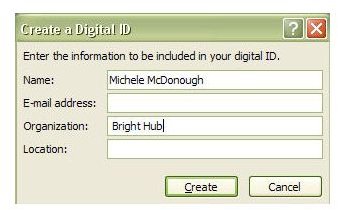
Next, you’ll be prompted to enter some personal details consisting of your name, e-mail address, organization, and location. You don’t have to use every field here, but make sure to enter enough information so that the digital signature appears legitimate. Click Create when done.
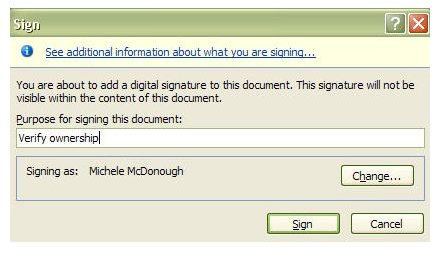
Finally, you’ll be presented with the Sign option which will ask you to fill in the Purpose for signing this document. Once you’ve entered a reason, click Sign to complete the digital signature process.
The digital signature will remain valid until any modification is made to the PowerPoint presentation. If you do edit the presentation at a later date, you’ll need to sign the document again. However, you won’t be asked to repeat the entire process here. Since the digital ID that you just created will be stored, you’ll only have to perform the last step in the above process to sign the document again.
For more tips and tricks, be sure to take a look at the other Microsoft PowerPoint user guides and tutorials found here on Bright Hub’s Windows Channel. New and updated articles are added on a regular basis, so bookmark us and check back often.
This post is part of the series: Sharing Your Microsoft PowerPoint Presentations
Once you have your Microsoft PowerPoint presentation in tip-top shape, the next step is to share it with others. In this series, we take a look at how to share a presentation online or through email as well as give advice on things to watch out for when making your presentation public.


