In Windows Vista, it was necessary to set up a schedule in Task Scheduler to automate incremental backups, and even worse, full backups were not available in the Home versions of Vista. Windows 7 brings full-disk backup to purchasers of all versions. Let’s try it out!
Windows 7 offers vastly improved full-disk backup and emergency restore for purchasers of all (retail) versions, including those getting upgrades and those getting full new installations.
In Windows Vista, only users of the Professional, Ultimate, and Enterprise versions were able to do full-disk OS and data backups. Users of the lesser versions of Vista got lesser versions of Windows Backup. It only backed up user data, not executable files and not the OS itself. That version could not provide a restorable full-disk “image” of the hard drive and was not much use at all.
That’s all changed in Windows 7. Buyers of all versions get the same full-disk and OS backup to external and internal hard drives and to CD/DVD. Professional and Ultimate users still get a perk- they can back up and restore to a network.
Since local backups (and Windows 7 Home Premium and Professional) will be more common, that’s what we’ll address here.
Setting Up for the First Backup
The best target device for your backups is an external hard drive, especially as these have come drastically down in price in the last year or so. I suggest getting one as large as, if not larger than, your current hard drive.
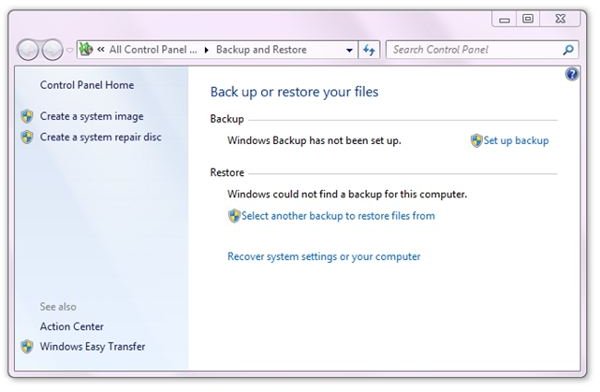
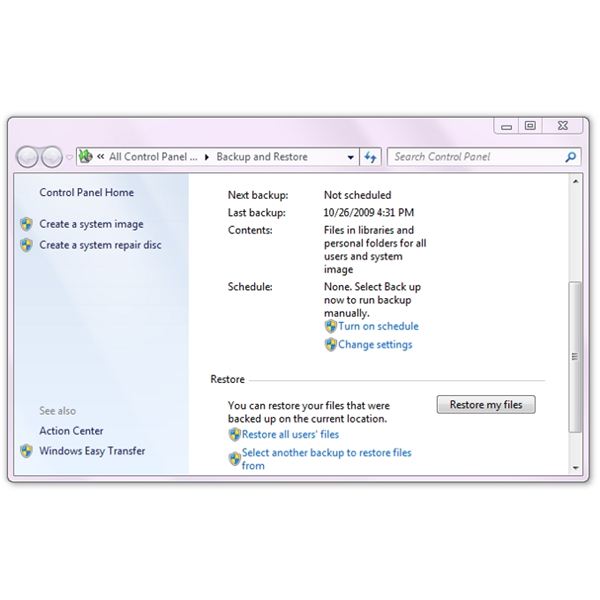
To start setting up Windows 7 Backup, press the Windows button or click the Windows 7 start orb. Type in “backup” and it should offer you “Backup and Restore” at the top of the list. Note that it’s also offering “Restore data, files, or computer from backup,” “Create a restore point,” and “Backup your computer.” This is nicely improved usability from our friends at Microsoft.
This will also open the Backup and Restore Center, which will warn you that “Windows Backup has not been set up” and “Windows could not find a backup for this computer.”
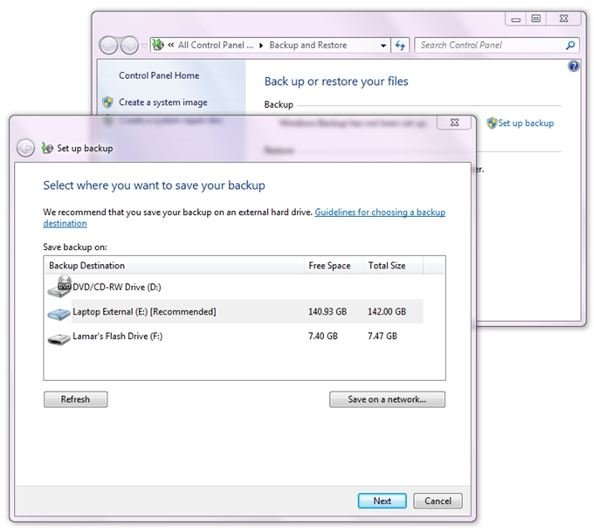
Clicking “Set up backup” will start Windows Backup. After scanning the storage devices on the PC, it will ask you to “Select where you want to save your backup,” and the most likely target will be highlighted.
In order of preference, Windows Backup will choose an internal hard drive, an external hard drive, a DVD/CD, and an external flash drive. A complete backup of a Windows installation is called an “image.” Not too many folks will have a Flash drive capable of saving a complete image, but some 128 and 256 GB models do exist on the market now .
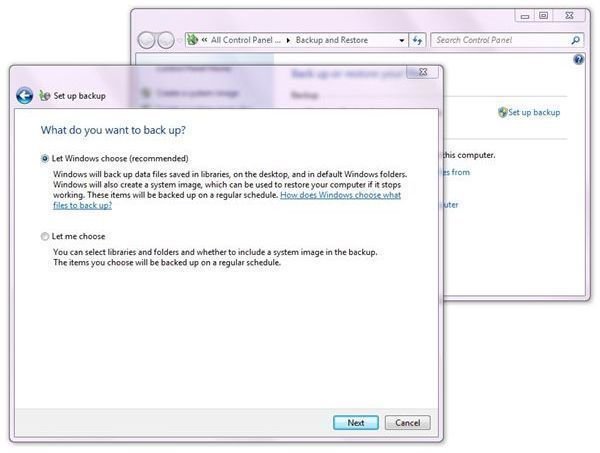
Windows Backup then asks what you want to back up. The choices are “Let me choose” and “Let Windows choose.” Whole-disk backup is automatically included (if adequate disk space is available) when Windows chooses, but it’s also an option when the user makes the selection.
Creating a System Repair Disc
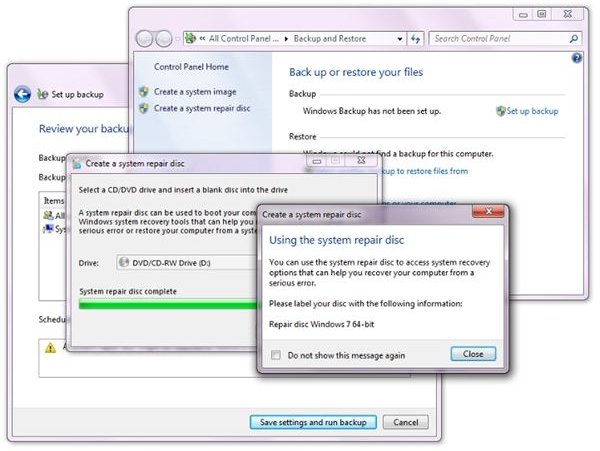
Before continuing, it’s a good idea to create a bootable restore disc, just in case you need to actually use the disk image to restore your computer someday.
This ability was completely lacking in Vista, leaving many folks scratching their heads wondering how to create a bootable disk in order to use the backups they were able to create. Oddly, this capability was removed from Vista sometime during the beta period. In Windows 7, it’s back.
To create your bootable repair disc, go back to the Backup and Restore Center and click “Create a system repair disc” in the left-hand column. Be sure you have a writable CD or DVD in the drive, and then make sure it’s showing your drive and click “Create disc.”
A default installation of Windows 7, by the way, comes with a bootable emergency repair disc image on the hard drive. If Windows Backup finds it, it will use it and the process will be relatively quick. If the image is not found, it will ask for a Windows 7 install DVD. Be warned.
Next: Running the First Backup, Setting Up Automatic Incremental Backups, and Restoring Discs, Folders, and Files
Running the First Backup in Windows 7
Back in the Backup and Restore Center, it’s time to actually run the backup. On the “Set up backup” window, click “Save settings and run backup.”
It will switch to the “Backup in progress” window. Click the “View Details” button if you want to see what it’s backing up.
It’s a good idea to leave the computer otherwise idle when doing a back up. I even take the precaution of taking the computer off-line.
After a while, the backup will be complete.
Windows Backup will have created a schedule for your backups. For me, it picked Sundays at 7:00 pm. This is an improvement over Vista, too. Vista chose Sundays at 3:00 am.
If you back up to a device that is more or less permanently attached, it’s fine to set up the backups on a schedule. However, if you prefer to use your own schedule instead of what Windows provides, you’ll need to run another backup, at least far enough to get to the setting.
In the Backup and Restore Center, after completing the first backup, scroll down and click “Change settings.”
Backup will start back at “Where do want to save?” Click “Next” twice to get to the “Review your backup settings” window. In the lower part of the window, click “Change Schedule.”
Here you can select the interval, time, and day of the week to run the backup.
Setting Up Automatic Incremental Backups
If you want Backup to handle daily or weekly incremental backups for you, it is very easy. In fact, just set up a schedule as shown in the previous section and let Windows 7 handle it for you.
By default, Backup won’t create more system images than can fit in 30% of your backup target’s space. You can find out how much Backup will use for older system images by clicking “Manage space” in the Backup and Restore Center and then clicking “Change Settings” under “System Image.” If that number is acceptable to you, that’s it! You’re set up for automatic incremental backups. What was a pain in Vista is now a breeze in Windows 7.
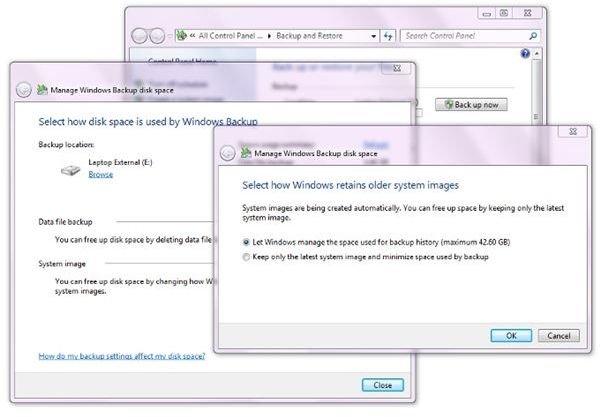
(Of course, if your external drive is used with other machines or for other purposes, you can also elect to keep only the most recent image.)
Restore Operations - File, Folder, and Complete Restore
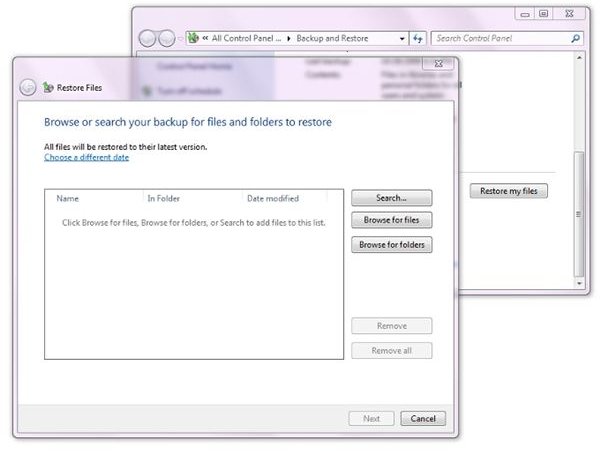
Although the backed-up content is not accessible through Windows Explorer, it can be accessed as if it were in the Backup and Restore Center. That’s a fine distinction, yes, but I can compare Windows 7 Backup to my favorite back-up utility, Acronis True Image . In Acronis, your backed up files and OS images are containers. The container can be accessed directly from Windows Explorer and extracting a file or folder from the backup is as easy as dragging it out to the desktop.
But back to Windows 7… Clicking “Restore my files” in the Backup and Restore Center opens the “Restore Files” window. Here you have the options of searching for a file or browsing for files or folders.
Conclusion
Of course, I had to observe at least one incremental backup. It started and ran in the background with minimal involvement of the PC and only one long scan of the hard drive. If I had not been looking for it, I may not have noticed, and it was over in less than ten minutes.
Again, that’s a far cry from Vista- the computer was otherwise almost useless when a backup session was running.
Well, that’s it. Windows 7 makes it easy to back up your PC and restore files, folders, or the entire computer. It fully leverages what has come before (shadow copies and restore points), but it’s both more capable and more user-friendly than in any previous version of Windows. It’s even better now that it’s combined with the ability to create bootable repair CDs or DVDs. (But still one has to wonder why in the world making a bootable disc was left out of Vista.)


