Word Tables - Learn How to Calculate and Write Formulas in Word 2003 Tables

Understanding Cell Names
Basic calculations can be performed in Word tables. But first it’s important to know how cell names are determined. Word tables are basically set up just as an Excel table would be. The difference is that you don’t see the “cell names” in a Word table. The following is an example of how Word sees a table:
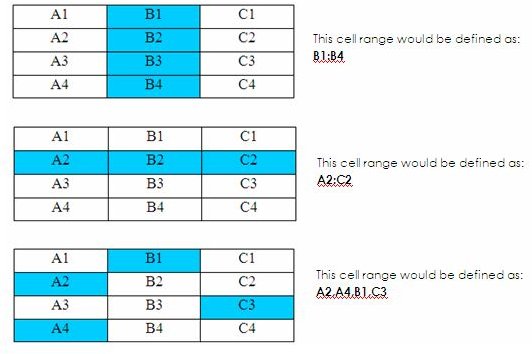
A cell is referred to by the column and row in which it is situated. The columns are referred to by letter (A, B, C, etc.), and the rows by number (1, 2, 3, etc.). A1, therefore, refers to the cell in the first row of the first column.
To specify a range of cells, the first cell in the group is typed, then a colon, then the final cell in the group. Non-contiguous cells are separated by commas. Click on the following image for an example of how to name cell ranges.
Using AutoSum
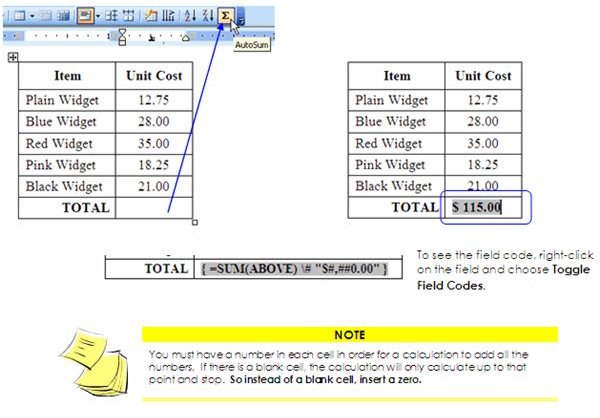
The most common calculation performed in a table is to add a list of numbers. Word’s AutoSum feature makes this easy.
1. Place your insertion point in an empty cell under (or to the right of) a list of numbers.
2. From the Tables and Borders toolbar, click the AutoSum button. (See image below.)
Word enters a field in the cell containing a { SUM } function that calculates all the cells above it, or to the left. Because the calculation is entered as a field, it can easily be updated if any of the numbers in the calculation are changed. However, the update must be done manually. (See Updating a Field)
Updating a Field
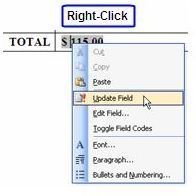
If you change any of the numbers in the calculation, the total does NOT re-calculate on its own. You have to update the total manually. To do this you can either right-click on the field code and click Update Field – or – select the field and press F9 on your keyboard.
Creating Formulas
Table formulas have to be created in a very specific way. Each formula must start with an equal (=) sign. The equal sign is then followed by a function name, such as SUM, and then the formula (in parentheses). However, for some formulas, the function name can be omitted. For example, when adding values, the formula could be written as =SUM(B1:B2) -or- the same formula could be written as =(B1+B2).
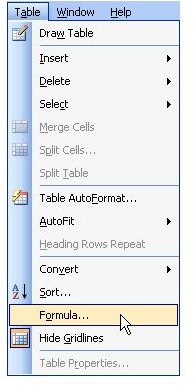
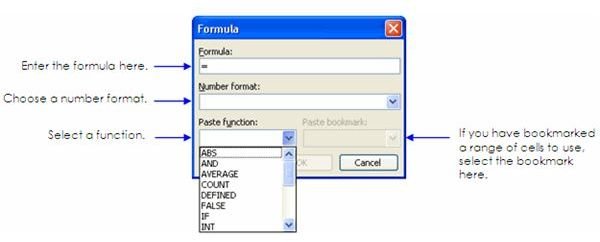
Formulas are typed in the Formula dialog box. In order to open up this dialog box, simply place your insertion point in an empty cell where you want your calculated total to be. Then click Table on the menu bar and choose Formula.
The Formula dialog box opens. Enter your formula in the formula field following an equal sign. You can choose a function from the Paste Function drop-down list and choose a number format from the Number Format drop-down list.
Writing Formulas
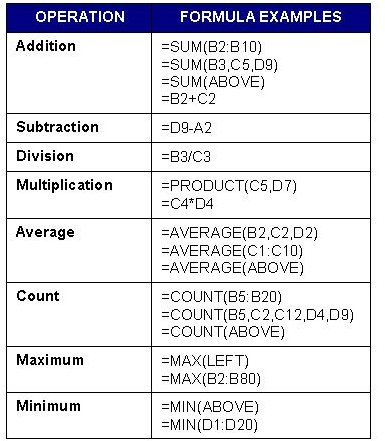
There are several different types of calculations that can be performed in a Word table. Some of the most commonly used functions are:
AVERAGE: Use this to calculate the average of a list of numbers.
COUNT: Use this function to display the number of items in a list.
MIN: This function is used to display the smallest number in a list.
MAX: This function is used to display the largest number in a list.
PRODUCT: Use this function to multiply values.
SUM: Use this function to add values.
However, for some formulas, the function names can be omitted. For instance, you can use mathematical symbols instead, such as the symbols to add (+), subtract (-), multiply (*), or divide (/). Click on the following image for examples of various ways formulas can be written:
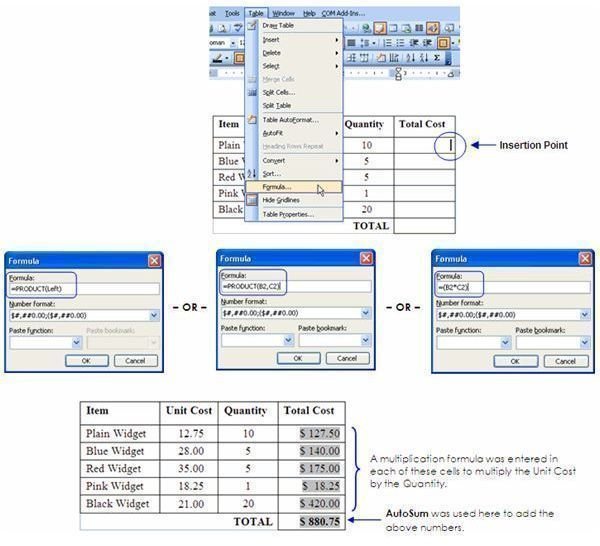
To Insert a Formula
1. Place your insertion point in the cell where you want the total to be.
2. Click Table on the menu bar and choose Formula. (Sometimes Word will try to “guess” what formula you need. If it guesses wrong, just delete the formula – but keep the equal sign.)
3. Choose your function from the Paste Function drop-down list followed by your formula in parentheses, -or- omit the function name and just type in your formula.
TIP: Instead of typing in the cell names, you can use “left” or “above” in your formula. For example, if you were placing your total at the bottom of a column, you could write your formulas like this: =SUM(above). Or if you were placing your total to the right of a row of numbers, you could write it like this: =SUM(left).
Calculating With Bookmarks
Suppose you want to insert an amount from your table into the body of your document. Or, maybe you want to calculate values from two different tables? These things can easily be done by creating bookmarks.
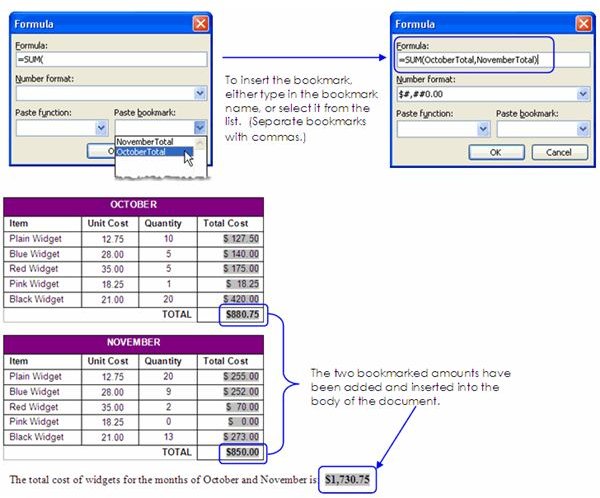
In the following example, we will add totals from two different tables and insert the calculated total in the body of the document:
Step 1: Create the Bookmark
1. Select the value in your document that you want to have bookmarked (the value does not have to be within a table).
2. Click Insert on the menu bar and choose Bookmark.
3. Name the bookmark. (NOTE: You cannot have any spaces in your bookmark name, and the name cannot begin with a number.)
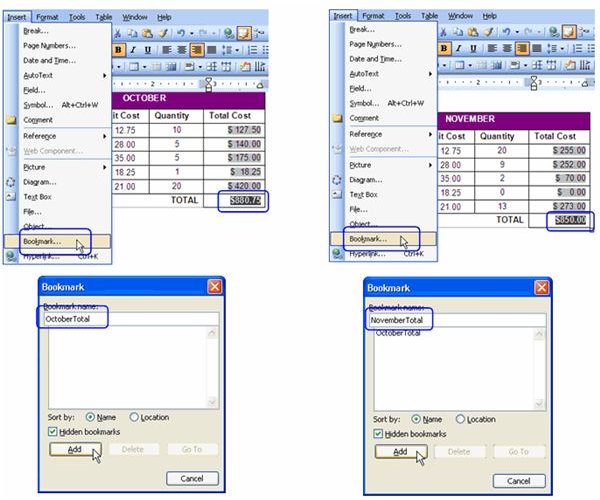
Give your bookmark a unique name - there cannot be another bookmark within the same document with the same name. If there are any other bookmarks in your document, you will see them listed.
Bookmarks, continued…
Step 2: Insert the Formula
1. Place your insertion point at the location where you want the total to be displayed. This can be in an empty cell in your table or anywhere within the body of your document outside of the table.
2. Click Table on the menu bar and choose Formula. (You can still use the “Table - Formula” function even when inserting a formula outside of a table.)
3. The Formula dialog box opens. Enter your formula in the Formula Field. To insert the bookmark, select the bookmark(s) from the Paste Bookmark drop-down list. All bookmarks created in your document will be listed.
4. Choose a Number Format if applicable, then click OK when your formula is complete.
Conclusion
One last final note: when you’re calculating a column or row of numbers, make sure there is a numerical value in each cell. If you leave a cell blank, the calculation may stop at that point. This is typical when using “above” or “left” in your formula. So rather than leaving a cell empty, put a zero there instead.
Now that you have all the skills you need to perform calculations in Word - go show off your skills!
This post is part of the series: Word 2003 Tables
Everything you need to know to create tables in Microsoft Word.