Top Win 7 Tweaks to Speed Up Your Computer
1. Change Logon Background
You might have previously changed the Welcome screen image in Windows XP or Vista, and there are ways you can change the background in Windows 7, too. It’s not a complicated job, and you don’t even need any tweak utility for this.
This is a DIY windows 7 tweak.
To change the Welcome screen background in Windows 7, follow these few simple steps:
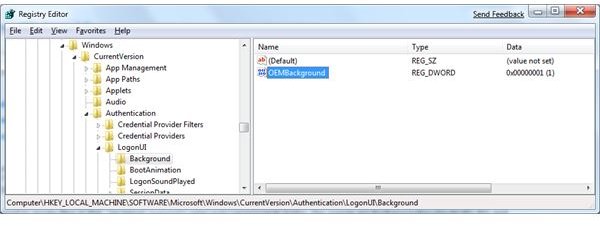
1. Open the Windows Registry Editor by entering regedit.exe in the Start menu.
2. Go to the following registry entry:
HKLM > Software > Microsoft > Windows > CurrentVersion > Authentication > LogonUI > Background.
3. Double-click on the DWORD value, named OEMBackground and change its value to 1. If OEMBackground does not exist, then create it.
4. Open Start menu, enter %windir%\System32\oobe\info\backgrounds, Windows Explorer with the backgrounds folder will open. Copy the background image of your choice in this folder. Again, if the folder doesn’t exist, just create it.
Remember, the image size needs to be less than 256 Kb for it to work properly
5. Rename the image to backgroundDefault.jpg.
That’s it! You’ve just changed the Windows 7 Welcome screen background with this easy Windows 7 tweak. Now when the next time you will start Windows 7, you will see the new background image displaying.
2. Wallpaper Slideshow
 Windows 7 comes with very attractive new wallpapers, but it is not always easy to decide which wallpaper to choose. Some people keep a large collection of wallpapers in their computers, but it often becomes difficult which one to choose. Changing them is another problem, as it requires talking of a few steps.
So why not let Windows display your collection of wallpapers in a desktop slideshow? To do this, simply right-click on the desktop and select Personalize -> Desktop Background. Next, hold down the CTRL key as you select the images you like. You can also choose how frequently you would like the images to be changed. You have options from daily to weekly to monthly. If you want the backgrounds to appear randomly, tick the Shuffle option, and finally click Save Changes and enjoy the slideshow.
3. Display Your Drives
Open Computer in Windows 7 and you will see a strange lack of system and external drives. Is it a virus that has removed the drives from the system, or there is another problem? Don’t panic, it is just a Microsoft’s new way of hiding drives that are empty. Some people think it’s an improvement, but if you agree, it is easy to get your empty drives back. How?
1. Launch Explorer
2. Go to Tools -> Options -> View and uncheck the Hide empty drives in the computer folder option.
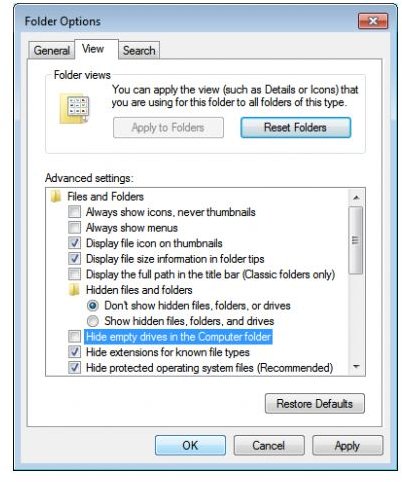
You’re done! By applying this Windows 7 tweak, now you will be able to see all your empty drives in Explorer
4. Make UAC Work Without Bothering You
<img src="https://images.brighthub.com/a5/d/a5dd2bac77914b68cf93abeeb7cba90b07a726e8_small.jpg" alt="win7 uac" title="win7 uac">User Access Control (UAC) was a new feature introduced in Vista and meant to enhance the security of your computer. Each time an important change is made by the user or an application is installed, the UAC grays out and disables the screen, then a dialog box appears with the choices to deny or allow the action.
This dialog box was found to be very annoying to most users because it pops up frequently. In Windows 7, you have more control over UAC. You can disable the UAC or balance between eliminating annoying pops and ensuring security.
To use this ultra simple Win 7 tweak simply open the Start menu, and type uac. When the results appear, click on User Access Control to open the UAC window. Now move the slider to whatever level you want, and eliminate those unnecessary nagging pop us.
5. Disable System Restore
 System Restore was introduced in Windows XP, and then was carried forward to Windows Vista and Windows 7. System Restore enables you to restore Windows to a previous state, before you had issues. It seems like a life savor but it doesn’t best utilize the system resources. You don’t want Windows to create duplicate data on your computer, and you wouldn’t even like Windows to slowdown when running this process.
Fortunately, in Windows 7 you can choose to adjust System Restore space, and even disable the feature completely. So, to disable or change the System Restore space, follow these steps to enable this win 7 tweak:
1. Open Control Panel.
2. Switch to all items and click System.
3. In the new window that opens, click on the System Protection link.
4. System Properties window opens, select your system drive, and click the Configure button.
5. Select turn off system protection to disable System Restore, or select the options above, and select the disk space usage by moving the vertical slider right or left.
Note that when you limit the amount of space, Windows Restore deletes very old Windows restore points, and creates new restore points less often.
6. Calibrate Text
 Windows 7 handles text differently from previous versions and it allows you to tweak Windows text by using the supplied ClearType calibration utility.
Open the Start menu, type “cttune” (without quotes), and click enter. The ClearType calibration utility will open and allow you to make the text on your screen more sharp, clearer, and easier to read. The utility will show you some sample text and you will select what looks best to you. By adjusting the text, you will be more comfortable with how Windows displays text, and improve the visual experience.
7. Run Multiple Copies Of Applications From the Taskbar
The Windows 7 task bar serves two purposes. It is used to switch between programs and also to launch programs. So you launch a program by clicking its icon, but what if you want to launch another instance of the same program? It seems there is no way to launch a second instance of the program because when you click on its icon, you only switch to the currently running instance.
This is a bit annoying, but here is a simple fix. After running a program if you want to launch another instance, hold down the Shift key and click on the program’s icon and the second instance will launch. With this method, you can launch as many instances of the program as you would want.
These are Brighthub’s Win 7 tweaks. If you know another good Windows 7 tweak, please share it with us, in the comments section below.
If you want to play more with Windows 7, then read Top Windows 7 Hacks.
References
Author’s personal experience
Screenshots taken by author