Windows 7 Backup and Restore: Review of Features and How to Use Them
Introduction
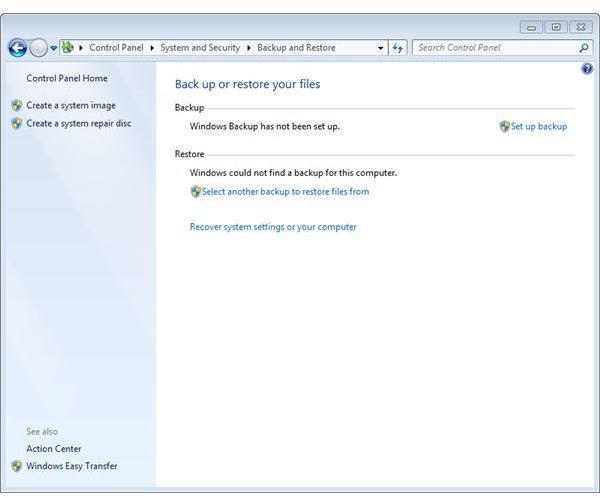
The Backup and Restore Center in Windows 7 is located in Control Panel –> System and Security –> Back up your computer. The first time you go there you need to instruct Windows where to place your backup and what to back up by clicking Set up back up.
Windows 7 Backup
Microsoft recommends that you back up to an external hard drive, yet the Backup wizard lets you choose from any disk. Depending on your Windows 7 edition - please see Bright Hub’s article <em>Backup: What is New in Windows 7?</em> for detailed information - there can additionally be a button for backing up to a network path, which I consider the best option if applicable.
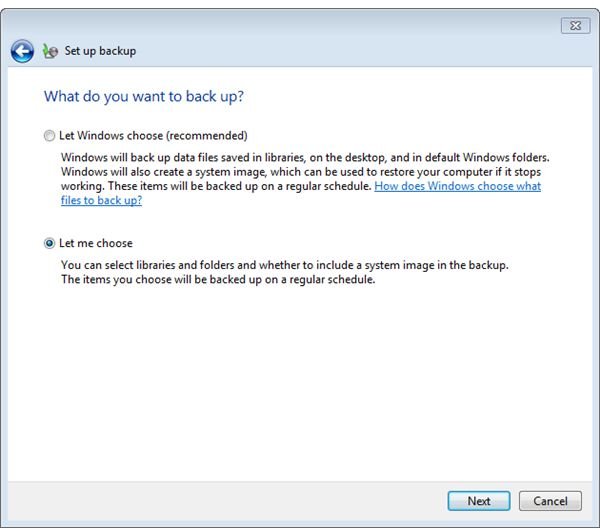
The next choice you are going to make is whether you let Windows decide what to back up (default), or you choose. The default includes data stored in local libraries as well as items found in the Windows folder plus all files and folders for any user’s desktop on the Windows 7 computer under consideration provided that your drive is formatted with the NTFS file system and if you do not create a backup onto the drive being backed up.
If you are going to make a backup onto an NTFS formatted drive which has enough free space your backup will also include a system image of your Windows 7 installation. Using such a system snapshot Windows 7 can restored to the system configuration it had a the point in time the system image was taken. This is useful if your system becomes unstable after an installation for example.
If you opt for Let me choose you can indicate the libraries or files and folders to be saved, and you can, of course, also make a system image if you choose to select what to back up. In any case will objects in the Recycle Bin and non-Microsoft program entries in the Registry not be saved. It is strongly recommended reading Microsoft’s Windows 7 Backup help file and testing your backup strategy.
Windows 7 Restore
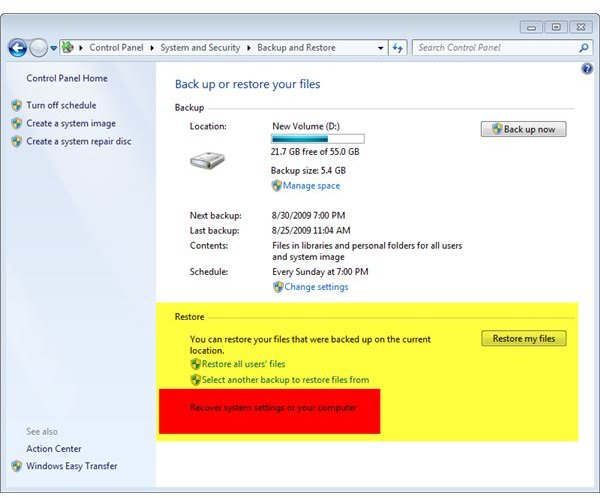
When you need to make a file or folder restore you can choose between the options Restore my files, Restore all user’s files or Select another back up to restore files from. Using Restore my files lets you browse or search your backups for files or folders to restore to their latest version, or another point in time you specify. In the next step you can indicate whether or not to restore to the original location.
If you click Select another back up to restore files from you first define the backup set (backup period) to restore from and then the file or folders you want to restore. Also choose Select another back up to restore files from if you want to restore from a network location. Restore all user’s files brings up the same dialogue as Restore my files.
Recover system settings on your computer brings up the Recovery center in default mode. You proceed by clicking Open System Restore to undo a recent program installation or system configuration change for example. In the recovery center you have to select Advanced recovery methods to reinstall Windows 7 or use a system image.
If you are going to apply a system image then the Windows 7 recovery wizard will remind you that as a best practice you should make an ordinary backup as outlined above. Your computer will reboot automatically to continue the recovery. Upon the computer boot you have to indicate what your keyboard layout you have. Then click Next.
In the next phase Windows 7 scans your computer for systems images which might take a while. On the next screen you find information about your latest system image, which is chosen as default for re-imaging your computer. Alternatively, you can make your own selection including additional advanced options such as for using system images on DVD or stored in network locations.
The next screen provides support for installing additional drivers, disk operations such as format and repartition, and has some advanced options, too. Clicking Next, Finish then Yes will finally start re-imaging your computer. Restoring an image takes about the same time as its creation, usually a couple of minutes at the most. Upon completion Windows 7 restarts automatically.
Windows 7 systems re-imaging does usually not affect your personal files and folders. Nonetheless will you be presented the option to restore your files from a backup Windows 7 starts the first time after being re-imaged.
Conclusion
Both, a Windows 7 file and folder backup as well as creating a system image and using it to recover a system state by means of re-imaging worked great in my lab, so Windows 7 imaging as well as Windows 7 Backup and Restore can really be recommended. As a best practice Windows 7 backups should be scheduled for automatic execution in Backup and Restore Center.
Please note that to restore an image a system repair disc is needed unless you have a Windows 7 install DVD or similar medium provided by your OEM manufacturer. A system repair disc can be created from the left panel in Windows 7 Backup and Restore.