Linux dd Commands - Understanding Linux Command Language?

Quick Links
dd - The Open Group Base Specifications Issue 6
A Brief History of dd
The dd command has been around for over 30 years, rewritten numerous times, ported to several different systems, and has withstood the test of time. The dd command is part of the fileutils package on most Linux distributions and, to this day, is an invaluable tool for Linux administrators and users alike.
dd - What does it do?
Disk Definition (dd) came from IBM’s Job Control Language and quickly became one of the more powerful and frequently used low-level UNIX and Linux commands. Data backup is one of the most frequent uses of this powerful command. You can create a byte-exact copy of a partition saving it to file or duplicating it to another hard drive. With the ability to restore this byte-exact copy anytime using the dd command again.
Other uses of the Linux dd command include creating an additional swapfile on a running server, benchmarking your hard drive, safely and securely erasing your hard drive, and much more!
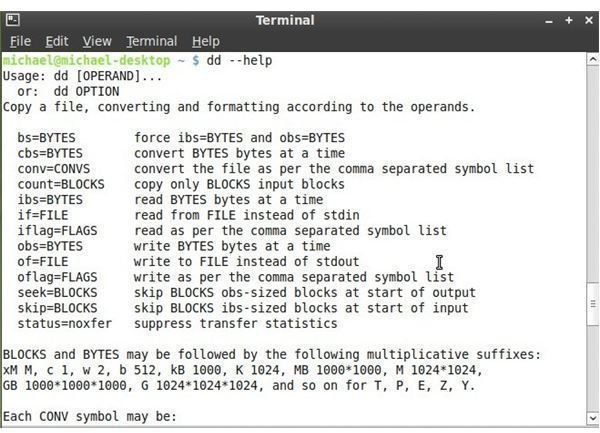
dd - The Syntax
The dd command uses the outdated if and of statements. You can simply think of it as input file and output file.
dd if=input-file of=output-file
For example:
dd if =/dev/sda of=/dev/sdb
This command would clone the data located on /dev/sda to /dev/sdb. Keep in mind that Linux devices are formatted as /dev/sd*, where * is the letter given to a particular device. This is then followed by a single number signifying the partition on that device. For example:
dd if=/dev/sda3 of=/my-home-directory/mybackupfile.bak
would make a byte-exact clone of your sda3 partition to a file called mybackupfile.bak in your home directory.
A full list of possible dd operands can be found in the dd section of The Open Group Base Specifications Issue 6. In the following sections we will take a look at some common uses of dd.
Clone an Entire Drive
The command used to clone an entire drive would look like this:
dd if=/dev/sda of=/dev/sdb
In this example /dev/sda is the device to be cloned and /dev/sdb is the target device. The power of dd, when it comes to cloning is the fact that it creates a byte-exact copy of a device or partition, whether it be to file, another partition, or another hard drive. This preserves ALL information on the device including deleted files which can be useful in data recovery operations as well as data forensics.
Duplicate One Partition to Another
The command used to duplicate one partition to another would look like this:
dd if=/dev/sda3 of=/dev/sdb3
In this example /dev/sda3 and /dev/sdb3 are both partitions. You are duplicating /dev/sda3 to /dev/sdb3 and if /dev/sdb3 does not exist, dd will create it at the beginning of the disk. In this scenario you have to be careful with the order of if and of. If you are not careful, you could write a blank disk to a disk that has information by simply reversing if and of.
Benchmark Your Hard Drive
The commands used to benchmark the read/write speed of your drive would look like this:
Read:
dd if=/home/my-home-directory/sample.3Gb.file bs=64k | dd of=/dev/null
Write:
dd if=/dev/zero bs=1024 count=1000000 of=/home/my-home-directory/sample.3b.file
Erase Your Hard Drive Securely
Caution: This will erase your hard drive by filling it with zeros. You will not be able to recover the data. Only use this command when you are sure you want to securely erase all data on the disk! For example, you are going to give away or throw away a computer where you stored sensitive information such as your bank login.
dd if=/dev/zero of=/dev/sda <—— replace with the drive you want to erase.
In the above example you have just filled the drive with zeros, effectively overwriting all data on the disk. This is more secure than simply erasing the data. When you erase data the traditional way it is easy to retrieve the data because the data is not actually erased until it is overwritten with new data. The pointers to the data are simply removed, allowing anyone with a knowledge of data retrieval to restore and access your information.
Backup (and restore) Partition to DVD(s)
Lets say you want to backup an entire partition to DVD(s) with the ability to restore this backup when needed. The command to accomplish this would looks something like this:
dd if=/dev/sda2 of=/home/my-home-directory/backup1.img bs=1M count=4600
dd if=/dev/sda2 skip=4600 of=/home/my-home-directory/backup2.img bs=1M count=4600
dd if=/dev/sda2 skip=9200 of=/home/my-home-directory/backup3.img bs=1M count=4600 …
… and so on until you have your entire drive backed up. In this example we assume you are using single sided DVDs for your backup, count=4600 will create an image file that will fit on one DVD. Your backup will span multiple DVDs depending on the size of the partition you want to backup. As you can see in the example you use the “skip” argument to skip that many ibs-sized (read bytes) blocks at the start of the input. Again, you want the image files to equal the size of the DVDs you will be using for your backup. If you are using double sided DVDs you will need to adjust the count and skip arguments accordingly.
Next we will will burn our image files to DVD. The tool you use this will depend on your distribution. Some Linux distributions use cdrecord while others use wodim when burning from the command line. Feel free to make use of these command line tools or an application with a GUI (Graphical User Interface) such as Brasero or K3B to burn your images.
When you encounter a situation where you need to restore these images you can do this very easily using the dd command. Based on the above backup you will execute the following commands:
dd if=/media/dvd/backup1.img of=/dev/sda2 bs=1M conv=sync,noerror
dd if=/media/dvd/backup2.img of=/dev/sda2 seek=4600 bs=1M conv=sync,noerror
dd if=/media/dvd/backup3.img of=/dev/sda2 seek=9200 bs=1M conv=sync,noerror …
… and so on. Again, you will need to adjust the commands to meet the needs of your specific system. If your DVD drive is not located at /media/dvd adjust accordingly. Here you are simply restoring your images to the partition that you backed up. You use the “seek” argument to skip that many obs-sized (write bytes) blocks at the start of the output. For our purposes this number will equal the number you used for “skip” during your image creation.
These examples and much more are possible using the dd command. dd is a powerful command and used improperly can do some serious damage to your system. Be careful experimenting with dd on a production system, otherwise feel free to explore what dd has to offer. Until next time, keep it open source!