Microscopes have long been a fundamental tool in medical biology. How do microscopes work and what are the parts of a microscope? In this article we will explore the basics of microscopes as well as some different kinds of microscopes and how they are used.
How They Work - The Basic Premise
Microscopes take an image of something generally too small to see with the naked eye and magnify that image so that the observer can see it in greater detail. To magnify images, a microscope uses several lenses to change angle at which rays of light strike the eye of the observer. This sounds a bit complex, but below we will break up the parts of the microscope for easy comprehension.
It is not incredibly important to understand the physics of a microscope beyond a certain point. Any rudimentary physics text can give you the formulas to calculate values for a compound light microscope. Instead, spend time learning to prepare slides and focus subjects.
What are the Parts of a Microscope?
For the purposes of understanding how microscopes function, we will “dissect” a compound light microscope into its component parts.
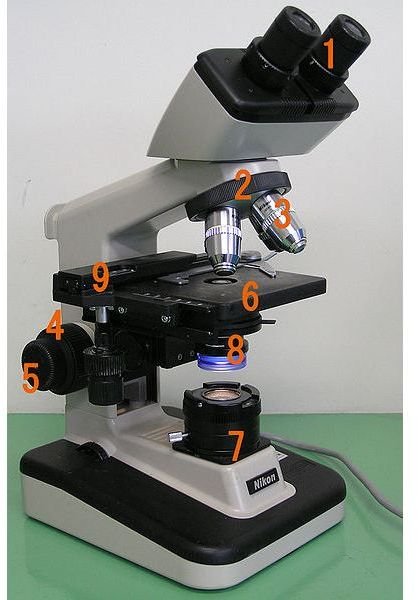
1. Ocular Lens or Eyepiece
This lens sits directly in front of the observer’s eye and does not typically change in magnification power. Older-style microscopes were “monocular,” meaning they had only one eyepiece, but in recent years microscopes have been made “binocular” in order relieve eyestrain and allow for more natural viewing. Frequently one of the ocular lenses can be adjusted slightly to match the needs of those who require corrective vision.
2. Objectives (organized on a turret)
The objective lenses combine with the power of the ocular lens to create the magnified image. Frequently one starts on the lowest magnification to find focus and then increases magnification one objective at a time. This is facilitated by a rotating turret that allows the objectives to be interchanged smoothly.
3. Objective Lens
Objective lenses come in several varieties. In a light microscope, the lowest power objective (frequently 4x or 10x) is referred to as the “scanning” objective, as it allows the observer to find an area of interest before increasing magnification. As magnification increases, the amount of light collected from the sample decreases. For this reason, the highest objective on a light microscope (such as the 100x) requires mineral oil to be applied to the gap between lens and sample. The oil has a greater refractive index and bends more light into the objective.
4. Coarse Adjustment Knob
Both knobs change the distance between objective and viewing sample. The coarse adjustment knob is primarily used with the scanning objective. It allows the user to bring the scope into approximately the right plane of focus. Once this has occurred, it is preferential to leave the coarse adjustment alone and use only the fine adjustment.
5. Fine Adjustment Knob
The fine adjustment knob helps clarify a partially focussed image. It requires many more turns than the course adjustment to do the same amount of work. This allows the observer to take great care in clarifying the image.
6. Stage
The stage, usually adorned with stage clips of some sort, is where the specimen rests. After being centered over a hole in the middle and secured with the clips, the subject can be raised or lowered by the course and fine adjustment knobs. Also, the stage has its own controls for moving the subject left, right, back, and forward on the horizontal plane.
7. Light Source
The light source sits at the base of the microscope (usually) and either consists of a radiant bulb or a mirror for redirecting light. Light is shined up through the hole in the stage to illuminate the sample.
8. Diaphragm and Condenser
Before the light enters the stage opening, it passes through the diaphragm and the condenser. The diaphragm, which has an opening or “aperature” in the form of an iris, only allows light to pass through its center. By increasing or shrinking the size of the iris, you can control how much light passes through to the sample.
The condenser, on the other hand, does not prevent light from passing, but condenses the existing light. This is important not only to prevent the scattering of light, but also to create the most efficient condenser setting for each objective.
These two components are by far the most frequently overlooked and misunderstood by students, but they can often bring a new level of clarity to an otherwise weak image.
9. Structural Components of the Apparatus
The “body” of the microscope is divided into two parts: the base and the arm. The base is heavy and prevents the scope from slipping on the bench top or tipping over. The arm holds all of the apparatus in place above the light source. A student microscope should ALWAYS be carried by both the base and the arm.
Advanced Optical Microscopes:
Bright Field - This is the simplest type of light microscopy because it simply illuminates the subject from behind. Frequently these samples are stained with dyes for better contrast.
Dark Field - The subject is illuminated from the sides, allowing the edges of cells and other structures to be seen more clearly. Some microbes require dark field in order to be conclusively identified.
Fluorescent - This method uses specific wavelengths of light to excite different components of a sample. Frequently a sample is tagged with fluorescent markers so the microscope can essentially “paint” the target areas with contrasting colors.
Phase Contrast - Utilizes how some materials bend light more than others. Objects that refract (bend) light more will appear distinct from those that allow light to pass through them more easily. This is helpful in identifying dense structures (such as bacterial endospores) or getting an idea of how an object looks three dimensionally.
There are other types of light microscopy in use, but as you start out learning about microscopes, the above types will be the most relevant to you.
Electron Microscopes:
Scanning Electron Microscope (SEM) - This method observes a whole object by bombarding it with electrons. When external structures need to be understood by researchers, SEM is a very helpful tool.
Transmission Electron Microscope (TEM) - Samples in TEM are sliced extremely thin so that the electron probes may be fired through the sample. TEM allows researchers to see a cross-section of the sample, but not the whole object.
How are Microscopes Used in Research?
Since the very early days, microscopes have been some of the best tools for observing the world of the very small. Microbiologists benefit greatly from seeing high-resolution images of their bacteria. Cell biologists can see animal and plant cells up close and get a very good idea of what is happening in each cell. Researchers are constantly inventing new ways to image tiny samples and push the limits of modern image technology.
In the clinic, microscopes are not usually as complex, but they allow technicians to rapidly identify infectious diseases and unhealthy tissues. Some bacteria show up very well under specific types of microscope. Once the pathogen has been identified, a course of treatment can then be determined. Also, if a group of human cells has become diseased, they often provide clear visible distortions that doctors can identify.
Microscopes are crucial in almost every area of the biological sciences. While many other techniques provide data to substantiate hypotheses, few are as convincing as good, old-fashioned pictures.