You can customize Excel AutoShapes in many ways – rotating them is one option.
**
Problem: How do I rotate an AutoShape?
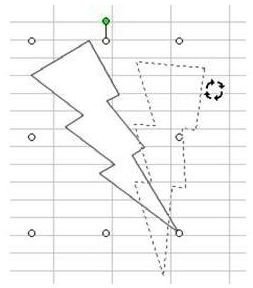
Strategy: When you select an AutoShape, a green circle appears, as shown in Fig. 1375. Grab the green arrow, click, and rotate. This is a free rotation; you can rotate it in 360 degrees.
Note: Click any image for a larger view of the figure.
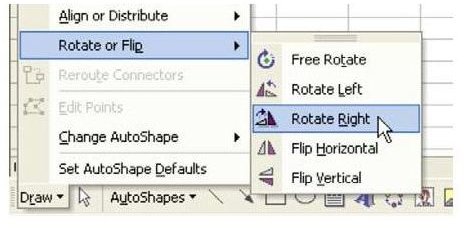
Additional Information: If you need to rotate exactly 90, 180, or 270 degrees, use the Draw dropdown on the left side of the Drawing toolbar. Choose Rotate or Flip and then one of the Rotate or Flip commands, as shown in Fig. 1376.
If you’re using Excel 2007 or 2010, you can find the Rotate and Flip options in the Arrange grouping of the Drawing Tools Format tab. In addition, if you right click on the shape and select Format Shape, you’ll find more options such as 3-D Rotation.
Summary: To rotate an AutoShape, select and use the green handle to rotate.
Commands Discussed: Draw – Rotate or Flip
If you have multiple shapes that you want to rotate or flip as a single unit, first group them. You can learn more about how to do that in Join Two Autoshapes . After rotating, you can ungroup the objects and alter them separately again.
References and Additional Resources
If you’re looking for more tips and tutorials, check out 91 Tips for Calculating With Microsoft Excel . This collection of easy-to-follow guides shows how to customize charts and graphs, various formatting techniques, different ways to make complex spreadsheets easier to update and even how to play games like Craps in Excel.
Have an Excel problem and can’t find the solution? Leave a note in the Comments section and we’ll try to help!
Other Resources:
Microsoft Excel Official Site, https://office.microsoft.com/en-us/excel/
Bill Jelen, Microsoft Excel 2010 In Depth, Available from Amazon.com .


