Learn how to set up tables in Microsoft Access 2007.
The first step to creating a database , or really any project, is setting up the tables. Tables are the units that actually house the data that we will be inputting and accessing.
In each table are columns, which are also referred to as fields. Each column is a categorized area to keep the information we are collecting. For instance, if you were setting up a business ledger, first names will be collected in the first name column and amount collected column only collects the money that has been collected. Two different data types can not be housed in the same column. This will make your data inconsistent and your database about as useful as keeping all your records on balled up pieces of paper in a shoe box.
Rows, also referred to as records, are also part of the table. This is where each specific record is kept. For instance, while the column may say Business Name, the row will say “Acme Company”. You now get the gist of the table and how it operates. Before we get started, here are just a few more tips about setting up tables:
-
There may be times where I may mention database objects. A database object is a table, form, query or report.
Advertisement -
Names for the items are case sensitive. For instance, you can have a table called “businesses” and one called “Businesses” and they will be different tables. Remember this while naming.
-
Don’t try to skip any of the steps. You may miss something important.
Advertisement
Setting up the Tables
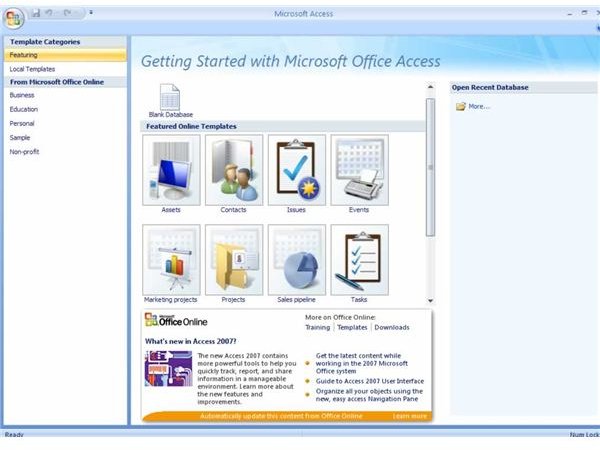
(1) Open up a new instance of Microsoft Access 2007. The first page you see will look like this:
(2) Click on Blank Database from the top of the middle section.
(3) On the right side, you will be asked to name the database first. Type in Business Ledger in this spot and click create.
(4) The first thing that opens is a new table with an ID field already created. This is an Autonumber field and you need it, so keep it.
(5) Towards the top of the page, you will see a button that looks like this
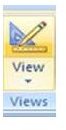
. Click it. This will change you to Design view. This is the view where we can add all the fields and their properties for each table.
(6) You will be asked for the table name in order to save it up to this point. Type in “Account Transactions” and click OK.
(7) You are now in datasheet view. In the row under the ID field, type in “Entry Title” in the Field Name. Then, click the drop down button next to Field Type and choose Text. Change the Field Size option at the bottom portion of the screen to “150”.
(8) Follow step 7 to add the next following fields:
Field Name (Field Type)
Entry Number (Number)
Entry Date (Date/Time)
Category (Number)
Transaction Amount (Currency)
Memo (Text)
(9) Close and save the table.
(10) Click on the Create tab and choose Table.
(11) Click on the Design View button again and type in Categories as the name of the table. Create the following fields:
Field Name (Field Type)
Description (Text)
Income/Expense (Text)
Taxable (Yes/No)
(12) Close and save the table.
(13) Create another table named “Filters” with the following fields:
Field Name (Field Type)
Object Type (Number)
Object Name (Text)
Filter Name (Text)
Filter String (Memo)
Sort String (Memo)
Default (Yes/No)
Description (Memo)
(14) Save and close the table.
You have now set up your tables. Now that you know the basics you can use this information to create tables in a number of projects. Learn more about creating a database with this series of articles .


