
Ventrilo can be used for a variety of different uses, from gamers to businesses, this program allows for all types of chat. In this article, learn how to set up Ventrilo for your personal or professional uses.
What is Ventrilo?
If you’ve never heard of Ventrilo, you’re missing out on a great program that allows for groups of people to speak to one another.
Ventrilo is a popular program for video gamers who partake in group participation or ‘raids’, as well as business professionals for business conferencing; the program allows for multiple people to talk to each other, as well as individual chats. It handles multiple channels - so you can have one channel for your gaming friends and another channel for your business opportunities.
In this article, learn how to set up Ventrilo, where and how to download it, and some tips on how to use it.
How to Setup Ventrilo
There are two versions of Ventrilo - a client version and that of a server version. The client version is what most people run while using the program, whereas the server version is the program in which the clients use in order to speak to each other. The client version is free, while the server version has two components - a free version and a pro version, which is licensed with approval from the people at Ventrilo.
Only one person needs to download the server version, while those that want to connect need to download the client version. Both can be downloaded from the main site of Ventrilo . The download link is on the left hand side of the main website; when you click on the link, you’ll be taken to the download area. The client version is listed first, along with which operating system, the same is true for the server download. The newest version of Vent - as most people call it - is 3.0.5.
Vent’s installation is the same as any other, asking permission for it to be installed, as well as choosing where you would like to install it (the C drive is the default location). When the program has installed, you’ll have the option to open it immediately in order to configure it. When Vent is opened, it will of course be blank. There are two ways to set up the program - the first is a completely new profile and the second is one that has been previously backed up .
To start a new profile, click the arrow button that is next to the first drop down box. This is the username; this is the name that you
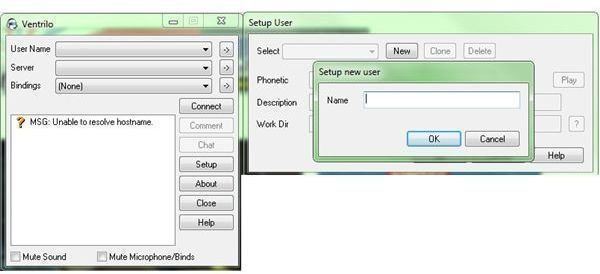
want people to identify you by. If using this for business, use your real name; if using this for a game, use your character or screen name. A pop up will appear; click the button that says ’new’ (creating another popup box) and then enter in your username and click OK. Then click OK again.
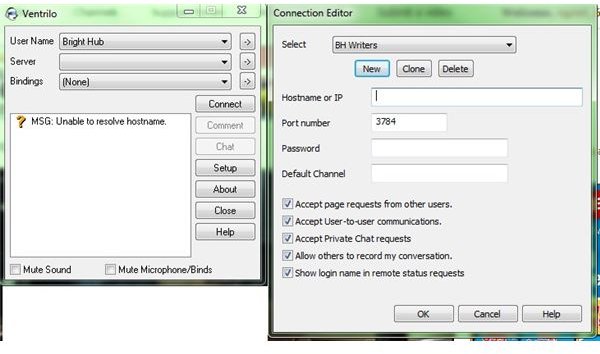
The next drop down is that of the server information. This information should be supplied by the person who is hosting the Vent server. As with the username, click the arrow next to the second drop down box labeled server. Yet another pop up will appear where you will enter in the server information. Click new (one more popup) and enter the name of the server. Then enter the port number for the server; again, this should be supplied by the person who is hosting the server. If there is a password being used, enter that as well. Then click OK until you return to the main Vent program.
You should then see your server in the middle screen, which should have a green icon next to it (this means that the server is up and running.) A question mark may mean you will need to speak to the server admin. If you are ready to chat, click the connect button and you’ll be connected.
Sometimes, for new Vent users, they may run into issues that require some troubleshooting . Some of the issues arise from setting up additional measures within the program, like setting up the correct audio and keys for the program.
Image content @ Ventrilo, author content


