
Users of Ventrilo know how important it is to keep in contact with a group, whether it be from the corporate world or that of the gaming world. When using more than one computer or switching to another computer, it is important to keep your current settings. Find out how to export Ventrilo settings.
What is Vent?
If you are an online video game player, you may have heard of the text and voice-over IP program called Ventrilo (shortened to Vent by gamers). It allows for communication with a small number of people (usually under eight), as well as the ability to chat by texting. While Vent is a popular application for the gaming community, it has also proven to be very effective with the business community as well for voice communications with say a group or team members who may not reside in the same city or even the same country.
The program is popular for many reasons - it uses a very small amount of the resources by the computer’s processor, while allowing for the quicker voice communication that gamers and meetings often need when discussing plans or ideas. Also, because the program runs along side either a video game or other software, if that software program suffers a problem, Vent continues to run.
Among the above, Vent is also free for both the client side and the server, as long as eight people or less are using the system.
For both gamers and business users, the subject of being able to transfer Vent settings are common. This is usually the case in which a user utilizes two separate computers, say a desktop and that of a laptop. Or for some business individuals, they may have a work computer and that of a home computer. Being able to export Ventrilo settings from one computer to another is important in maintaining those custom settings.
How to Export Vent Settings
Learning how to export Ventrilo settings is actually quite easy and only takes a few minutes. You will of course need to have Vent installed on both the main computer you are using, plus that of the one you plan on transferring the settings to. Vent is a free to use program and has a very quick installation time, so you don’t have to wait long.
To export your current settings, open Ventrilo. In the area where the channels are listed, right click within a white space area. A menu
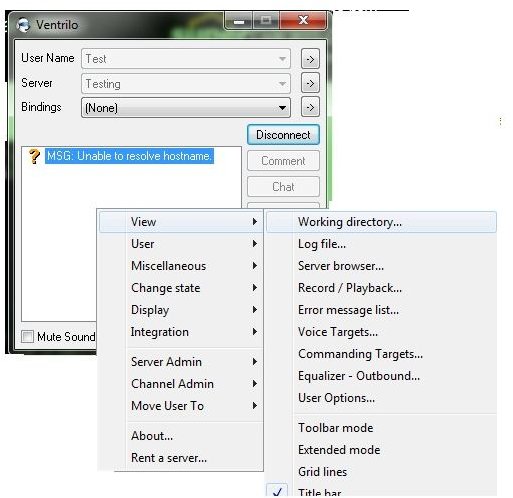
listing will appear; the first selection is ‘VIEW’, using the mouse to hover over the option, a new menu will appear. Select the first selection of ‘WORKING DIRECTORY’. This will automatically open up the Ventrilo folder that is installed on your hard drive. In this folder, you will be looking for a text file that is labeled ‘ventrilo2’. If your computer’s folders are configured to show the type of file, you will see that this is a configuration settings file. These types of files are usually called ‘ini’ files or installation files.
Select this file and right click it. Again, you will get a menu and you will need to find and select the option to ‘copy’. You can also use keyboard shortcuts by selecting the file and pressing the control key (CTRL) and the C key together. Now, you are going to paste this file in a different location - that is to say the location of the secondary computer. The best way to do this is to paste the copied ventrilo2.ini file to a thumb drive and then use the thumb drive to bring over to the second computer.
To restore this file, take the same steps in exporting it and then just paste the file in the Ventrilo folder. You will most likely get a warning that you will be replacing or overwriting the current ventrilo2.ini file. If this is alright with you, click OK that you acknowledge the message and continue to paste the file.
Conclusion
You now have copied Vent settings from one computer to another. This should go smoothly, though in the case of the second computer, you will need to set up the server settings once more if you haven’t already. If you do experience issues , try copying the ini file again or try reinstalling Vent on the second computer. Run it on the second computer and try running it to see where problems lie, then paste the copied file.
Image content @ Ventrilo; author


