Have you ever wanted to add flashy title and text boxes into your digital video projects? Apple’s Live Type can give you the tools to create animated text sequences that you can drop into your editing project.
Text Boxes
Have you ever watched a documentary and wondered how to put those great animated title cards into you digital video projects? When you are watching the news do the lower third nameplates ever catch your eye? Now Apple has enclosed a fabulous program in their Final Cut Suite to do this exact thing. It is called “Live Type,” and it is another feature that has been added so that you can try to fully complete your post-production work without fostering outside help.
Animation
Live Type is a program that is designed to create animated title markers, just like those you see in films and on television used to introduce a piece or to indicate who a person is when they are in an interview. You can put text into your project in Final Cut Pro , but it will not have the same versatility and does not have all the features to create a moving, animated text box.
The Layout
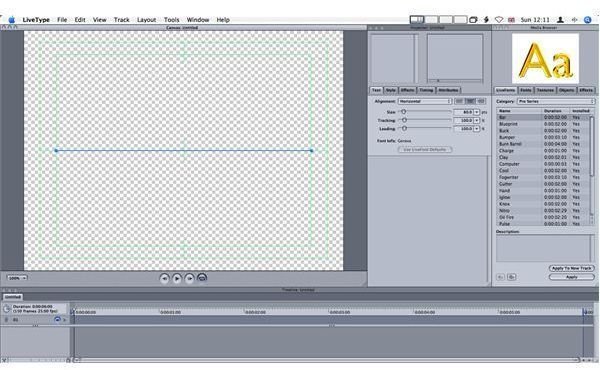
When you open Live Type you are given an interface with four distinct parts. The upper left segment is the Canvas, and where the text will appear when you are working on a specified clip and where you can do physical changes on it. Directly to the right of that is the “Inspector” where you have tabs to decide w
hat kind of text, style, effects, timing, and other attributes you want on your words. To the right of that is the Media Browser, which determines fonts, both specialty and regular, as well as more colorful alterations like textures and transition effects. The bottom half of the screen is taken up by the Timeline, which is similar to the Timeline you see in Final Cut Pro and other non-linear editing programs. Just as the Timeline in Final Cut Pro is where you align clips in the way you want them exported, you have a similar principle here. Here is where the text animation will be and where you can play it to see what it looks like. When you play the text animation it will do so in the Canvas.
Adding Text
When you are ready to create your text you go to the Inspector and type your text into the top left box. It will then appear in the Canvas and you are ready to begin working on what the final text box will look like. Any changes to the actual text itself must be done in the Inspector and cannot be changed in the Canvas, unless you are simply looking to delete a specific letter.
Visual Effects
In this lay out you can create text boxes that move and change, as well as have a variety of visual objects associated with them. After you decide what size you want your text to be in the Inspector, you can position it in the exact place you want it to be in the Canvas. Go back to the Inspector and you can set the timing for it, which decides how long each element of the text will be on the screen. Every tab in the Inspector has its own set of options in the Media Browser. So, when you click on the effects tab you will be given associated options in the media browser. This is where you can set the kind of movements you want the text to have, such as bounce on and off the screen or float in from above. The effects you can use can either be transitions or simple movement of the text. This is where you set the timing for fades, both in and out. Depending on how discrete you want the transitions to be you can go from subtle to incredibly loud and animated.
Live Fonts
One of the more unique features about Live Type is the Live Fonts, which are creative font animations that come with the package. These are things like making your text appear to be a slot machine or as if a child is scribbling them out. They are very distinct and can liven up an otherwise boring text box.
Textures
You can also add textures that will appear behind the text, which you can use to create a box separating the word from the video images. Once you add these to the text video you are working on in the Timeline you then go into the Canvas to alter the size of the texture box you want on your text. These are incredibly common in non-fiction filmmaking, and since Live Type provides animated backgrounds it is sure to be much more engaging than what you can do in Final Cut Pro.
Exporting
Once you are done with your text box you simply go up to File in the task bar and hit Export Movie, which is somewhat similar to exporting from Final Cut Pro . Make sure that in the following menu you select to export both the text and the background. Live Type will then create a QuickTime file that you can import into your editing project and use as a regular video clip.
A New Resource
What used to be a difficult process for using text in a project has now been made easy by this user-friendly program. You do not have to rely on the minimal number of options offered by your editing software, and can now decide exactly how your text should look.
This post is part of the series: Apple Post-Production Software
Here are profiles and reviews on some of Apple’s best post-production and non-linear video editing software.


