You can personalize your computer in more ways than just applying a new background or screen saver. When you personalize with advanced settings, you can make the computer easier to see, and make your work easier to complete.
From the Display Properties dialog box in Windows XP, from the Personalization window in Vista, and from the Appearance and Personalization window in Windows 7, you can change a number of viewing-related items. You can change the icons used for default Desktop icons like My Computer or the Recycle Bin, make tweaks to the Windows color schemes or create your own, and even change the DPI settings for the monitor.
Did you know?
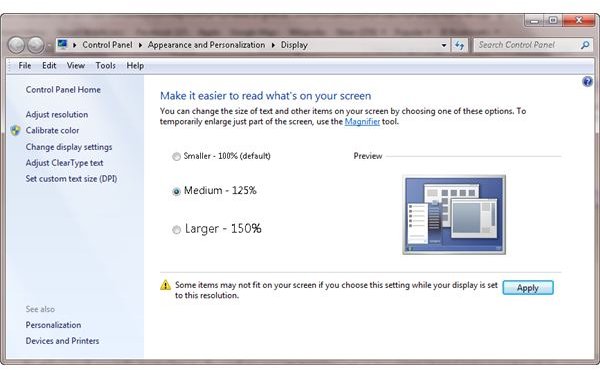
DPI stands for dots per inch, which means how many dots appear per inch on your computer monitor.
Change your DPI in Windows 7
To change the screen’s DPI, follow these steps:
1. Click Start, and in the Start Search box, type DPI.
2. In the Display window that appears, choose one of the options or click Set custom text size.
Tip: Making a change to the DPI settings is a good choice for those with media centers that are positioned further away from the user than regular monitors, for the elderly who have trouble with their eyesight, or for anyone who’d just like everything to be a tad bigger.
Change Default Desktop Icons in Windows XP
To change the default icons on the Desktop, follow these steps:
-
Right-click on an empty area of the Desktop and choose Properties.
-
In the Display Properties dialog box, select the Desktop tab.
Advertisement
-
Click the Customize Desktop button.
-
In the Desktop Items dialog box, select an icon to change. (Notice that you can also add or remove Desktop icons in the first section, Desktop Icons). We’ll choose My Computer, the first choice. Click the Change Icon button.
Advertisement -
In the Change Icon dialog box, select a new icon to represent My Computer.
-
Click OK three times to close all open dialog boxes.
Advertisement
Tip: If you know how to create your own icons or download icons others have created, you certainly can. The Browse button is available in the Change Icon dialog box for just this reason.
Change Windows Color Scheme in XP, Vista, or Windows 7
To make changes to the Windows color scheme, follow these steps:
- Right-click on an empty area of the Desktop and choose Properties. (In Windows 7, click Personalize.)
2.Select the Appearance tab, Window Color, or the appropriate option for your OS. In Windows 7, click Windows Color, and then enable the Advanced options.
- If you see the Windows and Buttons and Color Scheme, note the choices. To see any theme or color, select it and click Apply.
-
In Windows XP, to make your own specific and personalized changes to the color scheme, click the Advanced button and continue through these steps.
-
The Advanced Appearance dialog box allows you to select a specific part of the Windows theme you’re using and make changes to it. Click the down arrow under Item to see what is available. Choose Active Title Bar. In this example, we’ll change how the title bars appear.
Advertisement -
Use the up and down arrows to change the active title bar’s size and color(s) and the type, size, color, and other attributes of the font. Notice that you can preview the changes without clicking OK.
-
Once you’ve decided on any change, continue selecting items from the Item list and making additional changes as desired. Click OK when finished and OK again to close the Display Properties dialog box.
Advertisement
Tip: Making a change to the color scheme and/or fonts used is a good choice for those who are color-blind or have other visual impairments. It’s also for anyone who just wants to add a little spice to the old and tired Windows colors.
You can make additional changes to the display properties by working through all of the available options. For instance, from the Appearance tab and the Effects button, you can choose Large Icons, perfect for media centers since they’re usually farther away than other monitors are, and you can apply effects to menus (or remove them). Now that you’re aware of the options, take a few minutes to browse through them.
References and Images
The author took these images on a Windows 7 Professional computer.
The author’s own experiences:
It has been my experience that the newer the OS, the easier to personalization tasks. This means that personalizing a Windows XP machine takes longer than personalizing a Windows 7 machine. Additionally, the newer the monitor the more likely the settings are optimally set. You may try to find a better DPI say, but the one that’s configured is likely the one you’ll return to.


