Vegas Pro 10 is an amazing program if you know how to use it. While Vegas isn’t an overly complicated program, you still need to learn its quirks and abilities. This tutorial helps you with basic editing, rendering and importing tasks.
Getting To Know Vegas
Sony Vegas Pro is a video editing program, and the latest version of this software is Sony Vegas Pro 10, released on October 11, 2010. Sony Vegas allows you to perform simple audio and video editing techniques, and you can also use the software to add effects to your clips.
Before you can do all this, however, you have to know how to use Vegas Pro. This Sony Vegas Pro 10 tutorial will help you get familiar with this program and how to perform some basic editing steps.
Import/Capture Video
The first step to using Vegas Pro is importing or capturing video. Importing allows you to pull entire clips from your computer and camcorder.
Capture allows you to record only sections of clips that you want to use.
To import video, follow the below steps:
- Go to File and then Import.
- Select the type of file that you want to import. For example, you can import DVD Camcorder Disc if you have a Sony DVD Handycam file.
If you want to capture video, then you need to do the follow steps:
- Attach the capture card to the camcorder.
- Power up the camcorder, and change it to the VTR mode.
- Select Video Capture to start capturing your video.
- Select the type of format that you want to use.
- You have two options when capturing clips: Capture the whole tape or do not capture clips right away. Select the latter if you only want to capture certain clips.
- Go to the Video menu.
- Pick your camcorder from the list.
- Play the video until you get to the clip where you want to start capturing video.
- Hit the Capture Now button to start capturing the clip.
- Press Stop when you have captured all the video that you want to use.
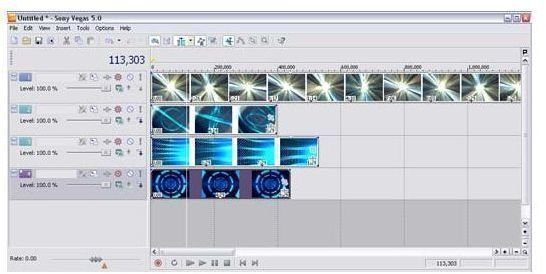
Now, you can open up the captured or imported clips, and they will show up on your timeline. You can change the order of the clips by dragging them around the timeline. If you want to remove a section of the clip, use the Crop tool to remove excess clip sections that you don’t want to use.
Pan Crop
You can also use the Crop tool to change the aspect ratio of your video. You can set the aspect ratio of your video in the Project Video
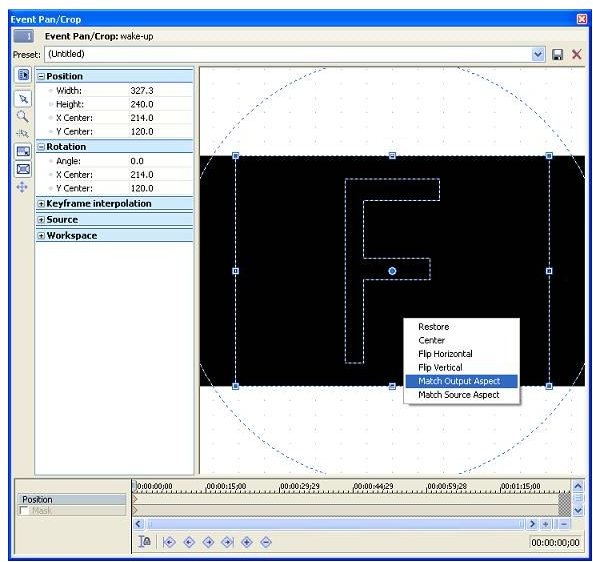
Properties. Click on the icon, which is located near the top of the Preview window. Change data like height, width, pixel aspect ratio and pixel format.
When you are done changing the properties, select the Pan Crop icon, which opens up the Pan Crop tool. The Event Pan/Crop window will open up. In this window, right-click on any section of the image. This brings up a drop down menu. Select Match Output Aspect. Now, any changes you make to your video will match the output aspect ratio of the rest of the video.
Auto Ripple
When you add multiple files to your timeline, you may have gaps between clips. You can use the magnifying glass to zoom into the
timeline and view the gaps. You can then select and delete these gaps or you can expand the previous or subsequent clip to fill the gap.
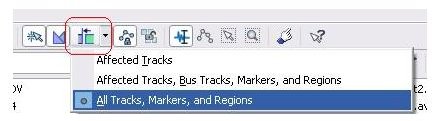
Another option is to use the Auto Ripple option. This tool consistently removes gaps in your timeline. To use the Auto Ripple option, follow the below directions:
- Go to Options and select the Auto Ripple icon. This icon looks like two clips with a gap with an arrow over it.
- A drop down menu appears, and you can select from the following three options:
- Affected Tracks
- Affected Tracks, Bus Tracks, Markers, and Regions
- All Tracks, Markers, and Regions
If you have already made a change that left a gap, you can adjust this by going to Edit and Post-Edit Ripple.
Rendering Video
The final part of any video editing is rendering the video . To render your video, go to the File menu and select Render As. You can change the settings for your video, including render quality and formats. For example, if you are rendering a video for DVD, you want to use either Wave or Dolby Digital AC-3.
Rendering a video does not prevent you from editing the video later. It just renders your current edits.
This Sony Vegas Pro 10 tutorial only gives you some basic directions. For more detailed directions, you can use the Help menu in Vegas Pro. Otherwise, just go to the Sony website and search the Answers. You can also directly ask Sony representatives a question by clicking on the Ask a Question section.


