The Adobe Production bundle has powerful tools for working with green screen. Adobe Premiere is not the ideal program to achieve the best results as the best tools are in After Effects. However, Premiere has options to work with green screen and here is how you can use those tools for your projects.
Hints on Shooting the Initial Green Screen Video
Chroma key effects are a normal part of many video editing projects. When you watch a weatherman on television, standing in front of a graphic background, chances are he is standing in front of a green screen. Adobe Premiere has a video keying effect to make the green screen transparent and insert graphics or a new background into its place.
When starting on this, there are some things to keep in mind while shooting the video.
Making green screen keying work properly takes hard work while filming. All the lighting and colors need to be precise and close to perfect. If you are just using textures or graphics, you don’t have to worry as much about small discrepancies. However, if you are placing an entire new background in the shot, you have to be careful when shooting it.
High contrast scenes work to make light backgrounds transparent with dark objects in the foreground. The same is true if the light objects are shot against a dark background. Make sure the objects you don’t want to key out are not the same color as the background. Keep green clothing off of people when the background is a green screen.
It is also recommended that you use a tripod when shooting green screen work. A moving camera will disorient the viewer when the background is different than what is shot in the foreground. If the background being substituted in is busy, this is less of a problem.
It is also important to keep the lighting the same in the two shots. If the background is an outdoor shot, it might be better to shoot the green screen outdoors. It can also be lit to resemble outdoor lights as well.
Understanding Ultra Key in Adobe Premiere
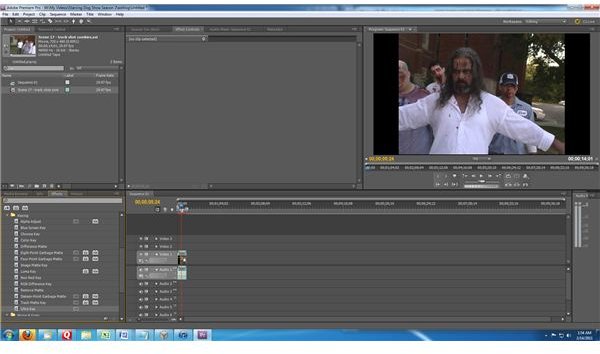
Ultra Key is the video effect used to work with green screen. Adobe Premiere should be open and the footage imported. Choose Video Effects > Keying in the Effects panel. When here, there are a few choices to choose from.
- Color/Chroma – Blue Screen, Chroma, Color, Non-Red, RGB Difference and Ultra Key.
- Luminance : Luma, Multiply and Screen.
- Matte: Difference, Garbage, Image, Remove and Track.
The color keys and Chroma keys work the same. You choose the specific color to make it transparent and then apply specific parameters to determine how far the color selection stretches. Adobe Premiere then looks for light and dark areas of that color to make transparent.
It is possible to exclude certain areas from the keying by drawing a box around these areas. It is also important to understand that when you use the eyedropper to get a sample color, it only chooses one pixel. This will not give the best results. There is a way to choose a 5x5 pixel area for better results. When using the eye dropper, use Ctrl-click (Windows) or Command-click (Mac OS) to turn on the 5x5 areas.
More Tips for Green Screen work
One of the biggest problems with green screen Adobe Premiere work is uneven lighting. Make sure to use flat lighting on the screen, with two lights at 45-degree angles so there are no “hot” spots. The light on the actors does not have to be flat.
If you do not shoot your Chroma Key shots outdoors, use blue tint over the lights to shoot the background scenes. Also, if you shoot indoors, but have an outdoor background, simulate outdoor movements like blowing the actors hair to make it appear as wind.
Keep the actors at least four feet from the green screen to avoid “Chroma key spill.” It is also a good idea to use a backlight on the actor to help prevent this as well.
Use a wide open iris on the camera to make the blue or green screen in the background slightly blurry to make it easier to key it out.
Adobe Premiere CS5 Chroma Key Effects
Using Ultra Key
- Load the Video into Adobe Premiere. Load the background into Adobe Premiere. Place both on the Timeline with the background under the green screen image.
- Scrub the timeline to see the background under the green screen. Adobe Premiere will allow you to then watch the video to see how the characters in the green screen look in front of the background.
- Make sure before you start working, the video is fit into the screen because most problems with keying occur around the edges.
- In the Effects panel, choose Video Effects > Keying and then drag the “Ultra Key” effect into the clip.
- In the Effects Controls window, choose the triangle next to “Ultra Key” to show its controls. Click the eyedropper and click on the green background. Make sure you use the 5x5 method described above.
- Drag the current time indicator and you will see most of the green is gone, but some remains.
- In the “Ultra Key Setting,” choose “Aggressive.” This will give a better result, eliminating most of the green.
- In the “Ultra Key Output” menu, choose “Alpha Channel .” Everything from the green screen video will be changed, so all eliminated video is black and what remains is white. If small black dots appear in the white that means some of your main character has been eliminated.
- In the “Ultra Key” effect, twirl the triangle to open the options. Increase the contrast a little at a time until the black dots disappear.
- If the area around the character it pixilated, increase the Soften levels until it is smoother.
- In the “Ultra Key Output,” return the video to “Composite” to see the final video. It should be close to perfect now.
References
Source: Adobe Premiere Pro CS5: Classroom in a Book, pp. 280-282
Source: Author’s own experience


