
There are several reason to use the masking tool in Photoshop, as it is an incredibly useful tool. A favorite feature is the ability to change the color of a graphic to “recycle” it. This article will give you some masking tips for Photoshop by walking you through the basic process of masking.
What is Masking?
Have you ever had to paint a wall or around a window in your house? Did you ever use masking tape or painters tape to protect the ceiling or glass of the window so you didn’t get paint where you did not want it? That is kind of what masking is like. By using the masking tool, you can quickly paint in a selection with brush tools without fear of ruining other parts of your project.
It is a lot more precise than other methods of selecting , though it does take a little more time. It has a ton of applications within digital photography, but it also has several within graphics design and artwork. It can be used to select areas to be removed, replaced, repaired, altered… pretty much whatever you want to do. This article will give you masking tips for Photoshop , as well as provide a handy trick to change the color of a recycled graphic.
Photoshop’s Masking Tool: A Walk-through
Open your desired document in Photoshop. Here I’ll be using a glassy car-style logo I created forever ago. Our ultimate goal is to change the color of the blue glass, but not the silver metal, using Photoshop’s masking tool.
Press D on your keyboard - this will reset your active foreground colors to black and white, which is what we’re looking for right now.
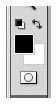
Press the masking button, which is located just under your active foreground/background colors. It looks like this:

Now, grab the basic brush tool. It can be soft edged or hard edged, depending on the finish you’re looking for. Here I’m starting off with a 19px hard-edged brush.

I am going to begin painting over the part I wish to change (some of you familiar with the masking tool might be yelling “NO!” at me right now, but I have my reasons. We’re going to invert the selection at the end here!) as it is fairly easy to fill in. Notice that it’s turning the area red. This is what we want!

Don’t be afraid to change your brush size to smaller or larger to fit into any tiny spots that come up, and remember: the zoom tool is your friend.

To clean up “spillage” onto other areas that you don’t want to be masked - simply press “X” on your keyboard. This will swap your black brush for your white one, which acts like an eraser when using the masking tool. Clean up the edges to make it look good!

Now, press the masking button again. This will create a selection around everything BUT the area you wish to change. To fix that, simply hit SHIFT+CTRL+I on your keyboard (Mac users, you guys just hit SHIFT+CMD+I).

Now, all I did was play with the hue and saturation to change it from blue to pink. You can get an idea of how the masking tool has made this process pretty accurate and speedy. Imagine the applications for this!

Image Credits
All images were created by Amber Neely.


