If you’re looking for a subtle way to add a simple, interesting effect to graphics, photos, banners, or layouts, the rounded corner is a great way to achieve a softer look. This tutorial will show you a fast and easy process to creating rectangles with rounded corners.
Foreward:
Sometimes you want a softer effect when laying out elements for a publishing project or web site. Harsh corners and lines created by using a standard box or rectangle often give a very formal, strict feeling to the website. If you’re looking for something a bit more tame, rounded corners might just be the look you are going for. This tutorial will show that with Photoshop, round corners are easy to achieve! This tutorial is intended for beginners, and uses Adobe Photoshop CS4, but should work perfectly fine for anyone using Adobe Photoshop +7.0 and up.
Toolbars Associated with the Rounded Rectangle Tool
The easiest way to achieve rounded corners in Photoshop is to use the Rounded Rectangle Tool. But to use the Rounded Rectangle Tool, you need to learn a little bit about it at first. Here are the tool bars that are associated with the Rounded Rectangle Tool. They won’t look quite like this when you look in Photoshop as I’ve edited them to fit in the area little better, but you should easily be able to find what you need to with little effort.
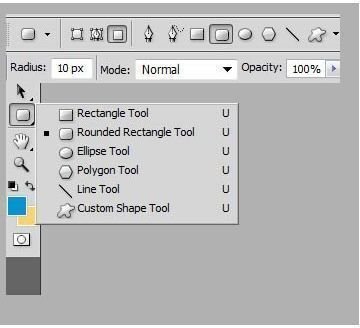
Location of the Rounded Rectangle Tool
In your side toolbar, toward the bottom, you will find the rounded rectangle. PC users can press U. The Rounded Rectangle Tool may be hidden, because it shares the same box with several other tools, such as the Rectangle Tool, Ellipse Tool, and Line Tool. Simply click and hold on the button where it would be located, and a fly-out menu will allow you to select the Rounded Rectangle Tool.

Settings: Path Options
The second set of settings you are going to take a look at in this tutorial is the path options. These are the three slightly different rectangles. One is outlined in a box and is called “Shape Layers”, one contains a small pen tool and is called “Paths,” and the third is a basic rectangle called “Fill Pixels.” While they all do different things, in this tutorial, we’re only going to deal with the Fill Pixels option.

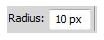
Setting: Radius
The last option you need to learn about is the radius option. This option tells Photoshop how curved the corner needs to be. A higher number will yield a rounder corner.
Different Radii
Here you can see four boxes that have progressively larger radii. The purple box has a very subtle curve at only 10 pixels, where as the green box has a very rounded curve to its corners, with a radius of 40px. The curve of the project you are looking for is entirely up to you, and you should feel free to play around with the radius setting until you find something you like.

Creating your Rectangle
Now you just have to set your radius what you would like it to be, and then click and hold on the canvas, dragging your rectangle to the size and shape you want it to be. You will see a grey line in the shape and size of your rectangle like so:

When your rectangle is the size and shape you would like it to be, simply release your mouse button and your rounded rectangle will automatically fill in with whatever color you have selected. Voila!