Clouds are common in the background of pictures, but creating clouds to add to a background can be intimidating. It is actually fairly easy to create clouds in Photoshop, using layers to add highlights where you need them and adjust the look of the clouds to meet your needs.
Photoshop Clouds
Though Photoshop comes with a “Render Clouds” filter, the results of the filter generally leave quite a bit to be desired. Most people who want to create clouds in Photoshop only want to add a few clouds with sections of sky visible behind them. Filter-rendered clouds cover a large area, and trying to cut out usable clouds results in obvious edges that need quite a bit of work to correct.
Creating your own clouds in Photoshop isn’t hard, and can generally be done in a few minutes with the airbrush tool. The key to creating clouds is to use multiple layers, adding accents along the tops and bottoms of the clouds to mimic the highlights and shadows that are created on real clouds. For the purpose of this example the clouds are being created on a new 700 by 700 image, but the same technique can be used to create clouds in an image of pretty much any size.
Creating the Sky
Before you begin adding clouds to your image you will need to have an image with a colored background so that you can see the shape of the clouds that you are creating. If you are adding clouds to an existing picture then you will likely already have a background that you can use, but if you’re starting from scratch then you’re going to need to create one. You could use a basic blue filled layer as a background, but you can create a much more realistic sky if you take the time to create a gradient.
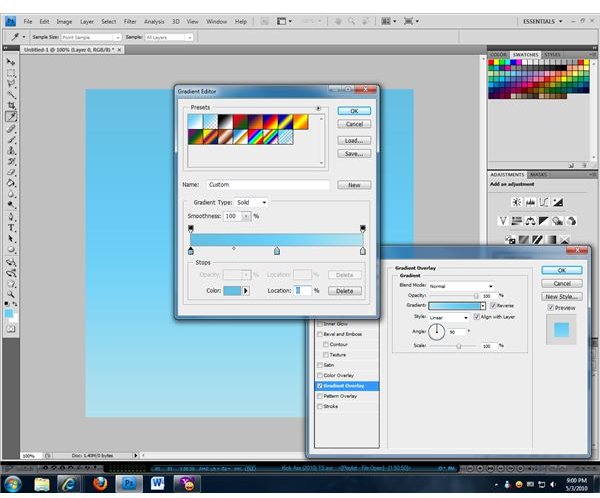
Select a light blue for your sky and use the paint bucket tool to fill in your image background. In the “Layers” workspace, right-click on your background and choose the “Layer from Background” option. Right-click the newly-created layer, then select “Blending Options…” from the context menu to open the Layer Style window.
Click the check box next to the “Gradient Overlay” option, then click “Gradient Overlay” to access the gradient options. Click the “Reverse” option, then click the gradient sample to open the gradient editor. Select the first gradient; it should fade from the blue that you’ve chosen to white. Add a new color option by clicking uder the gradient bar at the 50% point. Select the original blue located at 0% and click the color sample for it; darken the blue slightly. Select the white located at 100% and click the color sample, then adjust it so that it is a very light blue instead of white. Click “OK” to close the open windows and finalize your gradient sky.
Beginning the Clouds
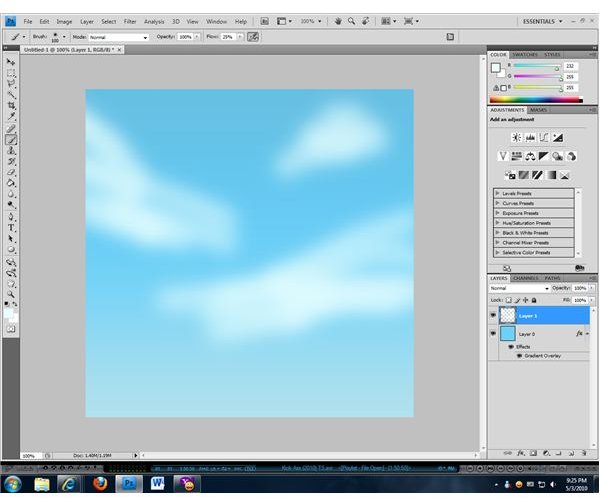
Create a new layer when you’re ready to start making your clouds. Select the brush tool, choosing a large soft round brush (a size 100 brush was used in the example picture). Click the “airbrush” option on the brush toolbar to turn on the airbrush tool, setting the flow at 25%. Set your brush color to white, then adjust the RGB value so that it is slightly blue by reducing the red value (the example picture has red set at 232).
Begin making the basic outlines of your clouds. Start at the top and then work your way down, using smooth and quick strokes. Keep in mind that you don’t have to fill in the clouds completely, since you just want to create a base image to work from. Gaps and variable coloring are not only acceptable in your basic cloud shapes, they are ideal.
Adding Depth and Definition

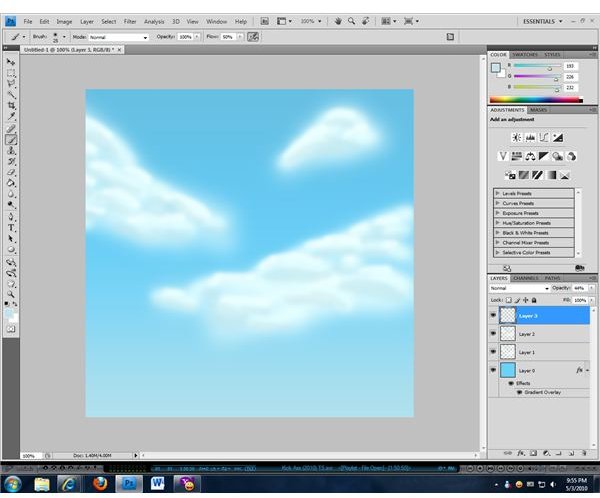
Create another new layer to begin adding depth and definition to your clouds. Reduce the size of your brush to approximately half of what you used before (the example used a size 50 brush) and increase the flow of your airbrush to 50%. Leave the brush color on your blue-tinted white for now.
Using smooth and quick strokes, begin adding contours to your clouds. Go along the tops of all of your previous strokes, creating highlights to mimic the sunlight that would be hitting the tops of real clouds. Make sure that all of your strokes follow the shape of your clouds, and use small strokes rather than large ones to create a “fluffy” look. Leave a number of gaps so that you can see your previous cloud layer beneath the highlights; you don’t want to cover everything or you’ll lose the illusion of depth.
If you wish to further tweak your clouds you can reduce the brush size even further to add additional highlights and details on a new layer. You can also adjust the color slightly, making it lighter (but not fully white) to create more of a highlighting effect. Be careful not to overdo it with the lighter colored accents, though; these highlights should only be added to the upper portions of each cloud.
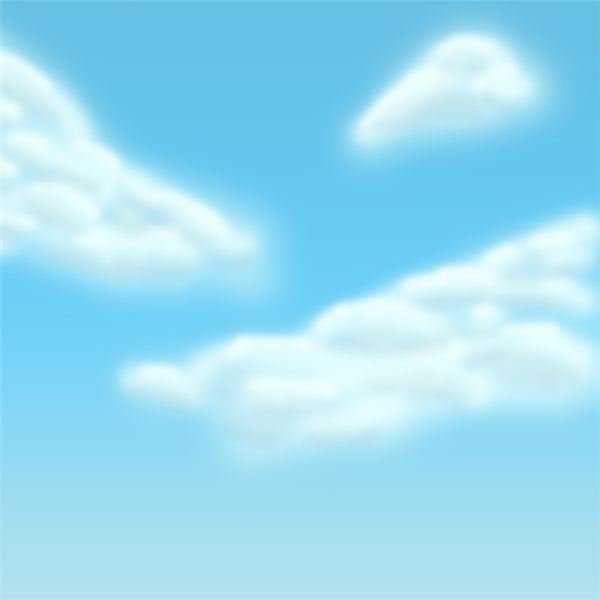
Finishing the Clouds
Create another layer so that you can start adding shadows to the bottoms of your clouds. Adjust your brush color so that it is a light blue-gray like you would see in nature and set your brush to approximately half the size of your original clouds (the example picture used a size 50 brush.) Add shadows along the bottoms of the clouds and other places where you feel that shadows are merited, making sure that you don’t go overboard with your shading; tweak the look of your shadows by adjusting the transparency of your shadow layer.
Once you’ve added your shadows, make any final adjustments that you feel your clouds need. Create additional layers for highlighting and shadows, adjusting the color and size of your airbrush to provide the additions that you’re looking for. Adjust the transparency of your layers to help them blend if you need to, and apply filters to individual layers such as Gaussian blurs if you would like to soften portions of your clouds. Continue making adjustments as needed until your clouds look exactly like you want them to.


