
If you are a freelancer or a media arts student trying to get your digital feet wet, it’s best to know the basic parts of Photoshop that stand as a foundation for the rest.
The Photoshop Interface
We will explore the parts of the Adobe Photoshop interface in this tutorial for those of you who may not quite know where to start with this popular image editor. Photoshop has a vast array of tools and so much to offer as an industry standard image editor. Where does one begin? What are the primary parts of Photoshop?
Photoshop has what we call a GUI setup. That is a Graphical User Interface. This allows the user to interact with Photoshop’s primary tools via visual graphics. Photoshop is a photo and image editing software application that was created by photographers for photographers, as well as for graphic designers and other visual artists. This industry standard software has been used for a multitude of purposes – including creating magazine layouts, flyers and brochures, motion graphics for broadcast, and the list goes on. Let’s start with the basic tools that every designer uses on most projects.
The Menu Bar
The Photoshop menu bar is on the top left corner, once you open the program. The menu bar is the standard place where you will find the File, Open, Close and Save Commands. This bar is your primary navigation around Photoshop. You will want to familiarize yourself with each of the primary menus that you will be using often. Here are some of the primary tools that visual artists use on almost all projects.
The menu bar consists of nine menus: File, Edit, Image, Layer, Select, Filter, View, Window, and Help. Take a few moments now to look at each of the menus. (Click any image in this article for a larger view.)
- the Open, Close, Save, and Print commands are in the File Menu
- the Cut, Copy, Paste, and Transform commands are in the Edit Menu
- the Image Size and Crop commands are in the Image Menu
- Adjustment Layers are found in the Layer Menu
- the Select, Deselect, Inverse Selection and Transform Selection commands are in the Select Menu
- the Gaussian Blur and Unsharp Mask filters are in the Filter Menu
- the Zoom In, Zoom Out, Fit On Screen and Actual Pixels commands are in the View Menu
- the ability to show and hide all of Photoshop’s palettes is in the Window Menu
- the Photoshop Help option is in the Help Menu
The Status Bar
Photoshop’s status bar is often an overlooked tool. The reason may be partly because it is located on the bottom left hand corner of the Photoshop window. The status bar’s role is to give the user three details about any open image. The number on the far left hand side indicates the size in percentage that the image is filling the screen. This is important for editing purposes with a paintbrush tool. If you are going for fine detail, you will want to magnify to view what you are doing.
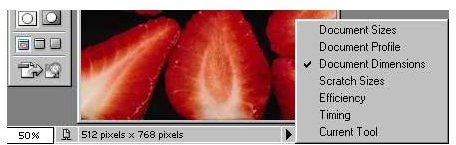
In the center of the status bar, you will see a number on the left which displays the uncompressed size of the image. This is helpful if you want to know how much space the image will take up on your hard drive or an external storage device.
The great thing about the status bar is that it displays information about any Photoshop tool that you are presently using. Shortcuts are essential to an artist when editing an image, and you will want to familiarize yourself with the primary commands. Shortcuts serve as alternatives, if for instance your mouse suddenly stopped working in the middle of a project. You will know how to save the document with the short cut keys or hotkeys on the keyboard. If you move the mouse over your image, you will see the status bar display options for using that tool. You will also see the shortcut options in the Menu Bar window.
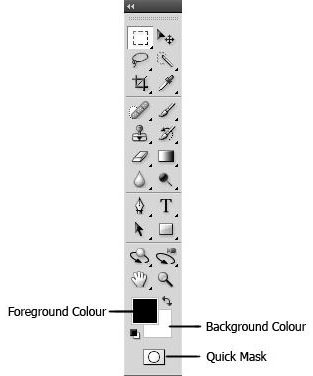
The Tools Palette
The Tools Palette is located on the left side of the interface by default. There are primary and secondary tools within this bar. Notice if you click on each tool, some may have a dark arrow located on the bottom right hand corner. This indicates that there is a fly out menu, with options related to that tool available. We will look at the basic tools that most artists use from the Tools Palette.

The Toolbox
First, there is the marquee or selection tool. It is used when selecting your image within a rectangular or circular frame. If you hold down the black arrow on this button, you will see the various options for the Marquee tool, including the circle marquee.
Next we have the magic wand. This is another selection tool that is used often in image editing. You select your image according to a percentage or tolerance level. If you set a 30 percent tolerance level for the image, you may only get a small selection of the entire image. Whereas, if you select 75 percent, you will have a greater chance of capturing more of the image.
The Blur tool is used to blur images in order to get a feathered or cloudy special effect.
The Paint Bucket tool is often used to add a color to an entire background or a selected area.
And last, but definitely not least, are the Color Swatches. You have to toggle back and forth between the Foreground and Background color to set the color for both. Simply click on either the foreground or background color, and a swatch palette will open up allowing you to pick a color for both your foreground and background color, for your canvas. This does not represent all of the colors you have at your disposal – that is what the Color Palette is for.
The Palettes
The palettes allow you to view important details about your image, such as the history, layers, and paragraphs. History allows you to toggle back and forth with changes you are making to your image. The layers palette allows you to work on parts of the image at different times, then flattening it into one image once you finalize it.
Once you have familiarized yourself with Photoshop’s essential elements, you are ready to explore other in-depth tools and techniques. All of the tools explained are the most widely used for most graphic design projects. Take a deep breath and learn the parts of Adobe Photoshop to complete your next graphic design project.
Palettes


