The Mail Merge feature in Microsoft Word assists with the process of sending a single document to a group, without creating separate documents for each recipient. Knowing how to use the Mail Merge is a must for any avid user of Word.
Before beginning, it is important to note there are two options…
- Using the Step by Step Mail Merge Wizard, or…
- Completing the steps yourself. (If you would like to experiment and improve your Word skills, I would highly suggest taking this route.)
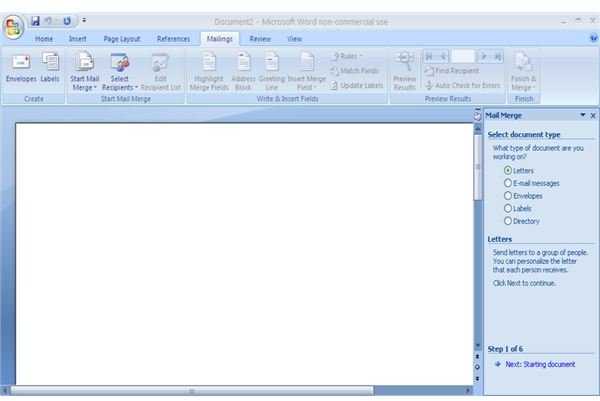
To begin, click Mailings. The Ribbon will automatically display the Mailings toolbar. The tasks are divided into five sections: Create, Start Mail Merge, Write & Insert Fields, Preview Results, and Finish. Click Start Mail Merge.
Start Mail Merge
- Start Mail Merge. Decide here if you would like your merging document to be in the form of a letter, email message, envelope, label, or Word document. The Step by Step Mail Merge Wizard option is here as well.
- Select Recipients. Gives you the options to start a new recipient list, use a previous recipient list, or select your recipients from your Microsoft Outlook contacts.
- Edit Recipients. This tool allows you to make various changes to your Recipient list.
Write and Insert Fields
- Highlight Merge Fields. This is a very simple and helpful tool. Clicking it will highlight the fields in which the information will appear. This way, with a quick scan you can find your merge field easily.
- Address Block. Don’t be confused by the command name, this tool allows you to add an address.
- Greeting Line. Allows you to create your greeting line format for saved recipients and unknown recipients.
- Insert Merge Field. Here is where you choose which fields you would like to merge. You can add a field at anytime before finishing the merging process.
- Rules. Provides a list of automated rules or questions to help save you time by handling these issues in the background, while you handle the more important things.
- Match Fields. This tool allows you to match up fields so that the information is interchangeable among different fields. Your data will update automatically without any extra work on your part. There is a button for this tool in the majority of the tools located in the Write and Insert Fields section.
- Update Labels. Brings your labels up to date with the latest merging settings. This tool is only accessible when using labels.
Preview Results
- Preview Results. Shows you what your merged document will look like.
- Find Recipient. Allows you to search for and preview recipient information.
- Auto Check for Errors. Opens a Checking and Reporting Errors dialog box prompting you to decide how you would like to be informed when an error occurs.
Finish
When you are done, click Finish and Merge, located on the right end of the Ribbon. You can also decide your method of delivery here.
Using the Mail Merge feature can be a bit tedious at times, but with a little practice you can begin margining documents and getting the most of your Word program in no time!