If you’ve ever tried to enlarge small, blurry images, you’ve probably understood the frustration behind it. But why does this happen? Here you’ll learn the reasons behind image pixelation and loss of quality, as well as some tips to help keep your images looking as nice as possible when sizing up.
Everyone who has worked with scanned images or imported high resolution images from their camera knows how easy it is to take a larger image and make it smaller. However, those of us who have tried to enlarge small or blurry images can tell you that it’s near impossible! But why does this happen? Here I’ll aim to explain why image quality tends to degrade when enlarging images, as well as some tips for keeping as much of your image quality intact when resizing.
Why Image Loss Happens
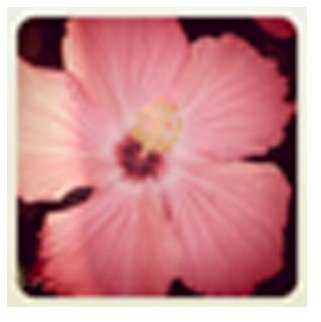
No matter what, taking a smaller image and making it larger is going to result in a loss of quality. This is because you simply cannot expect programs like Photoshop – or any program on the market – to be able to scale up the size of images accurately. It’s kind of like taking putty to copy newspaper comics. Sure, you can stretch it out for a bit and it looks okay, but eventually there simply isn’t enough ink left over and the image blurs. The fact of the matter is, is that these programs do not create new pixels of color, but expand the existing ones. This is why images result in chunky, blurry blocks of color, a process refereed to as “pixelation,” much like the image to the left which was sized up to 300x300 from 60x60. However, there are a few tips you can use to limit the amount of pixelation and quality loss when resizing your images, and we’ll discuss them below.
Start As Big As Possible
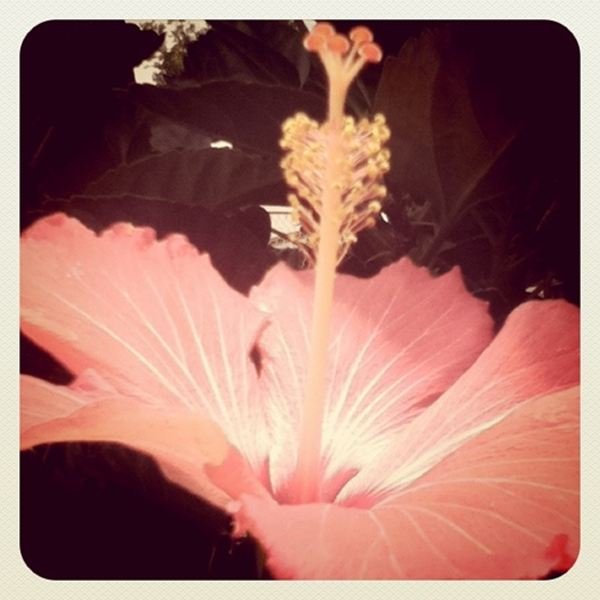
It’s important to start as big as possible. If you have multiple sizes of a file saved, the ability to take a large picture over a small one, or the chance to scan something in at a high resolution, make sure you do! Trying to get your file as close as possible to your targeted goal will insure that you have less of a leap to make to your desired file size, meaning that your image editing program won’t have to stretch your existing pixels as much. The example to the right was stretched from 600x600 from 500x500, and the loss of quality is only slight.
Only Resize As Much As Needed
Once again, this all ties back in with only having to make as much of a leap to a larger size as needed. There’s no sense in overstretching an image if you don’t have to. Only go as large as needed for your image. Sure, you might think that a graphic that is 500x500 looks better on your website, but stretching it to 300x300 might look a little better in terms of quality. Making these kinds of choices can greatly affect the way your images look, as well as the overall quality of your projects.
Use High Quality Images

It makes sense that you’re going to want to start with a high quality image before you begin sizing up, as trying to enlarge small, blurry images will only result in headaches. In terms of PPI, ideally you’d use something with a PPI of 150 or higher. Stay away from photographs taken by low-megapixel cameras – or worse – camera phones! This also means that you need to avoid resizing things like GIF images (such as transparent graphic elements for websites) and low-quality JPG images, which will degrade very quickly or stretch at strange intervals.
Reshade
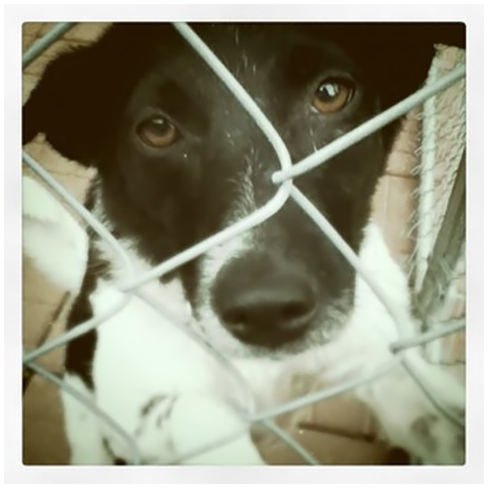
Reshade is a program that I’ve stumbled across a few times when looking for image editing solutions online. Reshade does a fairly good job of sizing up images with a one-click fix. This is a fantastic option for people who don’t have access to Photoshop, or for those of you looking for a quick fix alternative to using a ton of filters. While they claim to be a “lossless” image resizer - making a rather outlandish claim of being able to size up images 2000% with no loss at all - sizing up small images to large ones will still likely result in a noticeable reduction of image quality. Still, if you’re in a pinch, Reshade might be the option for you. The image to the right was resized from 200x200 to 480x480 with fairly pleasing results.
Know When to Walk Away
There are times when resizing an image isn’t feasible, and it will serve you well – and save you a lot of headaches – if you learn when to avoid this. Never resize smaller images for printed works, such as books, shirts, brochures, magazines, or catalogues. Enlarged versions of small, blurry images are a turn-off and will likely deter customers and prevent the sales of items with pixelated items printed on them. In the same vein, don’t bother resizing website graphics too much either, especially if they’re an integral part of your layout. If you resize an image and you have a hard time telling what the original image was, it’s a good indicator that you should probably find another way to work around it. However, resizing images to share on your favorite social network, your personal website, or send to your family across the country isn’t likely to be a big deal.
Credits & Tools
All information provided by Amber Neely who has six years professional experience in graphic design.
All images are various works provided by Amber Neely’s personal gallery.
Tools Mentioned:
Reshade, https://reshade.com/


