
Designing business cards in Adobe Illustrator has many advantages, including the vector capabilities. Once the card is designed, you will have to print it to hand out to others and promote your company. Printing business cards in Adobe Illustrator is simple and can be done with few steps.
Vector Art
Adobe Illustrator is vector-based software that is commonly used by graphic artists, desktop publishers and illustrators worldwide. The software is used for various documents including logos, websites and animations. It is also combined with other programs such as Photoshop to create print designs.
The main distinction between Illustrator and other software is that it is vector-based, which means the illustrations are based on mathematical equations. Points, lines and curves are drawn to represent images. Vector graphics are different than raster graphics because they do not use pixels and can therefore be scaled up or down without losing quality. This makes the software ideal for logos, which need to be smaller on business cards but much larger in the case of a poster.
With logos already designed in Illustrator, many artists will chose to design their own business card using Illustrator. An advantage is that Photoshop images can be imported into Illustrator to create sleek designs. Once the design has been created, the design must be printed. Although often designers may seek to have the design printed by professional printing shops, printing business cards in Adobe Illustrator is relatively simple to do yourself.
Printing Procedures
Printing business cards with Adobe Illustrator does not require any special procedure. Business card paper is sold at various office supply stores and can be used to print business cards. This paper is commonly sized at 8.5 by 11 inches and allows business cards sized at 2 by 3.5 inches to be printed. Two business cards are generally printed horizontally and the paper allows for 10 in total.
Step 1: Open a new document in Adobe Illustrator by clicking on “New” in the File menu.
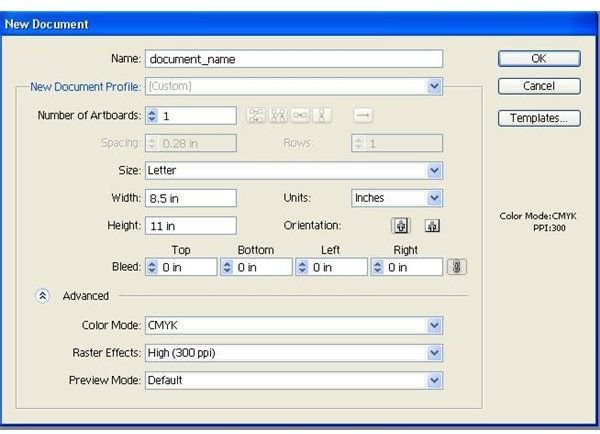
Step 2: Give your document a name of your choice. Select the size of the document by clicking on “Letter” and this should automatically put 8.5 inches and 11 inches in the Width and Height measurements. The orientation should already be set to Portrait, but should be changed if it is on landscape.
Step 3: Set up guides in Adobe Illustrator to represent the margins on your business card stock paper. Click and drag from the rulers on your artboard to create a guide. Drag the guide to the desired position by using the rulers. Determine the margins by referring to the instructions on the stock paper as they may vary by brand.
Step 4: Open the Illustrator document containing the business card. Select the entire business card and hit the “Ctrl”, “Shift” and “O” keys on your keyboard simultaneously to convert all the selections to objects. Click on “Ctrl” and “G” to group the objects on the business card.
Step 5: Copy and paste the business card from the document to the new 8.5 by 11 inches document. Place the business card so the left top corner of the card is flush with the right and top corner margin. The business card should be placed horizontally so it prints well on the stock paper.
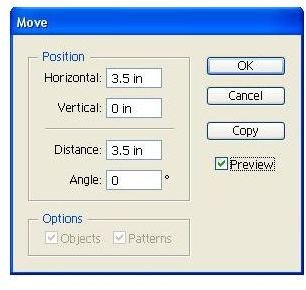
Step 6: Highlight the business card and navigate to the “Object” menu. Select “Transform” and then “Move” to move the object. Move the object 3.5 inches horizontally and leave the vertical option blank or at 0. Check the “Preview” box to view the document. Click on “Copy” to copy the business card and move it to the right of the first card. You should now have two cards on your page side-by-side.
Step 7: Highlight the two business cards and repeat the procedures in Step 6. However, this time leave the horizontal field blank and insert 2 inches in the vertical field. Click on “Copy” to now have four business cards on your page.
Step 8: Click “Ctrl” and “D” on your keyboard simultaneously to repeat the procedure in Step 7 until you have 10 business cards on your page.
Step 9: Print a test copy on a plain sheet of paper. Hold the test copy up in front of a stock copy to ensure that the business cards are printing correctly.
Step 10: Insert the stock paper into your printer according to the specifications on the stock paper, as it may vary with brand. Print the business cards from Adobe Illustrator.
Step 11: Save your Adobe Illustrator file as an .AI document by going to the File menu and clicking on “Save”.
Tip: If you are having trouble printing effects such as transparencies when you are printing business in Adobe Illustrator, you have the option to rasterize the artwork. This should be used as a last resort because rasterizing the artwork means the vector artwork will lose all vector capabilities. To rasterize, simply select your business card before importing it to the 8.5 by 11 inch sheet. Click on “Rasterize” in the Object menu to rasterize and then begin placing the cards side-by-side. Select a “High (300 ppi)” resolution and click “Ok”. Ensure that you have kept a version of your business card that is not rasterized.
References
Source: Author’s own experience
Image Credits:
Author’s images


