Shooting in the snow requires a little more patience and practice. From different exposure settings to finding the best backdrops, winter photography opens an entirely new dimension. So grab your snow boots, and get ready to head out for snowy adventures with your camera!
Winter photography can be extremely rewarding because of its unique nature. Falling snow and beautiful scenery create a winter wonderland for photographers. In this article, we will learn how to overcome some of the challenges that come with shooting snow pictures, as well as some tips and tricks to working in the elements and capturing the best snow scenes.
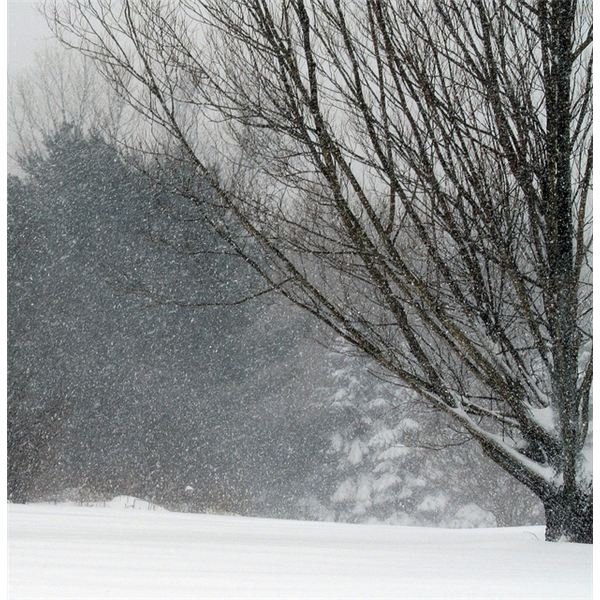
Image Credit: Snow Falling by lynn.gardner on Flickr
Getting Ready for the Snow
In all the excitement of winter photography , staying warm while outdoors is one key element often forgotten. The harsh weather can not only pose a threat to your equipment, but can limit your own mobility and endurance. This is why it is even more important to dress properly and take precautions in case the weather takes a harsh turn. Layers of lightweight clothing are preferred to reduce your weight load and keep you warm and dry.
Make sure to pack some lightweight gloves that are not bulky and work well with your camera. Wearing snow boots while shooting in the snow can help you navigate easily and find the ideal location to shoot. However, don’t wander off from designated spots and pathways. Snow can form the perfect trap as it layers up and camouflages the entire scene, causing you to forget your location.
You might also want to add sunglasses to your gear if you are planning to be outdoors under a clear sky on a sunny day. Sunglasses during winter sound a bit inappropriate, but the sun reflecting off a bright surface like the snow can cause a glare.
Protect Your Camera from Snow!
Snow is not the most ideal weather for your camera, but certain tricks can help you overcome its challenges. Keep your camera in a well insulated casing whenever you are not using it. If you like to hang it around your neck, make sure to put it under your jacket and close to your body. The warmth of your body will keep the camera warm, as well.
Cold weather will make your batteries drain faster. Pack some extra batteries just in case, and keep them in an insulated bag to make them last longer. Take special care when leaving a warm place or returning home, as the difference in temperature between the two environments can be extremely dangerous for your camera and equipment. This could cause condensation build-up, which can ultimately cause a lot of damage to the camera - especially when returning from temperatures below the freezing point. One trick is to put your equipment in a Ziploc bag so that the condensation builds up in the bag instead of the camera. Add a towel or paper towel to absorb the extra moisture, and make sure it is airtight. You might also consider gradually moving to a warmer place by leaving the equipment in the garage before moving it inside.
Exposure Compensation for Snow
If you have ever attempted to photograph snow, you might notice that your photos usually come out dark and grayish. This is a common occurrence due to the camera’s inability to distinguish snow from overexposure due to light. This is why you will see that your images come out darker, even in dim light or on overcast days. No worries! The easiest way is to adjust your camera’s exposure compensation setting is by adding +1.
If you would like to do this manually, or your camera does not provide an exposure compensation setting, you can adjust the exposure in the Manual exposure mode of your camera by modifying the ISO speed, the aperture, or the shutter speed, depending on the scene you want to capture.
Alternatively, shooting snow pictures in the RAW image format can give you a greater advantage, since you can adjust the settings afterward on your computer instead of tinkering with the camera settings while taking pictures. You will also appreciate the fact that you can do this in the comfort and warmth of your home, instead of spending extra time outside. This is especially helpful when the winter weather gets rough.
Also consider tweaking the different metering modes provided in the camera - like the spot metering, partial metering, or center-weighted average - and evaluative metering that determines exposure according to the AutoFocus (AF) point, even if it is off-center.
Lookout for the Highlights
Snowy scenes look particularly beautiful when all the areas are properly highlighted. This is hard to achieve because of the bright contrast that the snow itself creates in an image, blurring the other highlighted areas. Overexposing the shot to brighten the color of the snow risks losing detail in other highlighted areas. A simple trick to use in order to correct this problem is to apply the Highlight Tone Priority feature (HTP) available in most cameras.
You may also want to read the histogram as you playback your photos. Look for overexposed areas and adjust the exposure compensation by lowering it appropriately. For snowy scenes, the right side of the histogram should show more pixels than the left. If any part on the right is cut off, it is an indication of overexposure.
White Balance Setting
Your camera’s white balance setting is another important feature when it comes to shooting in the snow. Make sure to try the different white balance settings available on your camera, and choose the one that best matches your snowy scene. You might also be able to dial in the white balance yourself, depending on your camera giving you further control.
As mentioned earlier, if you decide to shoot in RAW, you can then change your white balance while editing the image on your computer as well.
Getting the Perfect Snow Fall Shot
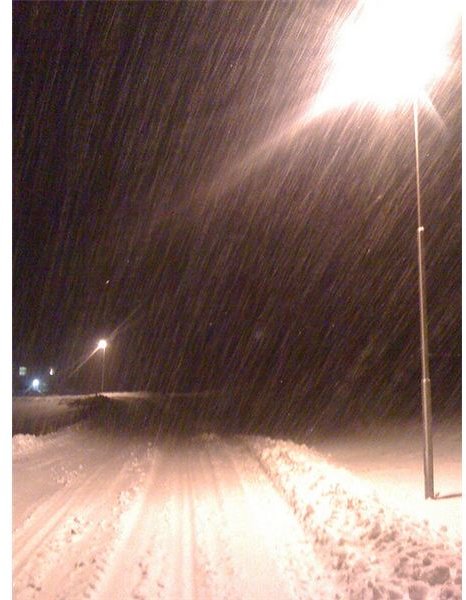
One of the most beautiful photos captured during the winter season is of falling snow. The white flakes of snow in front of a wintry scene create a timeless image. When capturing snow flakes, pay attention to your shutter speed to achieve different looks. Use a fast shutter speed to achieve perfect flakes of falling snow. Likewise, a slow shutter speed will cause a streaky effect like in the picture on the right.
Image Credit: Snow is Falling by Gunnar Hafdal on Flickr
A Bokeh of Snow Fall
To achieve a bokeh effect , keep your aperture wider to blur the falling snow. Combined with sunlight, this can create some amazing shots, as you can see in the picture above.
Focal Length
Capturing snow with a long focal length gives the snow a beautiful layered effect where you can see small snowflakes and bigger ones in the same image. Only see snow flurries? Just use a long focal length here as well, to capture a bigger area and more snowflakes.
Snow definitely brings some awe-inspiring scenes to photograph. With a few adjustments and preparation, you can achieve beautiful images without any frustration or dull images.
References
- Canon. “Quick Tip: Photographing Snow”, http://www.learn.usa.canon.com/resources/articles/2011/qt_photograph_snow_article.shtml


