
Layers help you change the look of your original photo, without actually changing that photo. So, how do you do this. Learn about editing layers and how to use layers in photo editing.
Why Use Layers
You’ve probably used the photo editing layers more than once in your life. Or, if you are a beginner, you’ve seen them on your toolbar. But, have you ever sat down and thought about what the layers do? Surprisingly, most people don’t. In this photo editing tutorial, we’re going to teach you how to use layers in photo editing and why you should do this.
When you use the Layers feature, you can manipulate a photo without actually changing the original photos. Basically, you are manipulating copies of the photograph or image, not the actual image.
Another important feature of layers is helping you blend together different colors, opacity or effects to create a whole new look.
Creating a New Layer
Depending on your software program, you may have to make the Layers palette visible before you can use it. Do this by going to Window and then Layers. This will bring up the palette. Once it is open, the first thing that you probably want to do is create a new layer. Generally to do this, follow the below steps:
1. Double-click on the background layer. If this layer is locked, click on the little lock on the right-hand side.
2. After you double-click the layer, it will bring up the New Layer dialog box.
3. Give your new layer a name, and select OK.
New layers are generally for adding backgrounds to images or adding items that don’t need pixels. Borders or frames are commonly added via the New Layer process.
Adding a Text Layer
Now, the New Layer selection is the simplest type of layer. You can also create Text layers if you want add text to your photos. To add text, click on the capital T tool on the Toolbar. This is the Horizontal Type Tool. Then, follow the below steps:
1. Select the font that you want to use.
2. Select the font size
3. Go to the area of the photograph where you want the text.
4. Type your text, and hit enter.
5. Use the Move Tool to move the text around. Once done, let go of the layer.
Using the Adjustment Layer Feature
Another important layer feature is the Adjustment Layer. The Adjustment Layer adds different effects to your image, without actually changing the image. The changes are restricted to the layer itself. If you don’t like the way that the Adjustment Layer looks, then you simply delete it.
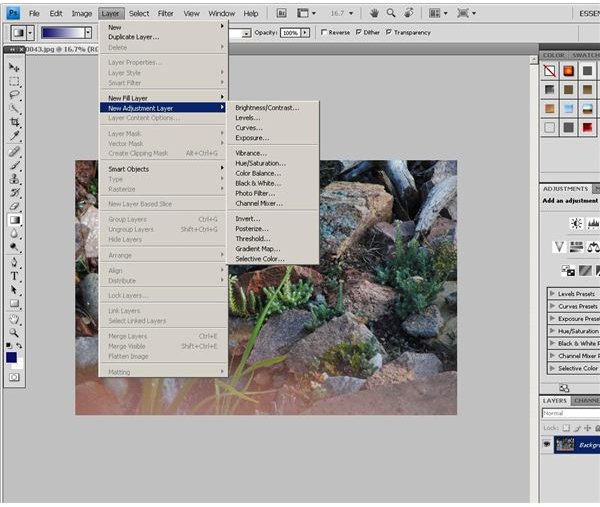
To add an Adjustment Layer, open up a New Adjustment Layer . The actual name of the tool will vary by software programs. Select the type of layer that you want to use. For example, use the Brightness/Contrast layer to change these settings on your photograph. To further adjust the layer, double-click it, and manipulate the settings. Then, press OK.
If you want to add a fill to your image, go to the New Fill Layer. Then, pick if you would like a Solid Color, Gradient , Pattern or similar type layer. Use this as a background for another image or project.
Do you have more tips for how to use Layers in photo editing? Be sure to visit the comments section below.


