Time to fire up Lightroom and get the pictures on your computer. Avoid one critical mistake and life will be sunshine and lollipops for your digital photography sessions.
Lightroom for Parents - Importing
Probably the single most important thing any digital photography software can do for a prolific photographer parent is to get those images off the camera and onto the computer in a way that makes them easy enough to find later for organization, editing, and printing. Abobe Lightroom does this extremely well.
By default, Lightroom comes set to put your photos in My Documents -> My Pictures. This is a good place to keep your pictures, but what if you want them to go somewhere else?
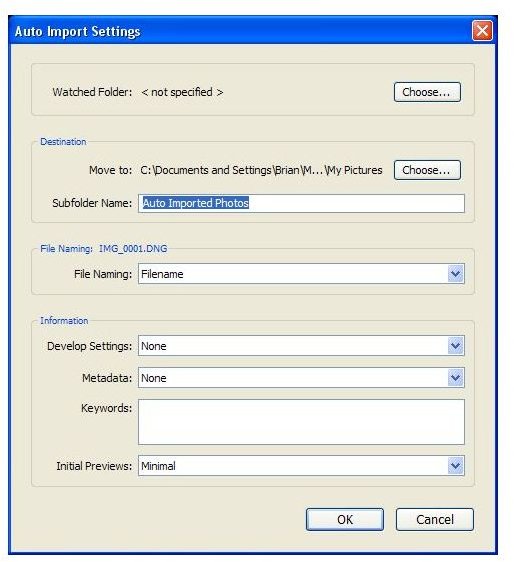
One of the things that make Lightroom so useful for parents is that it is very customizable. While some of these settings are not very useful for the parent, pretty much every setting that you will need is there for your tweaking pleasure. Under the File Menu there is Auto Import Settings. Make changes here and Lightroom will remember and do it your way from now on. So, you want your photos in D:\Family Photos. Just change the setting and you are off.
Directories
Now, here is your chance to mess up everything. When you import your photos, Lightroom will try to organize them in subdirectories or folders by date. It will use whatever format you want, but you do not want to get creative here. Many parents make the mistake of changing the date format. This is an understandable impulse, so I want to chop off this thinking before we get started.
Lightroom will want to use a date format like 2008-12-07. Which is the YEAR-MONTH-DAY format. People hate this because it isn’t how you are used to using dates. If this is your first year taking digital pictures or using software smart enough to group them for you in folders by date, you may have an urge to change the date format to the more familiar, 12-07-2008. This looks good on paper, and you will be happy with it for exactly 12 months. But, come next year, your folders will start to look like this:
12-07-2008
12-08-2009
12-11-2008
12-12-2008
12-14-2009
12-22-2008
12-22-2009
12-23-2008
12-23-2009
See the nightmare? If not, look at it after two years:
12-07-2008
12-08-2009
12-08-2010
12-11-2008
12-12-2008
12-13-2010
12-14-2009
12-15-2010
12-22-2008
12-22-2009
12-22-2010
12-23-2008
12-23-2009
12-23-2010
See how hard it is to pick out your photos by date? So, keep the YEAR first.
Next, you might be tempted to change the MONTH format to JAN or January. Again, this is a bad idea from a sorting and finding standpoint. Yes, some programs are smart enough to know that Jan comes before Feb, but most just go alphabetically which means your Feb photos come before your Jan photos all of which come after your April photos. For the same reason, you need to stick with the two digit month, that is, 04 not 4.
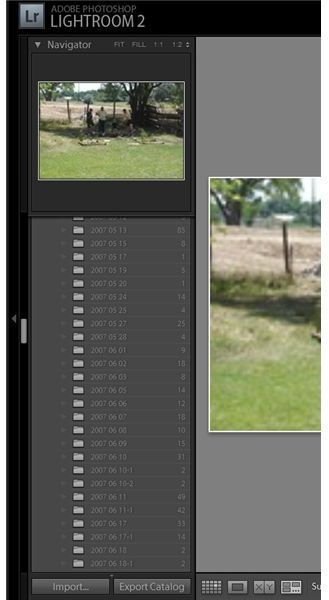
Then you get nice pretty directory layouts.
I make a big deal out of this, because ideally, once you set this option you will never change it. Inside Lightroom you can group, sort, and reorganize all you like. Out in file folder world though, you should leave your pictures alone. This helps for finding photos with a program other than Lightroom (like that Christmas card program you love) and also for backing up your photo collection.
Currently, my photos occupy over 50GB on my hard disk. Do I really just take that many photos? No. I started out making the year mistake. Then, I started making folders with copies for editing so I didn’t mess up the originals. Then, I started copying photos to other directories to resize them so they could be emailed. Long story made short, I have duplicates scattered all over my hard drive. The problem is that I can’t delete any of them because I don’t know which ones are the “real” photos and which ones are the copies. So, it takes several DVDs to backup my photos. By using the recommended file structure and editing your photos in Lightroom, you’ll save yourself a lot of this trouble.
Other Settings
Rounding out the Import settings you can generally trust your instincts. The one thing you want to be careful with is Develop Settings. These get applied to every picture being imported. So, if you are sure that your digital camera always needs a certain adjustment, and you are sure that you will never import photos from another camera, then feel free to use those settings. Otherwise, make your changes inside.
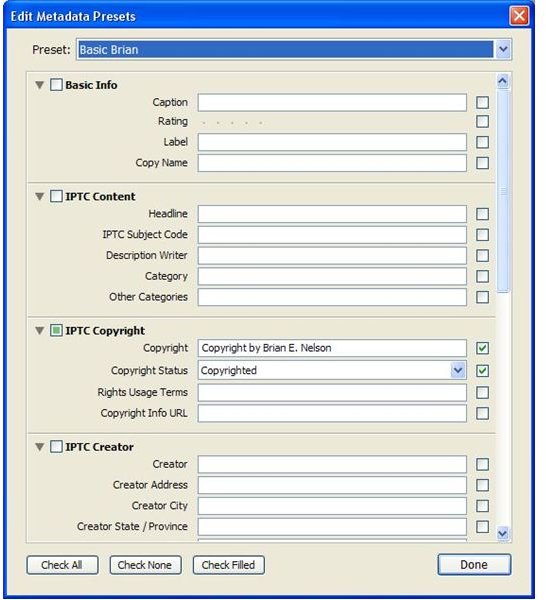
The Metadata setting can be a nice way to just get your name on your pictures. I have mine set to do nothing but put my name on my photographs in the Copyright spot. Does that provide me any protection from unscrupulous weasels? No.
Does it mean that no one will ever get a picture file of mine and accidentally think it was theirs? Yes.
Keywords can be useful to set here if you only have pictures of one thing on your camera or memory card. For example, if you went to the zoo with an empty card and you downloaded your pictures before you took a picture of anything else, you can enter Zoo in the keywords field and all of your photos will be tagged with Zoo automatically. As a parent, you will generally have more than one thing being imported at a time, so most of the time you won’t use this.
Enough already. We’ve got our pictures on the computer. Let’s do something with them!
Up Next: Doing something with them.
This post is part of the series: Adobe Lightroom For Parents
In a world with five thousand digital photography programs, how come it seems like none of them are made for parents? Actually, Adobe Lightroom is perfect for the parent photographer. It’s just that all the manuals are not. Get everything you need for your digital photos with Adobe Lightroom.


