Clovers, both of the three-leaf and four-leaf variety, make great embellishments for many digital scrapbooking projects. This guide will detail how to make your own clover embellishments in Digital Scrapbook Artist that you can use for St. Patrick’s Day or general Irish themes.
Digital Scrapbook Artist Shapes and Embellishments
Digital Scrapbook Artist comes with a several built-in shape tools that can be used to create a number of designs. While there may not be a clover among these shapes, it’s not too hard to create one with the tools that are already there – even if you’re not all that comfortable with drawing and design.
There are a few different techniques that can be used to create a clover in Digital Scrapbook Artist, but I’m going to focus on a particular one that involves using the heart shape to make the leaves of the clover. For this tutorial, I’ll be using Digital Scrapbook Artist 2 , but a similar technique can be used in other digital scrapbooking applications . When completed, the clover can be used to dress up your digital photos for St. Patrick’s Day or any other time when you want to add a bit of luck or “Irishness” to your scrapbook page layout.
At the end of this article, we’ll also provide a link to a download file that contains several different clover images that were created using this technique. You are welcome to download these free PNG images for use in your own personal digital scrapbook projects.
How to Make a Clover
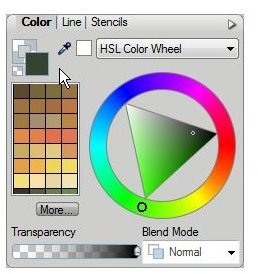
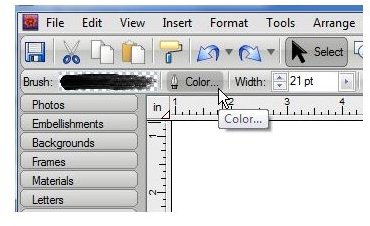
Step 1: Although you can perform this step later, the first thing I like to do is pick the colors that I want to use. Okay, I’ll admit that I usually change my mind and alter the colors several times during the creation process, Still, I like to pick some scheme as a basis to start with so I can actually see the clover as I’m creating it.
To pick your colors, go to the Color tab and either select a shade from one of the built-in palettes or define your own. For now, I am selecting a dark green color from the Earth palette for the Fill and leaving the Line transparent since I want to do something special with the clover leaf edges in a later step. (Click any image for a larger view.)
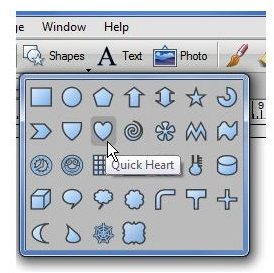
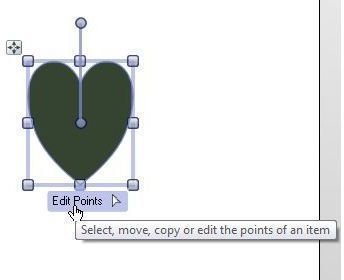
Step 2: For the next step, I want to create a single clover leaf. Clover leaves can come in many shapes and sizes, but a standard leaf looks a lot like a distorted heart shape. So I’ll start out by selecting the Quick Heart from the Shapes tool.
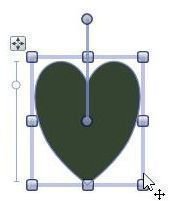
Then, I’ll use this tool to draw a basic heart on the scrapbook page.
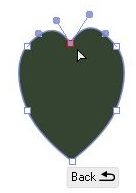
Step 3 (optional): Although you can skip this step, I like to make a few modifications to the heart at this point so that the dip between the two hills at the top of the heart isn’t quite so dramatic. To do this, first select Convert to Curves from the Tools menu.

Then, click on the Edit Points option shown when the heart shape is selected.
Now, select that point that is situated on the “pinch” of the heart (see the screenshot below). Shift this point upward a little bit and then use the handles (the two lines that extend from the point) to smooth out this pinch and make the heart look more leaf-like.
If you haven’t adjusted the points on a shape before, it may take a little practice to get a result you like – and it may even seem a little frustrating at first. But, don’t give up! Also, don’t worry about the shape looking perfectly symmetrical or try to make the leaf look just like the screenshot above. That’s one of the great things about digital scrapbooking – the so-called “imperfections” of any embellishment or drawing actually add both character and personalization to the final result, making the design truly your own.
When you’re done editing the point, click the Back option located near the object and it will return to Select mode.
Continue on to the next page to find out how to add some texture to the leaf’s edges, create a stem for the clover, and put the whole package together. Also included are images of several different possible clovers that you can create using this technique.
Adding Some Texture to the Clover Leaf’s Edges
To read this tutorial from the beginning, return to page 1.
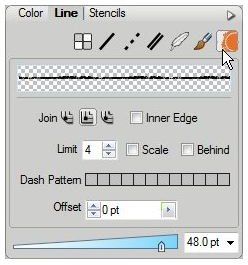
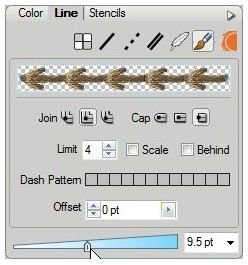
Step 4: Now, it’s time to have a little fun with the edges of the leaf. Go to the Line tab and click on Edges, as shown in the image below.
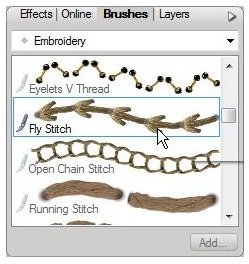
Next, go to the Brushes tab and select a pattern to use as an edge. As an example, I’ll pick the Fly Stitch from the Embroidery category.
Return to the Line tab and adjust the size of the brush (as well as any other attributes you wish to modify) to get a look and feel that is appealing to you. Here, I’ll lower the brush width so that the result looks like a small, close stitch.
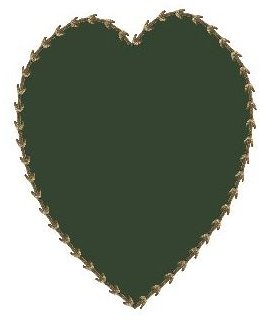
At this point, I’ve created one leaf of the clover. The screenshot below shows the progress so far.
Step 5: To make more leaves, select the one you’ve just created, and then copy and paste it. I’ll start out by making a three-leaf clover, so I will make two additional copies of the leaf.
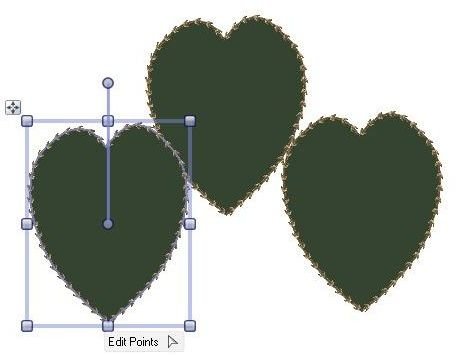
Step 6: Use the handle of the object to rotate each of the side leaves. As mentioned before, don’t worry about being too precise or perfectly symmetrical here. Just rotate each leaf so that the final result will have the general appearance of a clover.
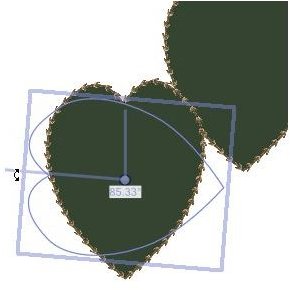
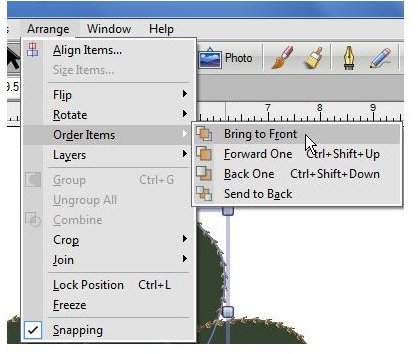
Step 7: After rotating, drag each leaf into the place. At this time, you may want to rotate individual leaves just a smidgeon more to get a placement that you like. Also, I like to select the top middle leaf and change the arrangement so that it is on top of the others. You can do this by selecting the leaf, going to the Arrange menu, and choosing Bring to Front from the Order Items set of options.
At this point, our clover looks like the image below.

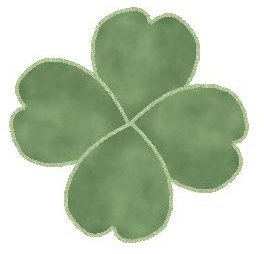
Note: If you want to create a four-leaf clover instead, just make another copy of the leaf, rotate it, and place it in the right position.
We’re almost done now! The only thing left is to create a stem for the clover.
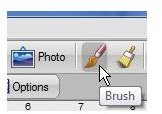
Step 8: There are a few different routes you can choose to make a clover stem, but I’ll show a quick and easy way using the Brush tool. First, select the Brush tool from the Digital Scrapbook Artist toolbar.
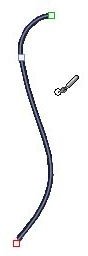
Use the brush to draw a simple curve anywhere on the scrapbook page.
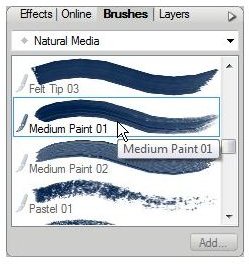
With the curve still selected, go to the Brush tab and pick a brush that you’d like to use. For this example, I’ll pick Medium Paint 01 from the Natural Media collection.
Now, go up to the Brush toolbar and modify the settings for Color and Width to get an appearance that will go well with the clover you created.
The screenshot below shows all of the components we have created so far.
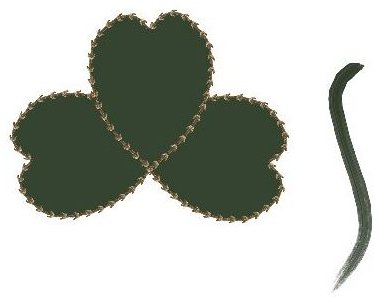
Step 9: Drag the newly created stem and place it in the proper position under the clover leaves. Also, while the stem is selected, make sure to use the Order Items feature and apply the Send to Back option to the stem so that it is underneath the leaves.
Here’s a view of our final image.

You can use this technique to create several types of clover images and embellishments in Digital Scrapbook Artist 2. A few different designs, all created using this same method, are shown below. A zip file containing the PNG versions of each of these images is available as a download in the Digital Photography Media Gallery. Feel free to download the images for your own personal projects or to use as an aid when creating your own clover embellishments.
Link to Download Page: Free Clover Image Files in PNG Format