Black and white photography is gaining popularity in the portrait market. Learn some photography techniques for creating black and white fine art portraits.
Black and White Fine Art Photography
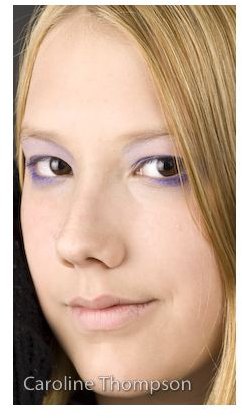
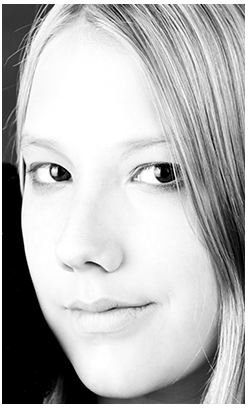
Black and white photography can create more drama and interest in a portrait. In black and white photography, the character and lines on a face are more thought provoking than just signs of a person’s age. The science behind color is vast and it will not be discussed here, but color is more emotional than black and white. Black and white imagery causes our minds to fill in the gaps and interpret the subject. Therefore, it is more character defining than color is in portraits. Look at Figures 1 and 2 below, these two images are the same image except one is black and white and the other color. The girl looks like a young teenager you would see in most American towns in the color photograph. In the black and white photograph, she looks more thoughtful, intense and the attention is on her eyes and expression more than the color of her eye shadow.
The world in black and white is more abstract. When looking at the subject and surroundings, focus on the geometric elements between the subject and with the subject. These are great elements in an image or portrait.
Figures 1 and 2
Tips for Shooting Black and White Portraits
Lighting the Set
For black and white portraits, the lighting needs to be used differently to create a dramatic mood to the portrait. The mid tones will give that soft ethereal feel, the blacks more drama and the whites that glowing softness on the edges. Each portrait will use light differently. The important thing in black and white portrait photography is to evaluate the subject and decide what type of lighting will best describe their personality. For instance, with babies, soft white light will accentuate the softness of the babies’ skin and newness of life. Babies are soft, therefore the light should be soft. With wizened old men, more drama and contrast to show the lines of knowledge that cross their brows from years of learning.
Using Highlights
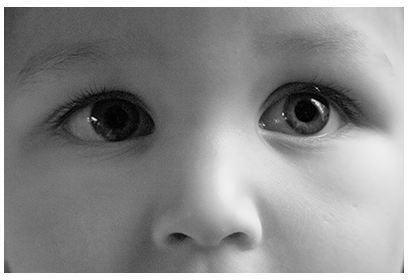
By using highlights, skin can be softened and smoothed. With the key light , use a higher setting to blow out some of the brighter sections of skin on the forehead, cheeks and chin. This will soften the areas and give a glowing look. (Note: This does not work well in color) In the studio, you can set all the highlight points. If shooting outside, look for light falling though trees as a highlight spot. Position the subject so the light falls directly on specific points on the face or cheek. (See figures 3 & 4)
Find Sharp Contrasting Light
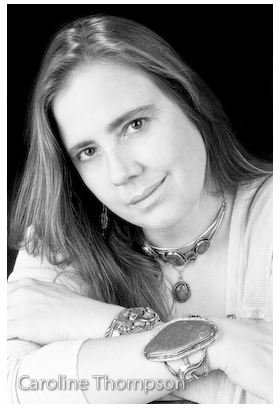
In the studio, light can be moved to create contrast and shadow depth. When shooting outdoors, look for contrasting light in shadowy areas with bits of sunshine seeping through the shadows. This will give the effect of spots. Use direct sun to sidelight or for profile shots. Separating the whites and blacks with a little mid-tone gray is great for creating intensity and drama.(Figures 5 & 8)
Soft Light
For subjects that need a softer effect or dream like quality, use soft boxes for all lighting. By using light in the mid-tone range, this will cut down on contrast and shadow detail. Using soft boxes and reflectors to cut down on contrast can soften the face and reduce the appearance of lines. Combine the use of highlighting and using soft light to reduce shadow detail and the images can be amazing. This softens the appearance, but with just enough contrast to define the face. (Figures 6 & 7)


Clothing and Make Up
For contrast or highlights, clothing will be important in the overall look. Stay away from white clothing. When looking for drama with lots of black area, browns and black shirts are great. Medium gray, blues, purples and rich greens are great for mid tone color that separates the skin from the clothing. These colors are also good for soft portraits. For more drama black, midnight blues, browns and reds work best. For light colors and highlights light blues and any pastels will work. You can always work with the clothing tones in the imaging process also. Texture is always a great thing to add to any portrait so look for clothing with texture or weaves. Make up needs to be suited to the image. Dark lipsticks will turn the lips an unnatural shade in black and white portraits. Gloss or flat lipsticks will give different effects. For women, mascara, eye shadow and blush are important to create texture and tone on the skin.
Camera Settings
Last but not least, the photographer will need to decide whether to shoot in black and white and avoid the conversion process or to shoot in color. If shooting in color, setting the camera to RAW mode is best. This will record all the information without losing the detail in the highlights. Just a note, in digital when the camera is set to shoot in black and white, the camera will throw away some data.
Summary
Light is the photographer’s paintbrush. Use these lighting techniques for beautiful black and white portraits.
- With black and white portraits just remember to suit the light to the subject.
- Use highlights to soften and define skin texture.
- Create richness by using contrast and enhancing the black tones
- Use contrast by sharp lighting and strong shadows to create drama and interest.
- Use soft lighting and mid-tone grays for a soft feel to your portrait
Black and white portraits make beautiful art prints. Consider the quality and texture of the paper that they are printed on. Fine art papers are the best suited for black and white portraits.


