
Learn the basics to photo editing in Corel Painter Xi. Learn how to correct color, lighting, exposure and contrast problems very easily in any photo you like.
How to Make Each Photo Beautiful
Many times I am complimented on my photography, and just as often I am asked, “How do you get pictures to turn out so beautifully?" I am going to let you in on the secret: I have Corel Painter. I would consider myself an amateur in digital photography. I understand basic principles and how to use the features of my cameras, but my photography very rarely comes out in professional quality. I have just mastered basic photo correction, or photo editing in Corel. Here are some tips to help you do the same.
Open the File
Select Your Picture
Go to File-->Open to select the picture you’d like to edit. You should already have it loaded onto your computer, and hopefully you remember where you put it. When you find the photo, double-click to open it.
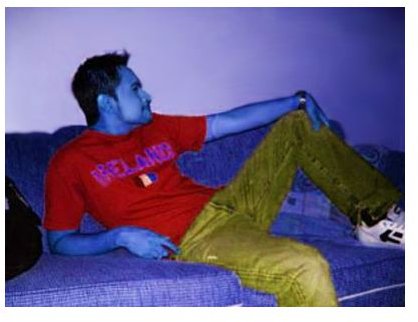
Here’s The Photo I’ve Chosen:
Photo Editing Process
Apply Underpainting Options
Go to Window–>Underpainting to open the Underpainting menu box. This box contains a lot of features you can use, but for basic photo editing, you normally only need to use Brightness, Contrast, Hue, Saturation, Value, and Smart Blur. Corel Painter uses slider bars for these options to easily navigate, and you can see what the change will do your photo instantly.
Brightness and Contrast helps give your picture better lighting and mood, and can either mellow a photo or up the dramatic effects of the photo.
So for my particular picture, I want to beef up the contrast just a little, and lower the brightness slightly. I play with the sliders for these two options until I decide I am happy. I settled for 12% more contrast, and -6% brightness, and added a very slight blur of 7%. I like lighting in my photos to be a little bit dramatic, so I always lean to that side when I am editing. This picture doesn’t need a whole lot of that feeling, though, so I will try to go easy on it.
My Edited Photo:

The Basics of Hue and Saturation
Hue will change the color palette of your photo, while Saturation will either amp up or dull down the intensity of the colors. You can lower it to a black and white scheme, or raise it to the point of an eyesore.
Some pictures turn out grainy, and for that problem you would use the Smart Blur Option. This will smooth out the grainy bits. But don’t go too crazy with it, or you can end up losing all detail in your photo!
Value will add more white to your photo, or take it away. I tend to use this option only for photos with way too much white in them due to over processing or bad lighting. This can be a tricky option, but you are not committed to any of you changes quite yet!
Fun With Hue and Saturation
Finishing Your New Photo
If at any point you decide you are not happy with the changes you’ve made to your picture, you can change all values back to zero by hitting the Reset button just below the slider bars. Or you can simply return one or two sliders back to the zero value to reset just them. Once you are happy with the changes you’ve made, you can hit the Apply button.
The other options in the Underpainting box are Color Scheme, Photo Enhance, and Edge Effect. The options can be helpful if you’d like to go beyond basic lighting and color correction, and want to get a little more artistic with your photos.
Color Scheme contains filters that will make your photo’s color palette look a bit more like a painting or drawing. They will not change lines or anything else besides color, value, and contrast, so sometimes they will look a little odd. Mostly they are used when you decide to use Corel Auto Painting feature.
Photo Enhance is designed to be an easy one-stop shop for editing your photo. Rather than playing with the slider bars, you can simply select Lighten, Darken, Higher Contrast, etc and the computer will put in automatic values. I normally do not like these values, but many people find it easier than the sliders.
Edge effect simply adds a frame around your photo. The options are Rectangle, Circle, or Jagged and then you can set the size of each frame below the drop menu. These are handy if you plan to use the photo in a flyer, invitation, or scrapbook and you’d like the picture to bland into its surroundings seamlessly.
Photo editing in Corel Painter is a very vast subject. Beyond these simple “photo correction” steps, there are endless possibilities. Have fun mastering these basic steps, and then you can start playing the Auto Paint feature and creating works of art very quickly and easily!


