If you’re new to PhotoPlus or have only used the photo editing software to make minor changes to digital photographs, you may not be familiar with all the powerful options that become available with the use of layers. Read on to find out more about layers and their uses in PhotoPlus X3.
Explaining Layers
One of the quickest ways to distinguish a full-featured photo editor from a basic cropping and resizing tool is to check to see if the application offers layer support. If you plan to buy a photo editor, make sure the software you’re considering supports full use of layers before making the purchase. Even if you don’t think you’ll use the feature right away, it’s something that you will probably eventually use, especially if you take photo editing projects seriously.
A lot of people tend to shy away from edits that require use of layers at first, because the concept sounds new and complex. Actually, using layers isn’t that complex at all, but – just like everything else – it will take some practice to learn how to get the most of them.
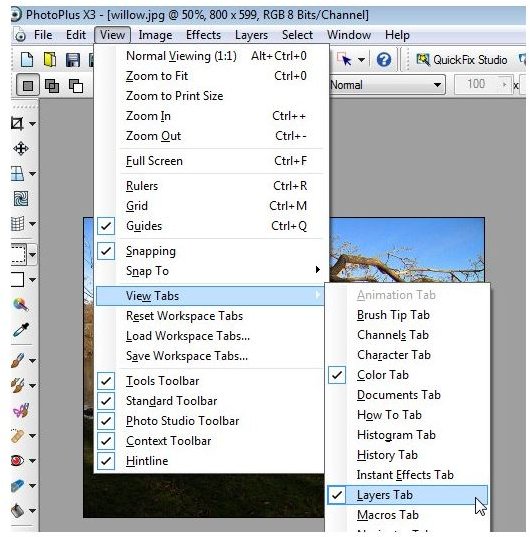
PhotoPlus X3 offers full layer support along with some additional layer features that can be a great aid when editing digital photos. Before we go into any more detail about the different layer options and their uses in PhotoPlus, it’s a good idea to make sure that the Layers Tab is visible in the PhotoPlus working area. If it’s not, you can toggle this tab on by going to the View menu on the main toolbar of PhotoPlus, selecting View Tabs, and making sure there is a check next to Layers Tab as shown in the screenshot below. (Click any image in this article to see a larger view.)
With the Layers tab visible and an image open in PhotoPlus, you should see a portion of your work area devoted to a panel that contains information on the layers in the photo as shown in the following image.
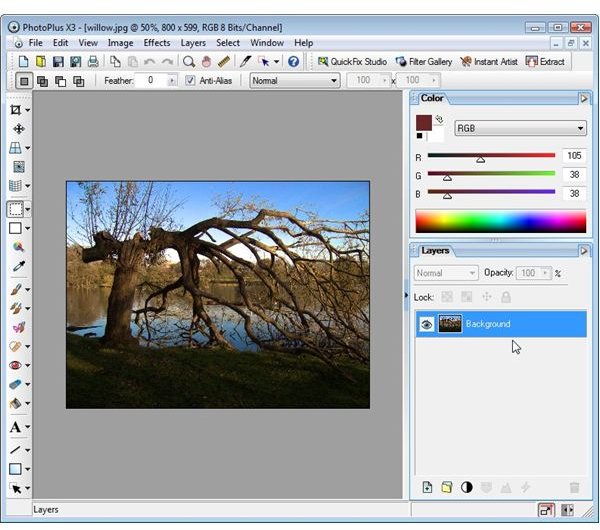
Note that a single digital photo in JPEG format will contain a single background layer when it is first opened in PhotoPlus.
If you want to convert this background layer to a full standard or filter layer, right click on the layer in the Layers tab.
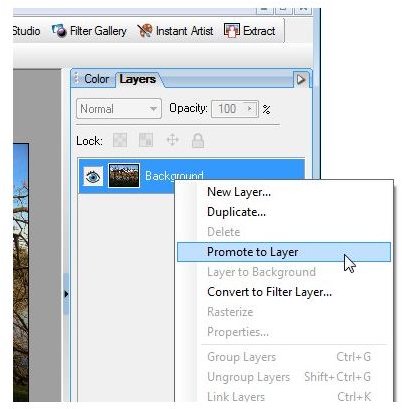
Here you can choose the Promote to Layer option to convert the background layer into a full standard layer, or you can select the Convert to Filter Layer if you want to apply a special effect. Note that you don’t have to convert a layer to a filter layer before applying an effect, but it is generally a good idea. We’ll talk more about that in the next section.
Types of Layers in PhotoPlus
PhotoPlus X3 classifies layers into six different categories. Here’s a basic description of each type.
Background Layers – If your image only has a single layer, that layer is generally designated as the background layer when viewing the image in PhotoPlus. Although this is the default layer type for images, background layers have some limitations. As the name suggests, there can only be one background layer for any photo editing project and that layer must be on the “bottom” or beneath all other layers. It’s usually more advantageous to convert a background layer to a standard layer before performing any type of edits on the file.
Standard Layers – A background layer is really a special type of standard layer that can’t be moved around or have certain effects applied to it. A standard layer is just a “slice” of the image that contains one or more parts of the entire photo. For example, you may have an object that you want to add to an existing photo. The existing photo could act as the background layer and you could add the object to a new layer. The nice thing about standard layers is that they can be moved around, added, or deleted without affecting the rest of the image. Other photo editors often refer to this type of layer as a raster layer, since they contain raster data .
Shape Layers – A shape layer is a type of vector layer that contains lines, shapes, or other type of vector drawings added to an image. For instance, if you want to add an arrow pointing to some object in a photo, that arrow would reside in its own shape layer in PhotoPlus. This makes it easy to change attributes about that shape without affecting the rest of the image.
Text Layers − A text layer is another type of vector layer that is very similar in concept to a shape layer. With this type of layer, you can add text to an image, keeping it separate from other components and easily editable.
Adjustment Layers – An adjustment layer allows you to make corrections to areas such as lighting and saturation without changing the original background layer. This is a particularly nice type of layer to use if you want to experiment with different settings in order to achieve a certain artistic look but also want to be able to get rid of these changes at any time. You can still make adjustments to other types of layers, but then those corrections are tied to whatever layer you use. With an adjustment layer, you can “move” your corrections between other layers so that some elements of the entire final image are affected and others are not.
Filter Layers – A filter layer is similar to an adjustment layer in that it allows you to apply certain filter effects to an image without making changes to the original layer. To use this type of layer, you generally duplicate the layer that you want to apply an effect to, convert it to a filter layer, and then apply the filter. As with adjustment layers, filter layers let you experiment with a whole range of effects that you can delete at any time without losing your original image.


