
The holidays are just around the corner. As opposed to running around like crazy trying to find the perfect gift, why not just make one for your friends and family! Learn how to create a keepsake photo ornament today!
The holidays are a special time for everyone.But, what do you get for the family member or friend who has everything? Well, how about a homemade DIY photo ornament.It’s something that they won’t be able to get anywhere else.
There are two ways to make photo ornaments.One way is to print out your favorite photo on glossy photo paper and cut it up to make an eye-popping ornament.
Photo Ornament One
Materials:
- Glossy photo paper
- Scissors
- Hole puncher
- Two paper fasteners
- Colored yarn
Here are the steps:
1. Print out your photograph on glossy paper, and color the back of the photograph with a marker that is a complimentary color to the photograph. You should pick a photograph that has a pattern or has a consistent color scheme.
2. Cut your photograph up in into one-half wide strips.If you have a 4X6 photograph, this should equal about ten strips.
3. Grab a few strips, and line them up so that they’re pretty even.Punch a hole in the top and bottom of the strips. Continue this until all the strips have holes.
4. Now, you need to give your photo pieces some contouring. Stack all the strips, and bend them gently. Do this until the strips keep their roundness.
5. Arrange your photos so that it’s in order, and then restack them. Grab your paper fasteners, and secure each end of your ornament.
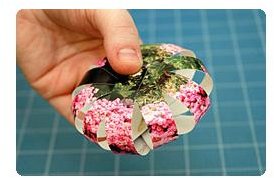
6. Push the pieces around the fasteners until they create a spherical shape.
7. Bend your ornament as needed to create a more spherical shape.
8. Cut a piece of yarn three to four inches long, and tie it around the top fastener.
Now, you can hang your new holiday ornament on your Christmas tree.
Photo Ornament 2
The next way to create a photo ornament is to use an existing, clear, glass ornament, and stick a photo of your choice it in.
Materials:
- Clear, round ornament
- Matte Photo Paper
- Clear-drying adhesive
- Thin brush
- Glitter
- Colored Sharpie
Here are the steps:
1. Remove the flange from the top, and place it aside. Clean your ornament out with a little bit of chlorine bleach to ensure that

mildew won’t form.
2. Print out a favorite photo. Cut the picture until it fits inside your glass ornament.You may want to roll the picture up and stick it in the ornament before you commit to see what the best cut will be.
3. Cut out your photograph and put a little bit of the clear adhesive where you would like your photograph to go in the ornament.
4. Use the brush to position the photograph in the ornament.
5. Add more adhesive (but not too much!) to the ornament, and use the brush to paint some of this adhesive to the back of your ornament. Then spread the rest around the rest of your ornament.
6. Add glitter, and shake up your ornament.
7. Shake out any excess glitter, and replace the flange.
8. On the back of the ornament, carefully write the names and date of the picture so you’ll always remember who the people in the picture are and when it was taken.
And, your ornament is ready to be hung on the tree!


