If you have a favorite picture that is old or damaged, learn how to restore it so you can print a new picture. Here are some easy steps to learn how to restore damaged pictures in Photoshop.
Restoring Damaged Pictures In Photoshop
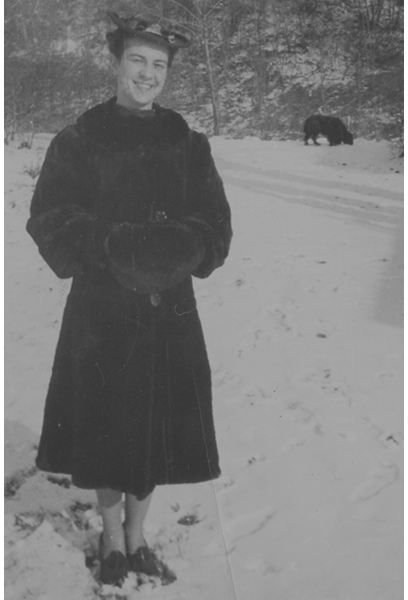
Here’s your chance to take all those old family photographs out of your drawer, restore and print them just in time for the holidays. Old family photographs make great Christmas gifts, especially to moms. Old photographs are moments in time captured and saved for the future. Unfortunately, photographs deteriorate with time and exposure to the elements.
This tutorial will walk you through a simple technique using the History Palette. For old color images and images with extensive damage, look for an in-depth look at photographic restorations.
Scan Your Image
The first step is to get a high-quality, high-resolution scan. This article assumes you already have the image scanned. If you are unsure how to scan, take a look at one of Bright Hub’s tutorials on scanning tips for the beginner .
Scan your image at 300 dpi and make sure the image is in RGB. If it is not, choose Image > Mode > RGB from the Menu bar. If your scanning software doesn’t automatically open in Photoshop, open the image in Photoshop and save as a copy from the dialog box. (Figures 1 & 2) Save your image as a TIFF file.
Now you are ready to start restoring the image.

Working With Channels
In the Channels’ Palette, take a look at all the channels and see which one has the most information. Make a note of the best channel. You will need this information later on.
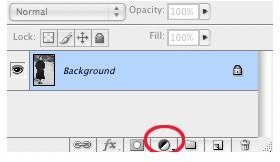
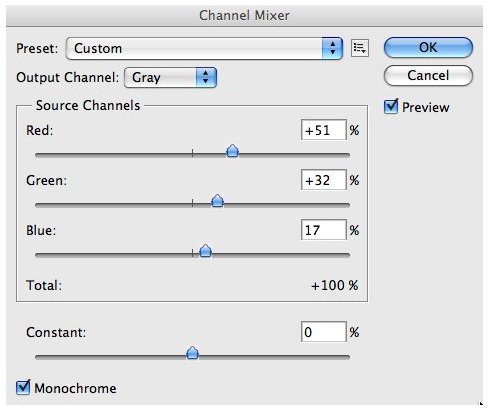
Next, in the Layers’ Palette, click the New Fill Button at the bottom of the palette (Figure 3) and choose Channel Mixer. In the dialog box select Monochrome. The Red Source Channel will be at 100. Now, take the channel that had the best tonal information and move the slider so that it has the highest number. You will need to move the other sliders and work with the image till you get the best overall improvement in your image and the numbers add up to 100. (Figure 4) Click OK.
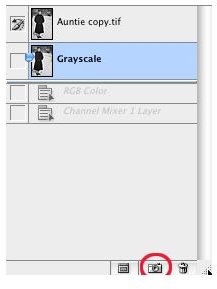
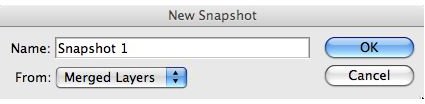
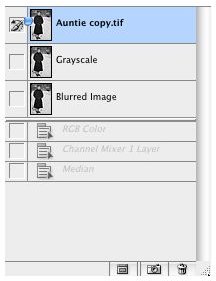
Next, click the Snapshot icon on the bottom of the History Palette. Rename your layer Grayscale. Or right click the last layer (Channel Mixer layer) of the History Palette and select Merged Layers from the pop up menu, click OK. This saves the grayscale image for later. (Figures 5, 6 & 7)
Eliminate Dust And Scratches
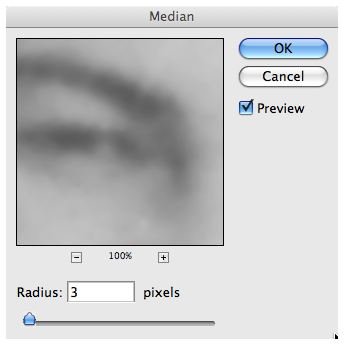
Select the Background layer in the Layers’ Palette and choose Filter > Noise > Median. In the dialog box set the radius to 3 or 4 depending on the image. You want your image slightly blurred. (Figures 8 & 9) Right click the last item (Median) in the History Palette, select Snapshot and in the dialog box rename the layer Blurred and select Merged Layers in the drop down menu.
Now, we will use the snapshots along with the History Brush tool to reclaim the lost detail while keeping the dust and scratches smooth. Select the History Brush Tool from the Tools Palette. (Figure 10) Then set the brush to Soft Light on the Tools Options’ bar and change the Opacity to 30%. (Figure 10) Next, on the History Palette, click next to the Grayscale Snapshot, this will make the Grayscale Snapshot your source for the History Brush. (Figure 12) For the History Brush, select a medium soft round brush to paint the image.
Go over the image reclaiming detail, but avoid the areas with dust and scratches.


Touch Ups
The majority of spots and hairline scratches should be smoothed out. There still may be some spots and deep scratches you need to remove. To clean up the remaining problem areas, make a new layer in the Layer’s Palette and rename it Touch Ups.
On the Tools Palette, select the Healing Brush. Sample the area around a scratch and use the Healing Brush or Clone Stamp to erase the scratch. You can use the Healing Brush or Spot Healing Brush to remove any dust spots remaining. (Figure 13)
For any areas that need to be lightened or darkened, you can use the Burn and Dodge tools on the Tools Palette or flatten the image and use the “Burn And Dodge Alternative” tutorial on Bright Hub.
You now have a restored photo ready to print. (Figure 14)

Summary
Restoring photographs is a unique process. Each image is individual and therefore different techniques and tools are needed. This tutorial serves as a starting point for restoring old photos. Experiment and try different things to see what works for you.


