This article covers photography of natural disasters such as earthquakes, volcanic eruptions, flooding, low-level tsunamis, forest fires, mudslides and landslides.
Why Take Pictures of Natural Disasters
Unless you’re a professional or freelance photo-journalist, you’re not likely to be sent onto the scene of a natural disaster. If you’re caught in one however, that’s another story – and one you can consider capitalizing on with your experiences and digital images. If a natural disaster occurs nearby, you might also consider going on location for some dramatic digital images too. Here are some tips and techniques on how to take pictures of natural disasters such as forest fires, earthquakes, landslides, mud slides, tsunamis, floods and natural disasters which are more exotic like avalanches and volcanic eruptions.
What Equipment You Need to Photograph Natural Disasters
Besides a few essentials which can double in helping you to protect your camera from moisture, you should consider carrying a small water-proof or disposable underwater camera. A small portable, battery-operated AM / FM radio can be indispensible for picking up news and emergency broadcasts. Photographic equipment that will prove useful includes wide angle and telephoto or zoom lenses and a camera which allows you to manually manipulate exposure settings. Higher-end model cameras are also sealed against moisture and dust.
Safety Precautions When Shooting Images of Natural Disasters
Your personal safety and that of those around you should be a primary concern. There’s no value in you suffering or getting hurt when shooting images of natural disasters yourself. Check up on safety precautions for the type of natural disaster you’re preparing to shoot.
Be sure to pack a few essential safety items before going into a potentially risky area. Basic supplies may suddenly be in short supply, highly over-priced or unavailable in a disaster- affected area.
Earthquake Safety Rules
More than one million earthquakes rock people in countries world wide each year according to statistics. Some general rules for survival of an earthquake are available online. You should be prepared when entering an area known for earthquakes and tremors or the possibility of them. The greatest dangers often lie, not in the earthquake itself, but in after shocks and subsequent falling debris.
Volcanic Eruption Safety Rules
When traveling in a region with active or semi-active volcanoes, some preparations should also be made to aid in your personal safety. Tuck a couple of disposable dust masks into your camera bag along with a pair of canvas or heavy cotton gloves, an industrial grade flashlight and a pair of safety goggles available at any hardware store or department. Some additional precautions to consider are online at volcano safety tips .
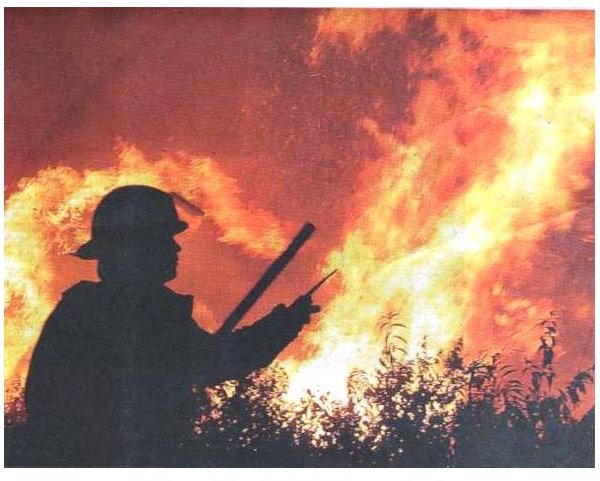
Forest Fires and Safety Precautions
Millions of acres of wilderness are destroyed each year by wild fires or forest fires. These can start at any time when lightning or a spark from a campfire are united with dry wood, trees or underbrush. Add a breeze and you have the big thee of combustion: heat, fuel and air. A fire must have all three elements in place at the same time in order to burn continually. Remove any one of them and the fire will go out. If you are in a area where one of these elements is missing, you are generally safe from the fire itself. Examples would be a clearing or brush-free zone, a river or lake shore, when the fire has already burned through or an area upwind of the fire. At all times you should follow directions given by firefighters and police or other authorities.
How to Take Pictures of Avalanches, Landslides and Mudslides
Thousands of lives are lost each year world wide due to land slides, mudslides, rockslides and avalanches. If these cannot be photographed from a safe distance outside the affected area, then the photographer should wait to get digital images of the aftermath and its effect on the people affected by the natural disaster. Huge volumes of earth, dirt, mud or ice and snow thunder downhill on a mountainside or slope during everything in their path. In some cases, survivors can be found among the debris resulting from the slide. Many times, however, the weight and suffocating debris leave no survivors.
Photo Shooting Tips for Natural Disasters
Your personal safety now reasonably accounted for, you can place more focus on getting images of the natural disaster itself and its aftermath. If your camera needs a bit of extra protection, some plastic wrap or a transparent plastic bag can help out in a pinch. In a forest fire of other sustained heat situation, DO NOT use plastic wrap to protect your camera as this may even work against you ultimately as the heat or fire melts the plastic onto your camera (Ouch!). It you need to wrap the camera try using cloth covered by aluminum foil to reduce the heat actually getting through to the camera. You should also be wearing protective clothing of some type when shooting under any kind of hazardous conditions. Shoot images in RAW format which allows faster picture-taking, if your camera model allows it. You can always convert the RAW image files to other formats using photo-editing software later. Consider using automatic settings or set the camera for basic lighting conditions that exist where you’re shooting.


