With the ability to carry a camera almost everywhere you go, it’s easier than ever to take photos of your family activities. Unfortunately, many people forget that photography is an art form, and with just a few simple considerations, you can turn ‘blah’ photos into something special.
Introduction
Everyone has a camera. Whether it’s in your cell phone, or a small point and shoot camera, or a fancy digital SLR, it seems that taking pictures is easier than ever. For many people, it’s natural to pull out the camera and snap a quick pic whenever anything interesting is going on, and for most people I’d wager than your kids, family, friends or pets are the primary subject of your photo skills.
Take a step back and look at your photos, however, and I’d guess that a large bulk of those pictures are not all that great. Maybe they are blurry, maybe they are filled with harsh flash and shadows, maybe they don’t capture the feeling of the moment at all. Whatever the problem is, if you think of photography as more than simply snapping a picture and consider it more carefully, as the art form it actually is, then you will quickly start to get a natural skill at recording the best moments in your life in such a way that your friends and coworkers don’t let out groans of protest each time you want to show off your weekend adventures.
To that end, let’s take a look at some basic things to think about while you shoot.
Composition
After spending years taking photos, looking at photos, and having family members take photos professionally, it became clear that one thing that really sets apart the ‘good’ photos from the ‘bad’ is the composition. Composition, plainly put, is how the subject of your photo is arranged in the frame. Unfortunately, composition is very subjective, and there is no scientific way to say, “This photo is perfect.”
“But if it’s all subjective, how can I improve?” you ask. Let’s take a look at some things that any photo can use to have some more interest and life.
The Rule of Thirds
How many photos have you seen, or taken yourself, where the primary subject is smack in the middle of the picture? Hundreds, no doubt. Now ask yourself, how many of those photos were amazingly good? It’s often the natural tendency to want to take photos in this way. You say to yourself, “I am taking a photo of this person, therefore I will put them in the center.” However, a long established rule of design known as the Rule of Thirds states that by mentally dividing your image into thirds both horizontally and vertically, and trying to align the most important elements near the intersections of these lines will create an image that is more dynamic, has more interest and tension, and generally “feels” more intriguing. Click here to learn more about the Rule of Thirds .
Zoom In
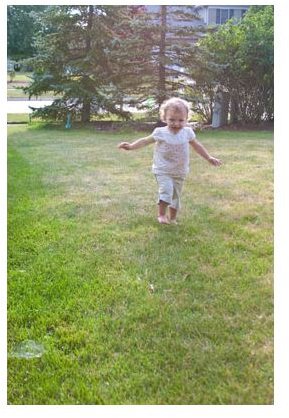
Don’t be afraid of details! I can’t count the number of people photos I see that shows the entire person, from head to toe, taken from approximately a mile away. When you do this, you are distancing the viewer from the subject and removing any intimate connection they might have with the person being photographed. You also lose details, lose out on subtle expressions, or miss nice textures . Consider the following two pictures. On the left is a pretty cute shot. My daughter is running around in the yard. But she’s so small in the frame (though correctly using the rule of thirds) that you can’t really feel what’s going on. Now look at the photo on the right. Yes, you can only see a small part of her, but look how much more you can take from this photo. You can see the texture in her hair, can see the wonder on her face, and while you might not see everything that was going on during this moment, you can connect with her on a much more personal level. Click here to learn more .

To learn more about various composition techniques, please read The Big Picture - Photographic Composition Techniques .
Please continue on to page two, where you will learn more tips on how to take the best “everyday” photos.
Take MORE Pictures!
Even the most modest digital camera can take an astounding number of pictures before filling up the memory card. So don’t be stingy! Take a TON of photos of the moments in your life that you want to remember because you never know which split second might be the perfect one.
My brother is a professional photographer and often has to shoot sporting events . It would not be out of the question for him to take 500 photos covering one football game, but out of those 500 photos perhaps 3 are really great. Even with a good eye, top of the line equipment and experience, capturing the moment can be a tough job. While most of us aren’t shooting pro football games, we might be shooting our son’s football game, and for many people that is probably more important.
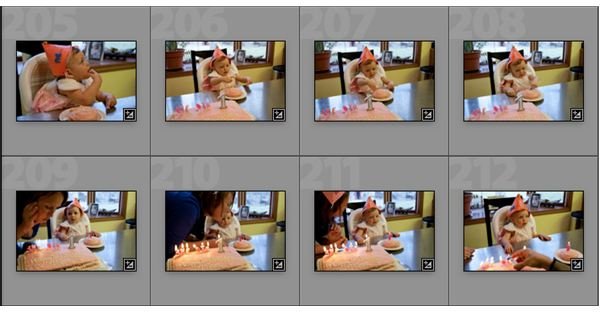
Use that camera, constantly snap pictures, and do not be afraid to delete the bad ones. In fact, be ruthless. If you have enough pictures to work with, it becomes a lot easier to eliminate the junk and end up with the gems. If I decide that it’s a good moment to take some pictures, I will shoot and shoot and shoot. With the pictures of my daughter above, I took about 60 pictures in a few minutes. Of those, I really liked about 10 and of those, just a few really spoke to me and made me remember how it felt to play with her at that time.
Think About Exposure
This might not always apply, depending on your camera settings, but it’s important to understand exposure when taking photographs. Cameras are pretty smart these days, but most point and shoot cameras can get confused pretty easily which can result in truly horrible photos.
Exposure is basically the amount of light that is allowed to hit the sensor when taking a photo. Too much exposure and your photo will be too bright and washed out, and too little exposure will give you a dark, muddy image.
Most people with a basic camera will just leave it on “automatic” and let the camera decide what’s best. This can work sometimes, but other times this can really backfire. Consider a scene in which you have a person who is standing on a hill side, with the bright rising sun right behind them. What will happen in most cases is that your camera will look at this scene, determine that the huge bright sun is the priority, and set the exposure to handle that. Of course what results is that you have a picture of the sun with a totally black silhouette of the person you were trying to take a picture of.
If you do leave your camera set to automatic, there are often a few tricks that can help combat this type of problem. Most digital cameras will set the focus and exposure when you half-press the shutter. So with a little dexterity, you can “trick” the camera into giving you a better exposure . For example, in our sample scene above, you could point the camera more at the ground in front of the person, half-press your shutter so the camera calculates exposure for that darker area, then move the camera up and snap the shot.
Ideally you will be able to set your camera to a manual mode and adjust this yourself. While there are many ways to adjust exposure (which are probably outside the scope of this article), let’s just talk about the most common method, shutter speed. The shutter which covers the sensor will open up for some span of time, usually something like 1/100 of a second, or 1/250. The longer the shutter is open, the more light comes in. So if your camera has the ability, take control of that and you can adjust the shutter speed for the scene, getting the exposure right for what you know is the focus. Remember though that the longer the shutter is open, the more potential for blurring you have. If your subject is a fast moving dog, you probably won’t be able to go much lower than 1/60 without getting blurred action. As with many things in photography, however, this could also be desirable and used to artistic effect, so you have to experiment and find the right balance.
If you are in doubt, remember that it’s almost always better to have an underexposed (darker) image. Software can usually pull details out of dark images, but once an image is overexposed with all the highlight areas blown out to pure white, there’s nothing you can do.
Please continue on to the final page of this article, where you will learn additional tips on how to take the best “everyday” photos, including tips on photo editing and retouching.
Post-Processing & Retouching
Even the best photos will probably need a little bit of work after being taken. Regardless of your operating system or budget, there are plenty of tools out there that allow you to make adjustments to your photos. Hopefully you took a decent picture already, but in case you messed up even pretty poorly done photos can be saved.
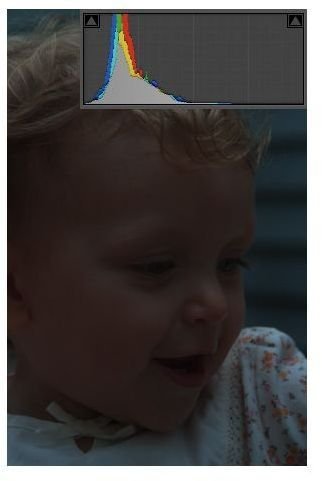
Consider the example shown here. In this case, I messed up my exposure pretty badly, resulting in the terrible photo on the left. It’s dark, muddy, and generally unusable.
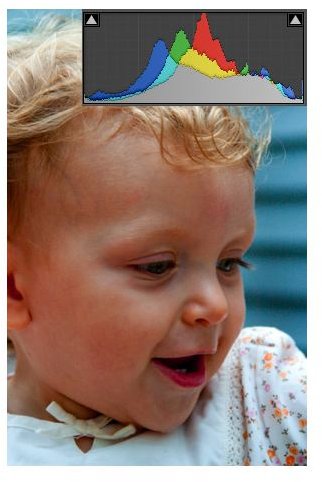
Luckily, the software I use to retouch my photos was able to salvage this, resulting in the much better picture on the right. Let’s take a look at a detail of my samples that visually illustrates just what was going on with these pictures.
At the top corner of my samples, you can see a small graph. This is called a “Histogram ” and most photo programs have the ability to display this for you. What the histogram does is show you where the overall values of your image lie on a scale of dark to light.
In the bad picture on the left, you will notice that all of the peaks on the histogram are squashed all the way over to the left side, which means that all the visual information for that photo is dark. Obviously, this is a bad thing. By adjusting values within my software for things like the exposure, brightness, contrast, black level, etc. I was able to shift the values for my image into the much better balanced histogram you see on the right. Instead of all the values being in the darks, now they are nicely balanced across the entire range, and the photo looks correspondingly better.
Ideally, every photo you take will be spot-on, but usually it won’t be. My first step with every photo I take is to check my histogram and make adjustments to get a nicely distributed curve.
After the overall image is adjusted properly, you can look to make any fine tuning needed to the image. If you took photos with a flash, you’ll very often have the dreaded red-eye to remove. Most editor programs have the ability to do this for you. Perhaps there are some blemishes you want to remove ? Many programs have features such as the “healing brush” which can intelligently take out blemishes. Perhaps your photo is slightly blurry? Maybe all it needs is a slight bit of sharpening.
The possibilities are endless, but for basic photography, focusing on getting a good exposure will quickly separate the good photos from bad.
Conclusion
Photography, like anything else in life, takes some practice. At its fundamental level, photography is about recording a moment in time, and with just a little extra thought you can easily capture those moments in a memorable form. Take pictures, take lots of pictures, think about your composition and exposure, and before you know it you’ll start to get the “eye” and instead of groans of protest, your coworkers will get a smile when you show them what you did with your family on the weekend.
Have fun!


