Tripods can be an expensive piece of equipment that many photographers nonetheless find necessary, if bulky. Here’s a quick guide on how to make your own Gorillapod, a small flexible wire tripod that serves as a handy alternative to traditional tripods.
Camera shake is a photographer’s worst nightmare, capable of completely and utterly ruining otherwise beautiful pictures. The most common solution to this is to purchase a tripod . However, those are often expensive and impractical to carry around—and can’t always get that precise angle you want. A recent innovation in response to this has been the Gorillapod. If you haven’t heard of it, it is basically a miniature tripod made of gripping wires that can be wrapped around virtually anything, from poles to fences to trees. Sounds simple? Well, that’s why they’re so easy to make for yourself!
Here is a review of the Gorillapod .
For a comparison of different stabilization devices designed for eliminating camera shake, including but not limited to traditional tripods, Gorillapods, beanpods, monopods and more, check out this article .
What You Need to Make Your Own Gorillapod Tripod
-
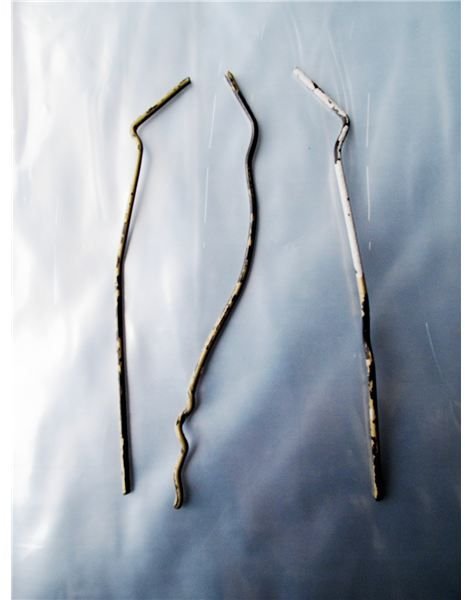
3 one foot pieces of stiff wire - think about cannibalizing those old coat hangers! Otherwise, this can be cheaply obtained at any hardware store.
Advertisement -
¼ inch bolt. While this is the standard size, make sure it fits your particular camera tripod mount at the base of your camera.
-
Sturdy tape – pick a color, any color. Electrical tape recommended. Black is the usual choice, as it is downkey and readily avvailable.
Advertisement -
Pliers – recommended, though not entirely necessary.
How to Make the Tripod
Step 1: Start by simply wrapping the strips of wire with the electrical tape. I would recommend seven complete wraps, so that the wires are stiff and strong, but not so much that they can’t be easily bent and manipulated. However, this may vary by the thickness of the tape and wire used. Test the wrapped wires out on various surfaces to make sure the number of wraps is appropriate before applying more. Make sure to leave the last 2 inches unwrapped at each end of the wires.
Step 2: Twist the unwrapped wire ends into small “U” loops. One of these ends will serve as the “feet” of the tripod for when you need to balance it on a flat surface, while the other end will be fastened to the bolt.
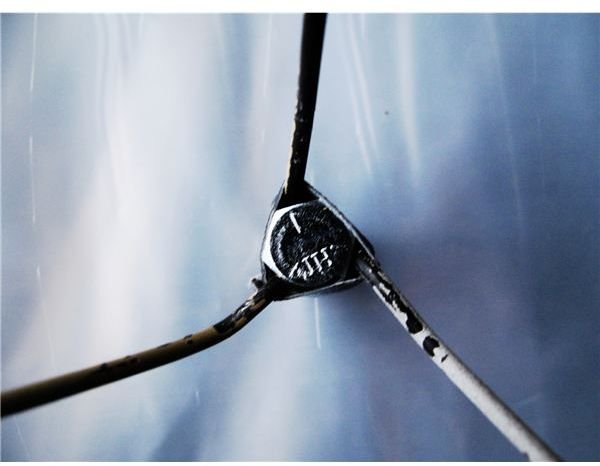
Step 3: Proceed by wrapping the end of the bolt nearest the head in one layer of tape, and then taking the “U” loops of the legs and clinching them tightly onto the bolt evenly spaced around the circumference of the bolt.
Step 4: Then, wrap further layers of tape around the combined wire loops and the bolt to fasten it securely. Don’t skimp on the tape!
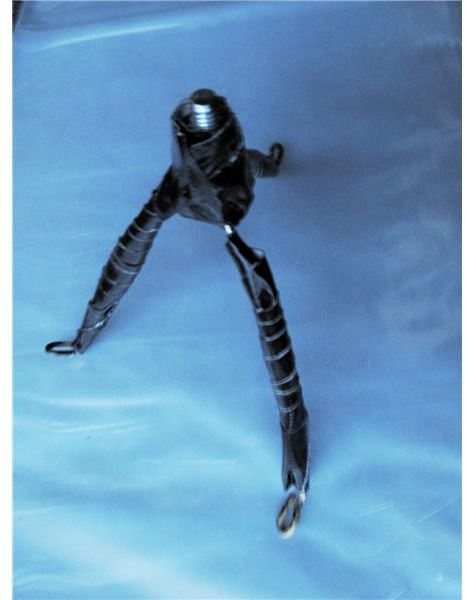
And that’s it!
Images
Variations
So… this isn’t exactly the prettiest creation. It is made of tape, after all. There are a few ways to make it look nice. A simple one is to use differently colored tapes for a striped effect. Sharpie markers can also be used for some interesting patterns, however, non-permanent markers and paints are not recommended as they will quickly wear off. If you’re more on the girly side, stickers and decals can make for good decoration as well.
For a more labor- and material-intensive version of the DIY Gorillapod, check out this Instructables tutorial .


