If you’ve read any digital photography magazines, websites, or books, you’ve heard about RAW format. If you’ve read any of the documentation or books for Adobe Lightroom, you’ve heard about it again. What is it exactly, and why is everyone so insistent on you using it?
History
Once upon a time, in a magical land where cameras that captured images without the use of film were considered high-tech marvels, there was a need to save pictures in a file format that allowed for their use on computers. So, camera manufacturers developed a file format that recorded every single detail for any given picture. However, each camera manufacturer created their own file structure, so those files could not be used universally. Even more distressing, the files were HUGE, and in this far away land, data storage was very expensive. And so, camera manufacturers included the ability to use other file formats to store the images taken with their cameras, and complexity was born.
Use RAW or You Are a Weenie!
Anyone, anywhere, who writes about photography, will almost always insist that you use the RAW mode on your camera if it has one. In one way, this makes perfect sense. RAW format files contain the most detailed information about your pictures and who wouldn’t want that? On the other hand, storing RAW photos takes more space, and they are slower to write to the memory card which can be a problem if you are trying to take a bunch of rapid fire shots. Besides, you never saw anything wrong with your JPEG image files. So, what is all the fuss about?
RAW Today
Today, an image taken on an 8 Megapixel Canon XL digital camera in RAW format takes around 6.5MB of disk space on a computer.
That isn’t small by any stretch of the imagination, but at the same time, a 4GB Compact Flash card can run you in the neighborhood of $40 to $50. This means that you can take over 200 pictures in RAW format on your digital camera without changing the card.
But, the same camera uses just 2.5MB to 3MB to store the highest quality JPEG image. Not only that, but JPEGs can be read by pretty much any image software from the smallest freeware, to the most expensive pro software. RAW may not be supported on some image programs.
The explanation of what RAW is and what it gives you almost always gets too esoteric too quick, so your non-pro camera buffs just roll their eyes and either:
a) Use RAW format for their pictures because they know that’s what the experts tell them to do,
or
b) Use JPEG because they have never seen anything wrong with their pictures before and as far as they’re concerned, all those experts can go jump in a lake.
Adobe Lightroom Makes Understanding RAW Easy
If you have gotten any details about what RAW format gives you, you probably know that it has something to do with white balance . This is partly true. The fact of the matter is that using JPEG format does cause you to lose some of the detail in your shots, and this can limit what you can do with them later. However, the white balance thing is a great way to understand in a practical way what exactly the difference is.
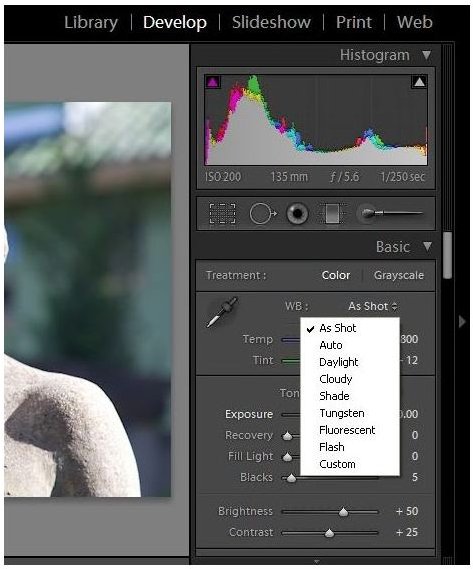
If you fire up Adobe Lightroom and choose a photograph file that is in JPEG format and click the White Balance box, you’ll get three choices: As Shot, Auto or Custom. As Shot means just use what your camera decided to use. Most cameras will automatically set the white balance in one way or another, so this option is to just run with that. Auto means that Lightroom will take its best guess based on what it seems in the image as to what the white balance should have been. And C_ustom_, well, that means you adjust it yourself.
Now, do the same thing with a photo you took in RAW format. Look at all those choices. When you shoot in RAW format, your camera saves so much information about what the picture was, that Adobe can actually recreate that digital moment. In doing so, it can allow you to set the white balance just like you would on your camera AFTER THE SHOT! So, instead of selecting Cloudy on an overcast day, and then hoping you remember to change it next time, you can just shoot in RAW and then at your computer, change it to cloudy later. But, this only works in RAW.
Is that it? No, there will be many other places that you’ll find limitations with JPEG files, but now at least you can get a handle on all that hubbub about white balance. Play around with some of your shots to see what difference it makes. You might pay more attention in the future to setting your white balance in the first place.
Screen Shots