Whether done purposely or by mistake, shooting silhouette photographs can present some of the most unique and interesting images you’ll have in your collection. This tutorial will provide you with tips, tricks and techniques on how to capture attention-grabbing silhouettes.
What is a Silhouette?
Have you ever taken a picture when the flash didn’t fire or you drastically underexposed the picture? Has your auto-focus / metering camera ever misread a scene and the subject came out almost black while the background was nearly perfectly exposed? Congratulations, you unknowingly photographed what is known as a silhouette. Technically speaking, a silhouette is a dark shape or figure seen against a light background. On occasion they can result from photographic “errors” and “accidents”, but when done on purpose, they can have a startlingly dramatic effect.
7 Tips to Help You Capture Dramatic Silhouettes
Here are seven tips to help you shoot better, more dramatic silhouette images:
-
Have the subject backlit
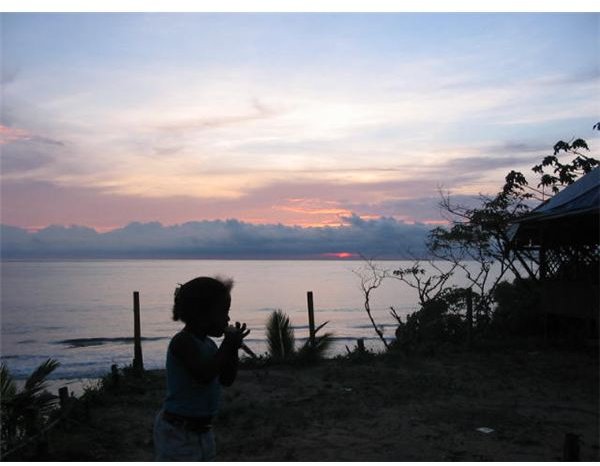
The first key to shooting silhouettes is to have the main or strongest light source behind the subject. If it’s the sun, for example, have your subject, a tree, a building, an object or a person, block the sun’s direct light. Using a fast shutter speed in low light conditions such as sunrises and sunsets will also help in creating silhouettes. Both of these times of the day are almost made-to-order for capturing silhouetted images. [See Image 1] In the silhouette of the girl at sunset, I metered off of the sky, then framed and took the image using a fast shutter speed to help “stop” any movement she made.
Advertisement -
Meter the Light off the Background
You’ll need to meter the exposure off of the light background to help to deliberately underexpose the subject and create the silhouette effect. When using manual metering on your camera or if you have a hand-held meter, point it at a clear, bright section of sky to take the light readings. Set the camera to these bright background meter readings to take the silhouetted main subject shots.
Advertisement -
Use Focus Lock to Hold the Camera’s Settings
When using auto-focus / metering on your camera, point it at a clear, bright section of sky and press the shutter button halfway down and hold the button there . Swing the camera back to frame the silhouetted subject, then press the shutter button all the way down to take the shot.
Advertisement -
Stop Down or Bracket for Lower Light Levels
You can deliberately shoot silhouetted images using the manual exposure settings on your camera. Set the exposure for the brightest part of the background, then shoot the framed image. You should have the subject photographed or exposed as a silhouette.
Advertisement -
Get Close to Your Subject
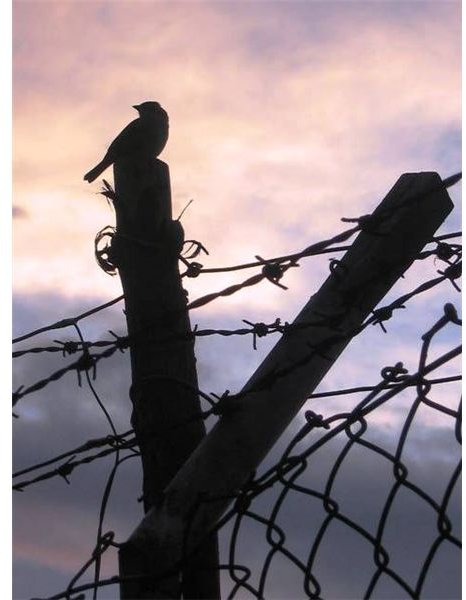
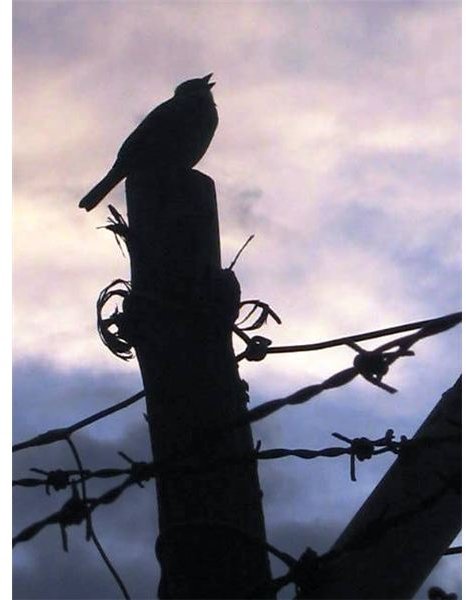
You’ll have far more success in taking good silhouettes if you get as close as possible to the subject . This will allow you to clearly place the strongest light source behind the subject and still allow for you to change your shooting angles to get a wider variety of images. If neither you nor the subject can move, then use your camera telephoto feature to zoom in or out for additional silhouette images. To get the silhouetted images of the bird on a fence at sunset, I first took the normal focal length shot [See Image 2] then zoomed in without moving – which would have disturbed the bird causing it to fly away. [See Image 3]
Advertisement -
Make Sure Your Flash is Turned Off
Any time you deliberately want to shoot silhouettes, make sure to turn off, disconnect or disable the camera’s flash unit, especially on automatic setting digital cameras. Otherwise, the camera’s internal metering system may override your efforts, see the potentially underexposed subject and fire the flash. Alternatively, you could temporarily tape over the flash with black electrician’s tape.
Advertisement -
Shoot from Different Angles
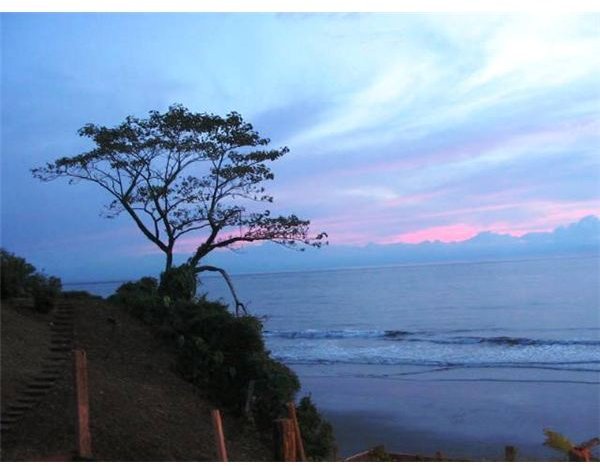
Shoot your subject making sure to keep the strongest source of light, like the sun, moon or other light source, behind the subject. With this in mind you can change to shoot from higher, lower or side angles to get more creative with the silhouette. You can also move or pose the subject in different positions too. Remember, when neither you nor the subject can move, zoom in to get the image. This was the case when I took the silhouetted image of the tree growing on a crag near the beach. There was a crevasse between me and the tree so I couldn’t change angles , so I simply zoomed in for the shot. [See Image 4]
Advertisement
Try a Few Silhouettes
When you want to expand your photographic horizons and deepen the range of your digital image portfolio, try shooting some silhouettes. They can be easy and simple to set up, but can provide some of the most unique, interesting, provoking and startling images you’ll have in your collection.
Images
If you found this tutorial helpful and you’d like to try your hand at other photography techniques, be sure to check out Bright Hub’s other great tutorials that will help you master your photography skills in no time!


