Photos can look wonderful when the foreground is in focus and the background blurred, especially when the light sources in the background twinkle like stars! How about customising the shape of the blurs that you see? Read on to learn how to create your own bokeh shapes that have impressive results.
What is Bokeh?
Let me start by telling you what bokeh is. Bokeh is the blur achieved by using a low aperture value (aperture wide open), where only the subject in focus is sharp and everything else is blurred beautifully.
For a more in-depth look, please read What is Bokeh? The Difference Between Bokeh and Depth of Field .
(Click on images to enlarge)
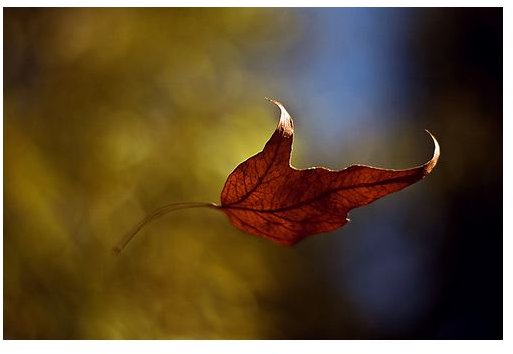
Photo by macroninja
Adding light to Bokehs
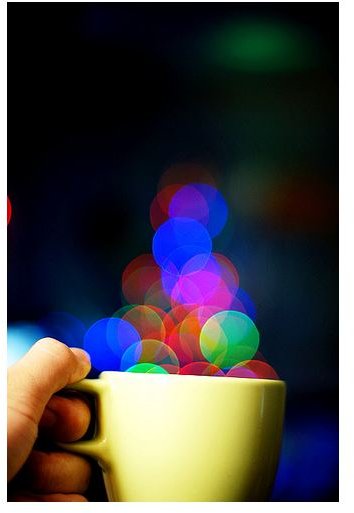
Unlike the above image, you can also achieve a bokeh image in artificial light which can add yet another interesting dimension to your photo. The out-of-focus light that you see in photos captured at night is caused simply by the light sources in the distance being thrown out of focus by the wide open aperture, providing a surreal look to your picture.
Now that you know that adding light to your photograph using a low aperture value can produce an image with interesting light sources, let see if we can play around with the shapes of those light sources.
Photo by Shermeee
Creating & Customizing Bokeh Shapes
The trick to customising bokeh shapes works on the principle that the shapes that you see in the background are basically the shape of the aperture in your digital camera. You might have noticed this if you’ve ever taken a picture at a very high aperture value in daylight - the light sources can appear as stars and these stars are essentially the aperture blades in the lens that you use. Therefore by playing around with the aperture shape we can change the way the light sources appear in a photograph.
What you need to create bokeh shapes
-
A lens capable of very low aperture value (a 50mm prime lens, for example)
Advertisement -
Piece of cardboard
-
Adhesive tape
Advertisement
How to customise bokeh shapes
- Using the cardboard, create a lens hood that will fit around your camera’s lens.
- Cut out a circular piece of cardboard (like a lens cap) and fix it to the lens hood and then onto the lens.
- Using adhesive tape, see to it that this contraption doesn’t fall off your lens.
- Now, cut out the shape that you want on the cardboard that serves as the lens cap. This will determine the shape of your bokeh. There are no strict rules as to how large or small the shape needs to be, experiment with different sizes to see different results. As a starting point, try 15mm.
Go crazy with your bokeh shapes
Start shooting with your camera and, before you know it, you’ll end up with pictures that have beautifully customized bokeh shapes. Remember, the cardboard contraption that we made here serves as a primary aperture, masking out the shape of the aperture blades of the lens.
Additional Tips
It is important that you shoot with a wide open aperture because the light entering the lens is greatly reduced by the cardboard setup.
Photo by Philgarlic

Compose your shot with lots of light source in the background to create beautiful patterns.
Photo by dotbenjamin
As you can see from the images above, adding some foreground objects to your image can definitely add more style to your image, so don’t forget to include a foreground subject.
Check out this excellent article and go through the comments section to learn a lot about the above mentioned technique.


