A beautiful moment in time can turn out dismal even when using a high quality digital camera. Don’t run to the store to buy grandma a card from Hallmark just yet. Follow this Photoshop tutorial to retouch your photos, and send your completed masterpiece to the printer.
Breathe New Life into a Gloomy Digital Photo
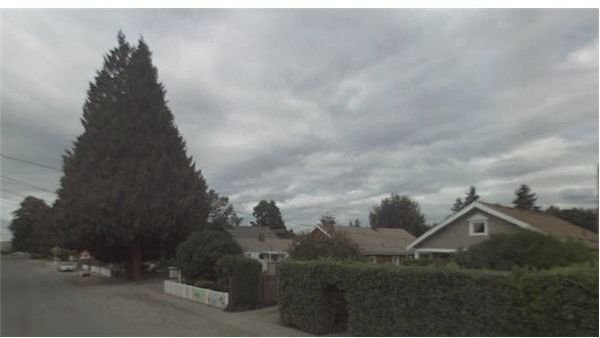
What should ordinarily be a beautiful moment in time can turn out dismal or unclean, even on a quality digital camera. This is particularly true of photos taken outside, and under situations where we haven’t had time to premeditate the capturing of a quality photo, or perhaps we forgot to bring the proper filters. Photoshop can nurse your dismal photos back to life and reconstruct that image of loveliness just as you remember it in your mind. It’s true, it just takes a little bit of time and patience to become adept at a few tricks that the pros have mastered. Best of all, it’s really not too hard for anyone to learn how to fix a photo. What we’ll cover here is a retouching method utilizing Photoshop’s Levels panel.
Bring Up Levels
Take this common photograph for example. Photoshop can completely change the gloomy mood of this photograph in just a few minutes. To start with, click on the Image drop-down menu. Select the Adjustment and Levels option from the list. Hit the Control key (Command in Mac) + L on your keyboard to bring up the Levels panel.
Highlights and Shadows
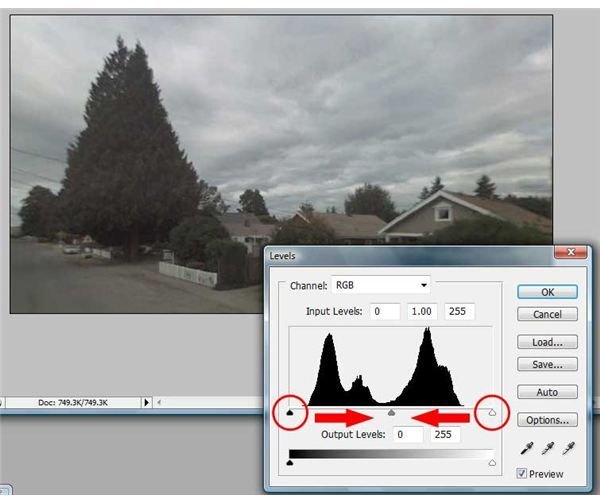
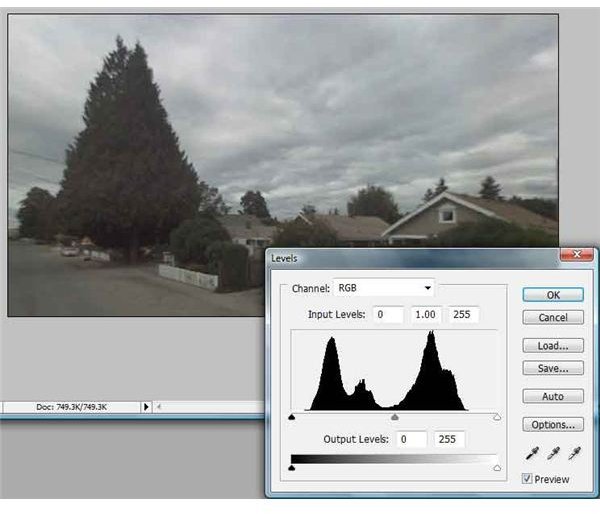
Now you need to find the shadows in your photo. Hold down the Alt key (Option key in Mac) on your keyboard, and pull the black little triangle slider on the Input level graph to the right (towards the gray slider). You will start to see the darkest area of the photo forming up. As soon as the dark area of the picture turns solid black, let go of the Alt key (Option key in Mac) on your keyboard, and release the mouse button. The changes to your photo take effect immediately.
Now hold down the Alt key (Option key in Mac) on your keyboard and pull the white little triangle slider to the left (towards the gray slider). You will start to see the lightest area of the picture forming up. Let go of Alt key (Option key in Mac) and the mouse from the slider.
Adjust the triangle sliders left-right by holding down the Alt key (Option key in Mac) until a satisfactory brightness and contrast is achieved. Click on “OK”. Go ahead and take a look at the History palette. Here you can see the photo as it was before and after the Level changes. You will see quite a difference.
Color Spread
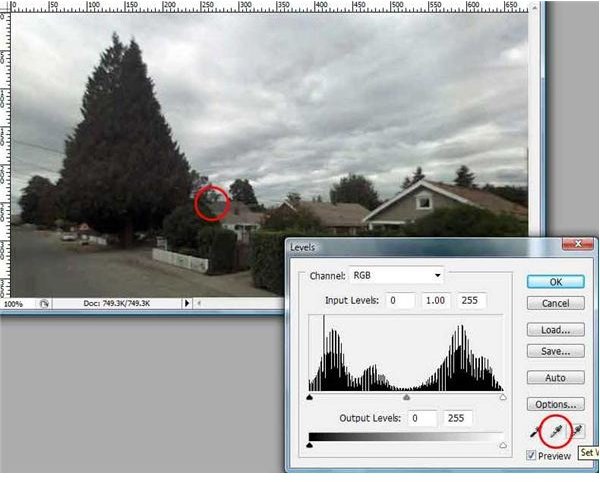
The spread of color over the picture may require just a bit more work. Make adjustments using the gray eyedropper located in the Levels panel. Click on the middle dropper tool, and find the color closest to gray in the picture. Click on this grayest area with the dropper tool. Try clicking on different gray areas to compare the resulting changes of color balance.
Add Vividness
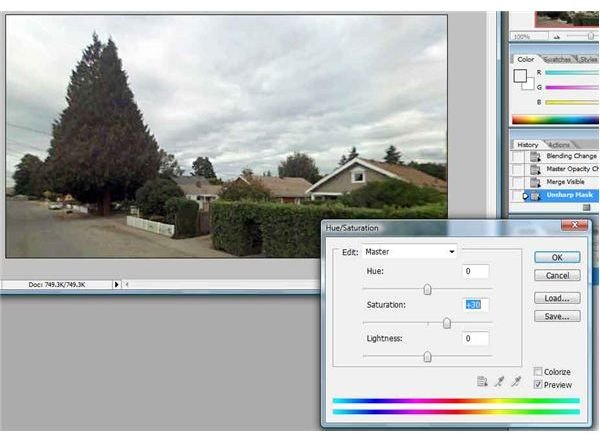
Add vividness to the photo. Click on the Image drop-down menu. Select Adjustments, and then select Hue/ Saturation. Press on the Control key (Command in Mac) +U on your keyboard. Add the number 10 in the little text box labelled “Saturation”. If you want more color, add a greater number in Saturation and compare the result. If you start to see pixelated color spots all over, then you’ve applied too much saturation. Type a smaller number in the Saturation text box to reduce the saturation.
Make it Stand Out

Add sharpness in the photo to make objects stand out more profoundly. Click on the Filter drop-down menu. Select Sharpen and Unsharp Mask. Start with small percentage and pixels in the Amount and Radius in the Unsharp Mask window. Make sure Preview is turned on by enabling the checkbox next to Preview. Enabling the preview allows you to watch the progress. Add more or less percentage to the Unsharp Mask window. Too much sharpness becomes distractive. Slight sharpness should be enough unless your photo is very small (for example, a thumbnail).
Check Your Progress and Save

Now check the History panel to compare the opening state of your photo with the changes you’ve made. What a difference! Now you can save your beautiful photo and toss the gloomy one in the recycle bin. Just click on the File menu. Click on “Save as”, and select the format you want to save your image as. You’re ready to take on just about any photo touch-ups from here on out!


