
Learn how to use ratio lighting techniques to create a more dramatic feel to your photos and bring out more character in your portraits.
If you have never heard of ratio lighting , count yourself as among the majority. However, you have certainly seen the effects of this technique, even if you had never thought about or actively noticed it before.
Ratio lighting is simply the lighting of a subject unevenly in order to bring out details or add a dramatic effect. Look at the image below.
Alex is a local bank executive I photographed not so long ago. Notice that one side of his face is brighter than the other. This is what is known as a lighting ratio, but that’s fancy talk. What the lighting ratio does is it adds a dramatic effect and makes a more interesting photograph than if the lighting were flat. So how do you achieve this look? See the diagram below.
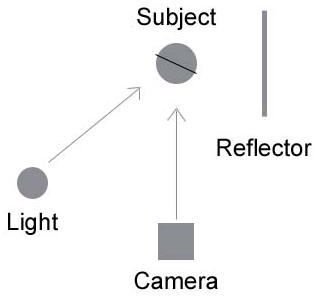
The light is pointed at the subject at roughly a 45-degree angle relative to the position of the camera. On the other side of the subject is a plain white reflector to bounce the light . This can be as simple as a piece of poster board, although I used a sheer nylon-type material, held by my assistant. If I did not have a reflector I could have easily used another light in that spot at a very low setting to give just a hint of light so as to preserve the shadow but to also have enough light so we can see both sides of his face. You might be interested in reading this tutorial on how to make a reflector for under $30 .
The technical settings can vary a bit. This particular portrait has more contrast than I would normally use, but I thought the extra darkness was interesting with the subject’s dark suit and the dark background. Normally I measure for a one-stop difference from the two light sources, which gives enough depth to the photo but not so much shadow that it is noticeable. In all honesty, I did not measure this particular set-up. I simply turned off the light on the right side (not shown in the diagram) and had my assistant hold a reflector. It was all spur of the moment, but I would guess it’s probably two steps difference from one side of his face to the other.
The diagonal line through the subject in the diagram represents the angle of the subject’s shoulders. Note that they are at an angle away from the camera, not straight on. This is really a matter of composition , rather than ratio lighting, but is an important element that adds depth to the photo and makes it more interesting.
This is just one example of ratio lighting. In the case above we see a very noticeable difference in lighting from one side of the face to the other. Similar effects can be accomplished with a more subtle difference. This is definitely something to experiment with so you can get a sense of how you want your shot to look. Next time you are photographing somebody, try this technique and see how it works for you. This particular experiment was successful. I gave the subject a print of the photo and he sent it to his mother for Mother’s Day and she was overjoyed. Success doesn’t get much better than that.


