There are literally countless ways you can use PaintShop Pro to edit a photograph – even though some them are quite simple, they still give striking results. Here, we’ll show how one photo can be transformed several different ways.
Original Photo
We’ve all heard the saying (perhaps too many times) that “a picture is worth a 1000 words,” but have you ever thought about how many different looks a single picture can take on with just a few little changes?
Well, I’m not going to look at 1000 different changes, but I do want to look at several ways you can edit the same photo in PaintShop Pro. I’ll start with this great stock photo I found at sxc.hu. The link for this photo is provided below, so you can download the image and follow along by making your own modifications, if you like. And, if you come up with a new way to edit the photo and would like to share your strategy, please leave a note in the Comments!
For this project, I’ll be using PaintShop Pro X4 . Many of the results can be obtained used older versions of the software, but there are a few times that I’ll be taking advantage of some of X4’s new features. However, if you want to try them yourself and don’t have the software, you can download a free trial from Corel’s website.
Time Machine
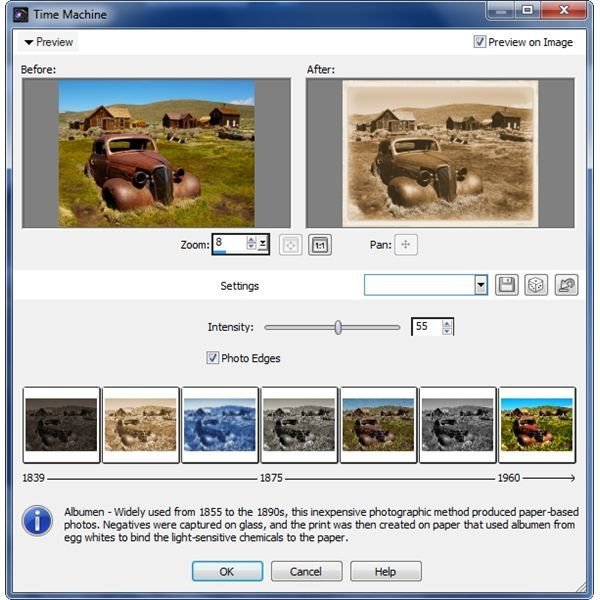
The photographer notes that this photo was taken at an old gold mining town – Bodie, California to be specific. The structures shown in the image definitely look old and abandoned, but the vivid colors and great resolution make it clear that the photo was taken in modern times. There are a number of different techniques we can use to make the photo itself look like it was taken long ago. The Time Machine filter is just one of these options.
I almost feel guilty including this effect because it’s so easy to apply – in fact, it’s a built-in filter in PaintShop Pro X4 (and in many older versions as well). But, the end result just looks so great that I couldn’t leave it out. If you want to replicate these results, here are the steps I used.
1. From the Effects menu, select Photo Effects and then Time Machine.
2. Select one of the techniques from the row of photos in the Time Machine window. For the image above, I chose Albumen, the second one from the left.
3. Adjust the Intensity slider if you like to tweak the effect. I left my slider at 55.
4. Click OK and wait a second or two for the effect to be applied. If your image is small, the application will be almost instantaneous, but it may take a few seconds for larger images.
I especially like the effect on this particular photo, since it gives the image even more of a historical feel.
Local Tone Mapping
Another way to really accentuate the “old and abandoned” look in our original photo is to bring out the fine details and make them much more visible. The Local Tone Mapping tool makes this much easier than most people think.
There are a lot of third-party plugins – some of them with big price tags – that rely heavily on local tone mapping to accentuate the details of an image. But, before you go shelling out the money for one of these plugins, try experimenting with PaintShop Pro’s built-in tool. It really is quite intuitive.
To get the image above, I applied these steps to the original photograph:
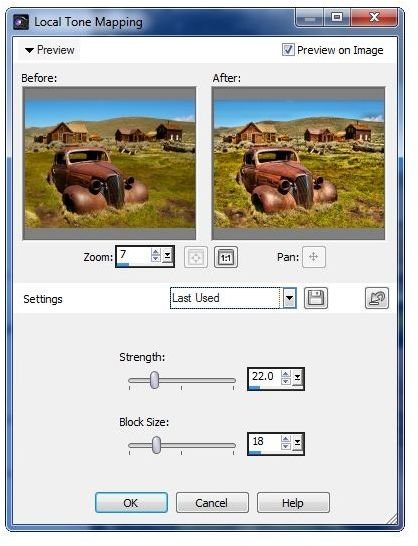
1. From the Adjust menu, choose Brightness and Contrast, and then Local Tone Mapping.
2. There are several presets that you can select from the Settings drop-down menu, but I usually just manually adjust the Strength and Block Size sliders while viewing a preview of the changes. In this case, I chose a Strength of 22 and a Block Size of 18.
3. Click OK and wait a couple seconds for the image to update.
You do want to be a bit careful when using this tool, since high values for the settings can introduce some unwanted effects – like noise and other artifacts. For instance, in this example, I may want to go back and restrict the local tone mapping changes to just the non-sky portion of the image because the sky could definitely look better here. Then again, experimenting is half the fun!
Turn It Into a Polaroid
This little editing project is actually very quick and easy if you have the white Polaroid frame saved in your PSP picture frames directory. You can recreate the frame from scratch if you like, or you can download a copy from Bright Hub’s Digital Photography Media Gallery and save yourself the hassle.
Download Link: Polaroid Picture Frame
Here are the steps I used to create (minus the time it took to throw together the picture frame file):
1. Crop out a square portion of the photo. I chose to focus on the old car for this example, because it really is the star of the show.
2. Add the picture frame.
3. Use the text tool and a fun font to write a message on the bottom portion of the whitish-gray frame. Here, I used the Heather BTN font. If you don’t have that font on your PC, you can download it for free from a number of sources. Or, you can just use another font you like. By the way, if you’re interested in finding other free fonts to download or just want to learn more about fonts in general, check out Bright Hub’s Everything You Need to Know About Fonts guide.
The brown-slatted background in the image above really isn’t part of the technique I was trying to demonstrate here. I just needed to add something to the background of the Polaroid so the white edges wouldn’t blend in with the color of the web page background.
However, as I look at the image I see that it could be edited even more to come up with a lot of new looks. For example, you could replace the brown background with something that looks like cork, and add a drop shadow and a pushpin to the Polaroid to make it look like it was pinned to a note board.
Make a Pattern!
I thought it would be fun to take a little intermission from our photo editing and show another neat tool in PaintShop Pro that lets you quickly create unique patterns and designs using a digital photo as your basis. So, all you photo editing purists may want to skip to the next slide, but I hope you digital scrapbookers and desktop publishers will stick around.
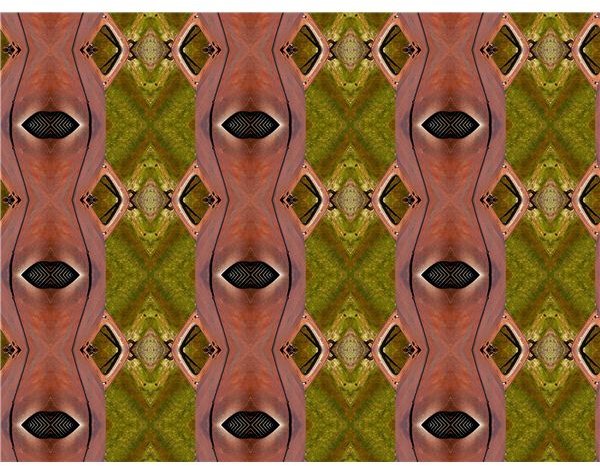
Have you ever wanted to create a new pattern or background for a project, but weren’t sure where to begin? There are several nice tools in PaintShop Pro that can help, and one of them is the Pattern Reflection Effect. Just pick any digital photo – or any other image, for that matter – with colors that you like and follow these steps. I’m still using the same original photo here, so if you downloaded that, you can follow along.
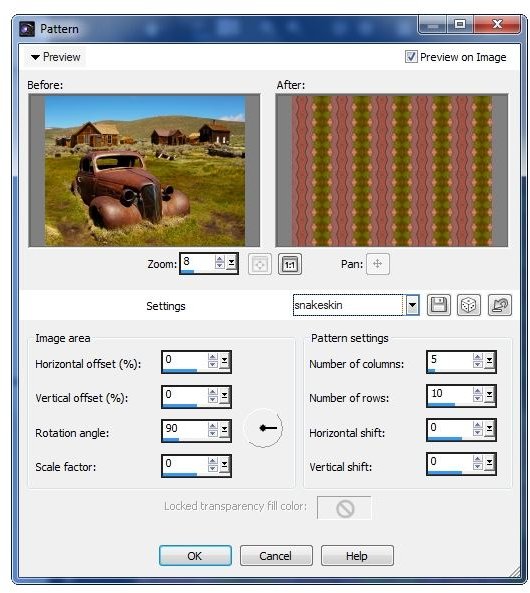
1. From the Effects menu, select Reflection Effects and then Pattern.
2. When the Pattern window pops up, it’s a good idea to check the box next to Preview on Image so you can get a larger view of your pattern as you’re designing it.
3. Experiment with all the different settings until you find a design you like. The exact settings I used for the image above are shown in the screenshot to the right.
4. When you do find a pattern you like, be sure to save it as a new preset just in case you want to apply the same settings to another photo.
5. When done, click OK to apply the changes to your image.
6. Be sure to save your resulting image under a new file name so you don’t lose your original photo.
Note: You can save several presets before clicking OK and applying the final one. That way, you can create a bunch of different patterns from a single image and apply them one by one.
Miniaturization Effect
One of my favorite additions to PaintShop Pro X4 is the Selective Focus effect. You can achieve a lot of different looks with this filter, but it’s most commonly used to create a miniaturization effect. That is, it can turn your photo of a realistic natural scene into one that looks like a toy model.
To use this tool, here are the basic steps to follow.
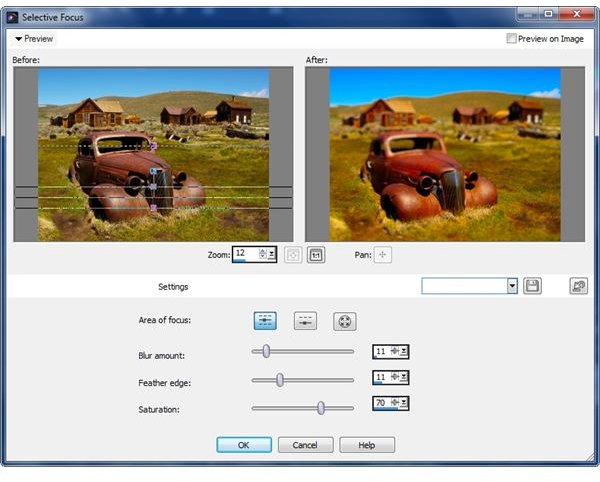
1. From the Effects menu, select Photo Effects and then Selective Focus.
2. Here’s where you’ll have to do some experimentation to find the look you want to achieve. The exact settings I used are shown in the screenshot to the right, but take some time to play around and see how changing the setting of one slider affects the entire image. You may also what to try out different options for your Area of Focus.
3. When you find a combination you like, be sure to save it as a preset. To do this, click on the disk icon next to the Settings dropdown list, give your new preset a name and click OK. Now you can apply this configuration to other photos with just a single click.
4. After you’re done experimenting and you’ve saved your settings, click OK to apply the changes to your photo.
Go Black and White
Transforming a color photo into an interesting-looking black and white image can be a lot harder than it sounds. You have to be extra careful that the resulting black and white photo doesn’t look drab and boring – and the settings you choose will depend a whole lot on the colors and lighting of the original image as well as on the look you want to achieve.
There are several extremely popular photo-editing plugins that focus entirely on applying black and white film effects. These add-ins don’t necessarily offer more functionality than the Black and White film filter in PaintShop Pro, but they do generally come with tons of presets. This makes it easy to look at dozens of different possibilities and choose the right one. That alone can make them worth the price.
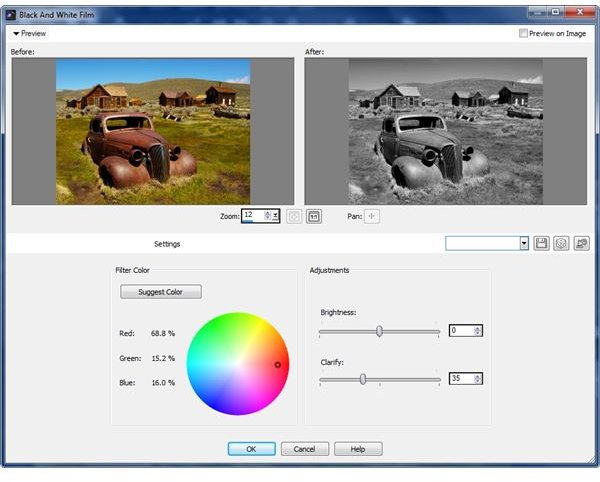
I know I say this a lot, but before you go down the plugin route, experiment with the Black and White film effect in PSP. And, always remember, when you find a combination of settings you like, save it as a new preset. Maybe you’ll be able to save enough to create your own plugin!
PaintShop Pro’s Black and White Film filter is found in the Photo Effects grouping in the Effects menu. The screenshot to the right shows the settings I used to obtain the image above, but I grant that it’s not trivial to duplicate since you can’t input the exact percentages for the filter color. Of course, the easiest way to duplicate the results is to share the presets file – so if anyone is really interested, leave a note in the Comments, and I’ll see about getting it uploaded.
Transform Into a Painting
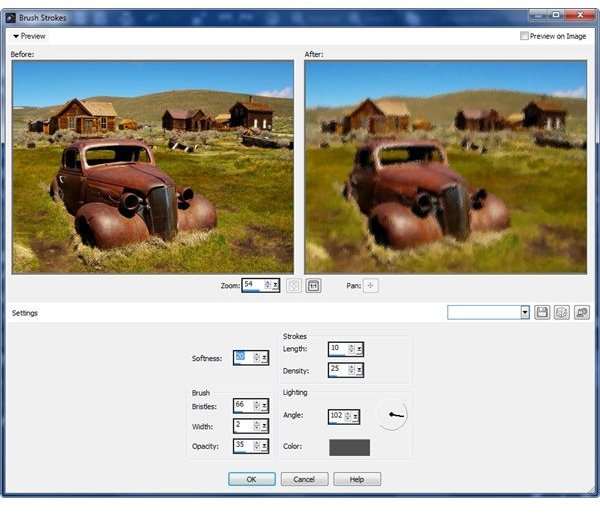
The art of turning a digital photo into an image that looks like a painting is very popular these days, and it is possible to do this in PaintShop Pro. However, while possible, it is a bit of a pain to get the look you want using PSP alone – if you haven’t already built yourself up a nice collection of custom presets.
If this is a process that you want to perform on a regular basis, I recommend checking into various third-party plugins that are available. A couple of great ones are Alien Skin Snap Art and AKVIS Artwork . These plugins actually allow you to simulate lots of different media, not just paint. So, they can be used to transform photos into pencil sketches, cartoons and more – fairly quickly.
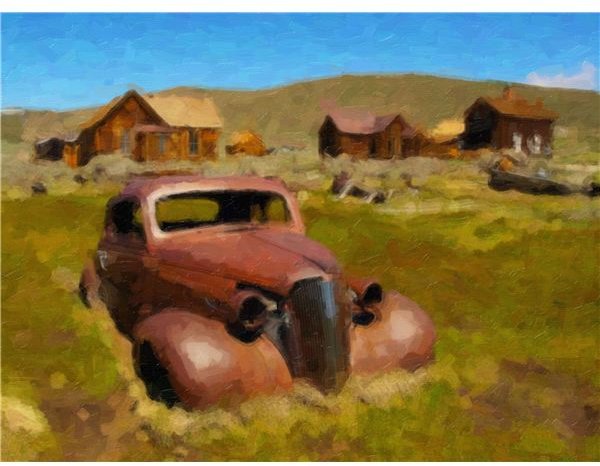
Still, it is possible to do these things in PaintShop Pro without the use of plugins – just be prepared for a lot of trial and error and some frustration along the way. The large image above was created without the help of any plugins (Haha, can you tell?) using the settings shown in the screenshot to the upper right. It didn’t take very long at all to create, but it’s also not even close to the kind of quality you can achieve either by using plugins or spending a lot more time fine-tuning PSP’s settings.
For this image, I used the Brush Strokes filter, found in the Art Media Effects grouping in the Effects menu. If you have any tips for getting more out of PaintShop Pro’s built-in art media tools, I’d love to hear.
Oh, by the way, the image to the left shows an image I created using Alien Skin Snap Art with just one click.
References
- Corel PaintShop Pro X4 Official Site, http://www.corel.com/servlet/Satellite/us/en/Product/1184951547051


