In this tutorial I will show you how to use the warp effects in Adobe Illustrator. I will also show you an easy way to apply warp effects.
In Adobe Illustrator there is a warp menu. Under this menu you will find the different warp effects that you can apply to your photos. I will walk you through the steps on how to apply some of these warp effects. To begin this tutorial, you will need to open your Adobe Illustrator program and open the photo that you want to use for this tutorial. You can use the same photo for each warp effect. You can simply undo an effect before applying another one. So let’s get started.
To get to the Warp Effect menu, you will need to click Effect > Warp > then you will see the different warp effects.
**
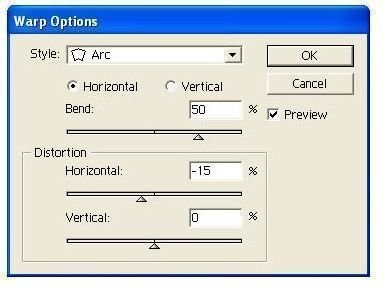
Arc Warp Effect
Let’s start off with the Arc Warp Effect. Using this effect will arc your photo. So click Effect > Warp > Arc. When the box opens, you will see the different options in the box. Go ahead and tick the Preview field with your mouse. This way, you can see everything that you are doing while you are doing it. You can adjust the bars in the box to distort the photo even more. Tick the horizontal field or the vertical field. This determines how your photo will arc. When you have the photo the way that you want it, click Ok to apply the arc. To undo the effect, click Edit > Undo.
Flag Effect
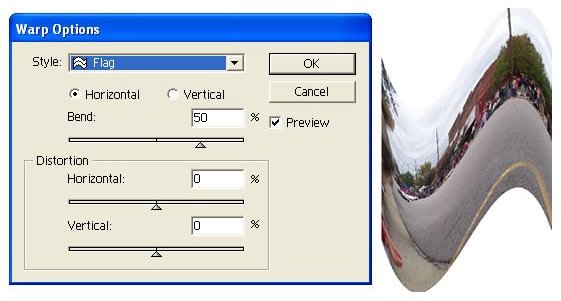
Now we will take a look at the flag effect. Click Effect > Warp > Flag. That will open the flag effect box. Go ahead and tick the preview field so that you can see what you are doing. Again, you will need to adjust the Distortion bars to get the effect that you are going for. You can slide your effects box over so that you can see what you are doing. After you have your flag effect the way that you want it, click the OK button.
Fish Effect
The fish effect will turn the photo into the shape of a fish. To apply this effect click Effect > Warp > Fish. When the box opens, adjust the settings to what you want. Don’t forget to tick the preview field so that you can see what you are doing.
Warp Effects
You may have noticed that every time you applied a warp effect, you seen the same settings box. The only thing that changed was the name in the top of the box. An easy way to use the warp effects is by dropping the top box down and selecting the warp effect that you want to apply. All of the warp effects are in the drop down box at the top of the settings box.
Using the warp effects is a fun way to distort photos. Play around with the warp effects to come up with some cool looking photos.


