Windows 7 comes with a free photo editing program: Windows Media Center. This program allows you to perform simple edits to your images, including cropping and contrast correction. Learn how to use this program in this Windows 7 tutorial.
Windows 7 Capabilities
Windows 7 is the latest offering from Microsoft. It comes with the Windows Media Center, which is a program that allows you to perform simple edits to your photographs. You can do edits like red eye correction, adjusting contrast and cropping your images.
Now that you know what you can do with this program, you probably want to know how to edit photos in Windows 7. It’s a fairly easy process. Simply open up the Windows Media Center and your image, and then use the following steps to perform edits to your images.
Red Eye and Cropping
The most common fix to any image is removing red eye from images. Red eye is caused when your flash or surrounding ambient light causes a red reflection in your subject’s eye. To correct this problem using the Windows 7 Windows Media Center, follow the below steps:
-
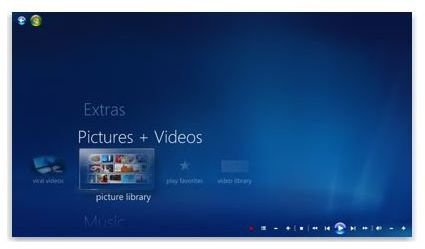
Go to the Start screen, and then go to Pictures + Videos.
Advertisement -
Open up the Picture Library.
-
Right-click on the picture that you need to change.
Advertisement -
In the dropdown menu, select Picture Details.
-
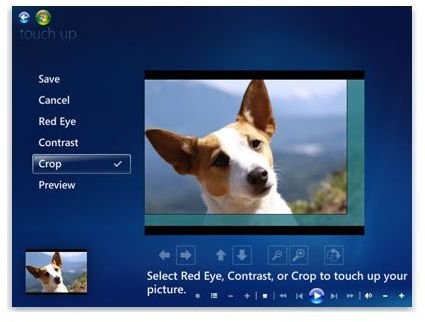
Go to Touch Up and then Red Eye.
Advertisement -
Select Save, and Windows Media Center will correct the red eye problem in the image.
Another issue that many people have with images is that the picture is the wrong angle. While you can crop out the edges of the image so that it sits straight, you also lose the rest of the image. It works better to actually rotate the image to straighten it.
You can do this in the Windows Media Center . Navigate to the image, and right-click on it. Go to Picture Details, and select Rotate.
The image rotates at 90 degree angles. You can only rotate the image 90 degrees at a time and not in incremental degrees. If your image is completely upside down, you may have to click the button more than once until it’s in the correct position.
If you over-rotate the image, simply keep hitting the rotate button until it is back in the correct position.
If you do need to crop an image, go to the Touch Up menu, and select Crop. With this tool, you can change the size, orientation and location of the image. When you are done, simply hit Save to save all of your changes.
Fixing Contrast
Many images have problems with contrast. Either the image is too bright, or it is too dark. You can do simple contrast correction with Windows Media Center. Open up the Picture Details menu, and click on Touch Up. Select Contrast, and then press Save to save your changes.
The program will then apply a simple contrast correction to the image. If your image still doesn’t look right, you can either undo the change, or save the current change under a different name. If the contrast correction makes the image look worse, then you really want to use another program.
Editing on the Slideshow and Printing
Windows 7 Windows Media Center allows you to edit your images while you are watching them on a slideshow. To do this, follow the below steps:
- Go to the Start screen, and select Pictures + Video.
- Open up the Picture Library.
- Find the picture that you want to edit, and click on it. It should now fill up the screen.
- Right-click on the image, and select the Picture Details option.
- Make the changes that you need to make to the image.
- Select Play Slide Show to start the slideshow again.
Once you are done with all of your edits, you may want to print the image so you can share it with others. To print an image in Windows 7, follow the below steps:
- Right-click on the image to bring up the Picture Details menu.
- In this menu, select Print to bring up the print picture dialog menu.
- Select your printer and printer options.
- Press Print to start printing your picture.
You can also use this program to delete unwanted images from your computer. To delete an image, go into the Picture Library, and right-click on the image that you want to delete. Select Delete, and press Yes, confirming that you actually want to delete this image.
Now, you know how to edit photos in Windows 7. The Windows Media Center only allows you to perform simple edits. If you need advanced edits, you can use other free programs like GIMP or online editors like Photobucket and Picnik. While the Windows Media Center isn’t a full editor, it’s great for quick edits on your Windows 7 PC.
References
Image and Article Source: Windows


