Ok, you have your passport photo picture and it looks good. Now, just a couple of tweaks in Photoshop or your favorite photo editor, and you are ready to print and submit.
Lights
The main subject light should be the light coming in through the windows. The rest of the lighting will come from household lights. The purpose of these lights is to eliminate shadows and make the light consistent. If you have an overhead light, turn it on. If it does not cause shadows, you can keep it. Otherwise, turn it back off. Now, using floor lamps, set one lamp just out of the frame such that two lines drawn from the subject to the window and the subject to the lamp come together at approximately a 90 degree angle. Note the presence or lack of shadows on the subject and move the lamp in small adjustments both back and forward (but always out of the frame) and side to side until there is no shadow on the subject’s face.
Next, it is time to get rid of background shadows. A desk lamp or a short floor lamp is the solution. Position the lamp behind the subject but in front of the background. Move the light until there is no shadow and no halo (no ring of light) behind the subject. You are successful when the entire area behind the subject has the same amount of light. Keep in mind that only the area behind the subject’s head and shoulder area matters. The rest will be cropped from the picture.
Photoshop
Step one is don’t do anything you would normally do! Photos turn out much better with a little enhancement, but doing anything other than setting the white balance properly is like to get your photo thrown out. Do not adjust the color, the saturation, the curves, nothing. Keep your hands away from the toolbox!
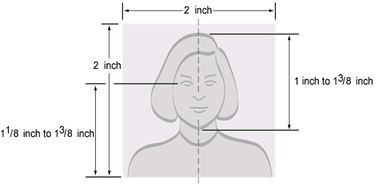
What you do want to do is crop your photo to the right dimensions. A passport photo must be 2 inches by 2 inches, so set your crop tool to 2x2 and zoom in on your head and shoulders. You want your head (from top of hair to chin) to take up from 1 inch to 1 3/8 inch of the photos height. You want your eyes to be 1 1/8 to 1 3/8 inches from the bottom of the photo. There can be some resizing here, but be careful to not degrade your photo quality or it will get tossed. The best bet is to resize and see if it works. If not, don’t resize again from there, undo all the way back to the original photo and resize again. Repeat this until you have it right. Keep in mind your neck and shoulders are supposed to appear in the picture.
(Image from official US State Department Passport Website)
Printing
The last step is to print your photo and send it in. Here is where you might want to go the professional printer route unless your printer is a VERY high end photo printer. Don’t even think about trying to print off your photos on some sub-$500 photo printer. It is good enough for your photo album, but not good enough for the state department. An online photo printer is good enough for this kind of picture. In order to get the size right, try ordering wallets of your picture (which will also give you the two photos you need).
Just make sure that you use the proper options to keep them from “zooming” the photo to fit the print size, otherwise all of your work will got down the drain.
This post is part of the series: Making Your Own Passport Photos
Once upon a time, the State Department actively discouraged people from using digital cameras for passport pictures. Later, they were fine with digital pictures, but discouraged people from creating their own passport pictures. Now, you can do it yourself, you just have to do it right.


