Like tree carvings? Then you need to take some pictures of arborglyhs. Learn some photographing arborglyphs techniques in this digital photography tutorial.
How to Photograph Arborglyphs
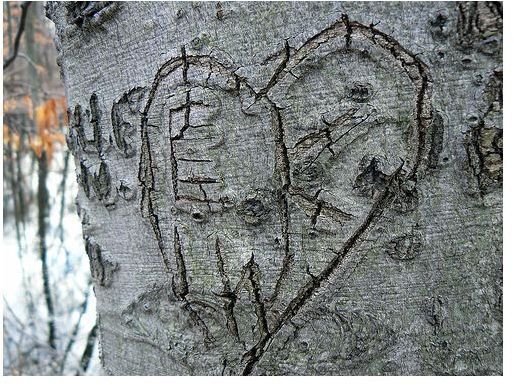
You’ve probably walked past them a 1,000 times in the park or in your neighborhood, but you probably don’t know their official names. Arborglyphs or tree carvings include all those hearts and names that you see on trees. But, there are even more elaborate arborglyphs that include poetry, dates and drawings. These drawings make for powerful photographs if you know how to capture these images. So, how do you go about photographing arborglyphs?
Equipment
Well, you, of course, need some equipment. You need a good digital SLR camera and both a zoom and wide angle lens. Depending on how close you can get to the tree, you may have to use the zoom lens to get close to the image. If you want to capture a group of arborglyphs, then the wide angle lens comes in handy.
You may also consider bringing some extra lighting. You don’t want to use your flash, or you’ll over-expose the image. Instead, use some reflectors and maybe a fill flash to brighten up the scene.
Pack your equipment in a backpack. You are probably going to have to do some hiking to find the right trees and setting. If you have a park in your area, you may be able to find some there. You should also research where other people in your area have found arborglyphs. It will make your search easier.
Focus on Your Subject
Next, you need to focus on composition. The arborglyph should take up the entire frame. Try to avoid any extraneous items in your image unless it’s on purpose. For example, if the arborglyphs on are the side of the tree, and you have a good background, then focus on the carvings and blur the background. This allows you to contrast the carvings with the background.
Use your zoom lens when taking these types of photographs. The zoom lens is better at isolating on your subject than the wide angle lens.
Natural Lighting
Pick your time of day. Just like when you take pictures of regular trees , natural lighting can enhance the colors and the bark of the tree. Cloudy days provide you with the near perfect type of lighting. You don’t need to use extra lighting or flash, and your images are not over-exposed due to bright sunlight. This is especially the case if you are working with a tree without any leaves.
You can also experiment with early morning and afternoon lighting as it filters through the leaves of your tree. The mixture of light and shadows creates interesting contrasts. Always look for interesting lighting. Sunrise and sunset provide you with different colors that you can use for your background.
Angles and Seasons
Next, look for different angles. Straight on angles aren’t as interesting as different types of angles. Play around with the perspective until you find a really interesting shot.
Finally, take pictures during different seasons. Some snow mixed in with the scene will add some contrast against the black of the carvings and the coloring of the bark. Also, bring a few filters, especially IR filters, which add some different shades to your images.


