If you are a budding producer or just a music hobbyist, and are looking for information about using FL Studio, read onward. This article will quickly get you to building your first groove, about a minute or so, without over-complicating matters.
There are many detailed guides on how to use FL Studio and, although they go into depth regarding what the program can do, few are really “hands-on” or practical. A lot of the complex aspects of the program may drive people away; it needn’t be so and, by following the simple steps in this guide, you can get a basic arrangement down quickly.
This article will quickly show you how to set-up your first two patterns, add them to your playlist and export the audio. Follow the guide and you will get practical advice on how to use FL Studio: it will help you to eventually create things in your own style.
Before starting download the two midi clips provided at this address : they are piano and bass loops which will be part of the tutorial.
Setting up a Kit
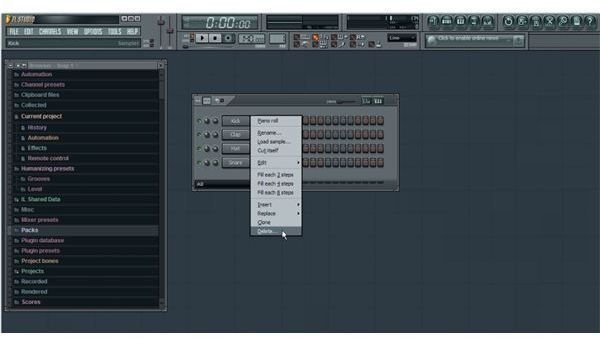
After having launched the program, you should have the step sequencer up, with four drum instruments being kick, clap, hat and snare. If you don’t see the step-sequencer, press F6 and it will appear instantly. Delete all four instruments by right-click and selecting “Delete” at the very bottom.
Next go to the browser window, it should be on the left-hand side. If not, press F8. Here you have a list of all the instruments already included with the program, to which you can add loops , more instruments and so on. For now let’s use what’s already there as they are perfectly good resources, although they won’t help you being particularly original.
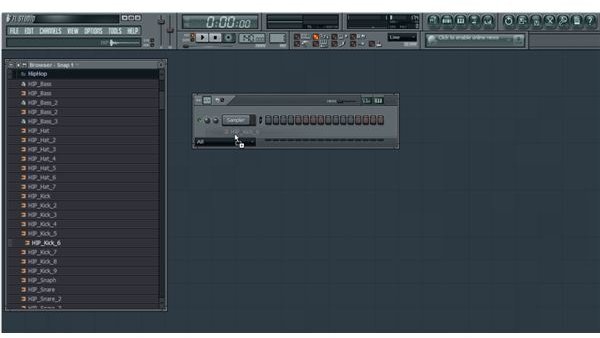
Click on the “Packs” folder in the same browser window, and click on “Hip-Hop.” These are listed alphabetically so they are easy to find. Each folder opens as a drop-down to reveal the containing samples. In the “Hip-hop” folder find “HIP_Kick_6” and drag-drop onto your step-sequencer. Do the same for “HIP_Snare_8” and “HIP_Snare_9”. Remember not to drop these on top of an existing instrument or it will replace it. Lastly load up a hat by dropping “HIP_Hat_5”
Loading your Midi Sequence

First, you want to create another pattern. Go to the pattern selector where a double-arrow icon will appear. Hold your left-mouse button and move up until you get to 2.
Minimize Fruity loops and copy the two Midi files you downloaded previously (bss.midi, keys.midi) to your “User” folder. This is located in “C:\Program Files\Image-Line\FL Studio 8\Data\Patches\User.” You might have installed the program on a different drive letter , i.e. drive E, but the remaining path is the same.
Bring FL up again. Go to the browser window (the one on the left-hand side) and scroll to the bottom until you see a folder named “User.” The two midi files will be there now. Drag and drop ‘bss.mid’ on top of “Sampler” and the other in an unoccupied space (click the tick button at the prompt).
Setting Tempo and Beats per bar
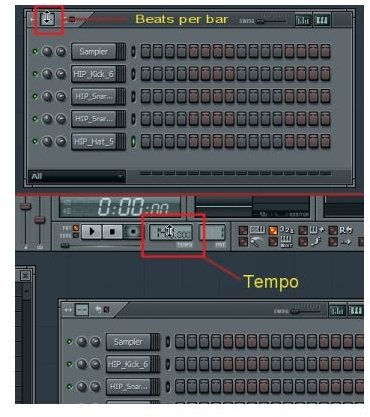
Now you are well on your way towards knowing how to use FL Studio. Set your tempo and the beats-per-bar. You can do this by holding your left mouse-button while it’s on either window. A double-arrow icon will appear which you can move up (or down) until you get your desired value (look at the figure for help).
For this project we will set the pattern to 8 bpb and the tempo to 80 bpm.
Continue reading on page 2 to learn more about how to use FL Studio.
Loading Plugins
Nothing will play in the MIDI files unless you load up plug-ins; they are basically the same as VST instruments apart from the automation perhaps. Always remember MIDI is just raw data, not sound.
Right-click on “Sampler” in your step-sequencer, then go to “Replace” in the drop down and select “Boo Bass.” The interface will pop-up, and you can fiddle with the settings. I’d recommend turning the bass up and turning down mids and treble.
Right-click on “Sampler #2.” Go to “Replace” and select “FL Keys.” The interface will come up. Choose your desired keys from the sample set. My personal favorite is the Rhodes.
Now we have sound. Click on the play button at the top to hear it.
Making Your Drum beat
The initial raw set-up is done. Now it’s time to bang-out a groove. First go back to “pattern 1” as described above (pattern selector, hold your left mouse-button etc…)
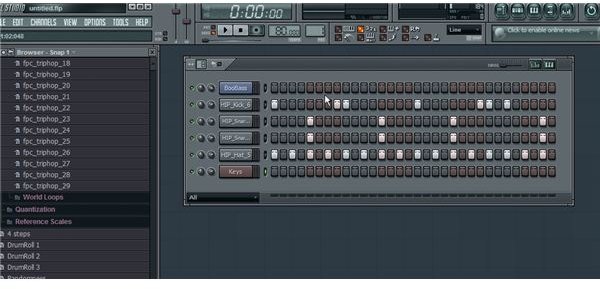
You can set up a beat by left-clicking on those rectangular buttons in the step-sequencer (the sample triggers.) You can experiment at will once you are familiar but for now, look at the diagram to see how I’ve set-up this beat.
Notice that there are two snares, not just one. It is quite common to use layers, particularly where drums are concerned, and by effect processing you can obtain an even fuller sound. These tricks not only help in knowing how to use FL studio, but generally with music production.
Ordering in the Playlist
First, click on “Song Mode” near the play button. The final stage is actually creating your song with the material given in this tutorial. Click F5 to bring up the playlist.
Click on “Pattern 1” on the bottom corner on your left-hand side. Now click the “Draw” button located in the small icons at the top. Draw your pattern in the top-window, it should be on the top empty line and it should be at the very beginning. You can move it by holding the left mouse button.

Click on “Pattern 2” and draw it in the second line, still at the very beginning. Look at the diagram if the steps seem complicated.
Once you’ve drawn both, you’ll notice one is longer than the other. Select “Pattern 1” again and keep on drawing (on the top line) until both match-up. It should look like this:
Now you can go ahead and play it by clicking on the play button.
Exporting at Last
Finally the track is complete. Now you know how to use FL Studio to create a track. You can export by going to “File” and selecting “Export” from the drop-down. Select Wav file as your option. Select your directory and there you have it - your first track! Now, it wasn’t that difficult, was it?
NOTE: This tutorial was created by using Fruity Loops Studio 8. All images and content are the author’s work and may not be reproduced without permission.


