Here is an article for those who are new at using the loop recorder in Ableton Live 8. It shows how to record some audio, loop it, and then move onto the next recording. Once you learn about this process your will improve your ability to create great tracks or mixes with different flavors.
Ableton Live can be quite unforgiving, especially to inexperienced users. The software is mainly aimed at DJ’s, and although it can do anything that other sequencing software can, it is rather less intuitive as far as track addition and editing is concerned.
If you are a new user and wish to know how to loop an audio recording in Ableton Live, read on for all the information you need. This feature is mainly used when mixing with the program. You can use the audio loop recorder to record one section of a mix for instance, then loop it (you will set the markers before) and drop the next track in real-time as you are mixing. It allows for greater flexibility in your live set.
Setting Audio tracks
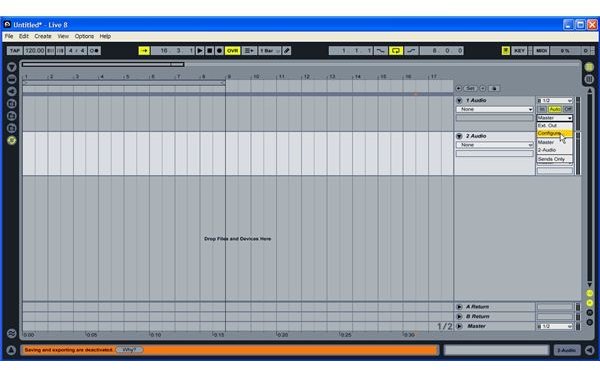
Start by launching the program and making sure you have the arrangement window up on your screen - (click ‘‘View’ and then ‘Arrangement’). Make sure your ‘In/Out’ map is visible, (‘View’ – ‘In/Out’). It will appear on the right-hand side of your tracks. You may wish to minimize effects and other windows for now so you concentrate on this task.
Now, configure your input channels. Go to the right of your channels and click on ‘Master’ then ‘Configure’ (see image left). Now set up a keyboard key for your global record button and stop button: go to ‘Key’ at the top, then click on the global record button and hit ‘R’, or any other key you like. Do the same for your stop button.
Recording
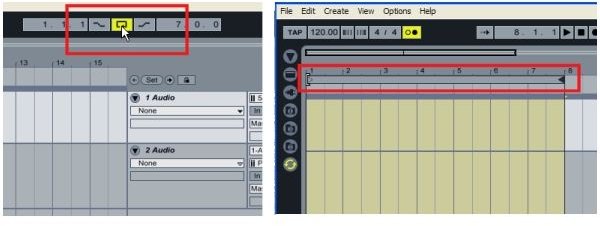
Next you need to click on the ‘Loop’ button and set your markers. Set the markers for however many bars you wish to record for. In my screenshot on the left, it is set for eight. You can do this by hovering your mouse cursor at the top and dragging the markers to where you desire.
Now pick the audio channel that will record the outputted audio signal. This is done by selecting it from the panels on the right, as shown before, (the In/Out panel next to the main arrangement window). In my case, I chose channels 5/6 which were playing a track from my media player .
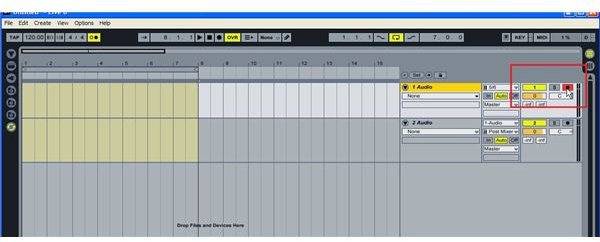
After that, click on the track-record button (see image left), then hit the space bar and the track will begin playing. When you are ready, hit the ‘R’ button to begin recording in real-time, either from your instrument source or from a track already playing. Once finished, hit whatever you’ve chosen for your stop button on your keyboard. The track will continue to play as a looped audio clip. Click the track-record button once again, (this time for track 2), and repeat the process.
If you follow these steps, you’ll know how to loop an audio recording in Ableton live. Mixing and looping your own tracks will soon become an easy task, even though it might look difficult at first.
References
Screenshots created by the author.