Tracking your expenses helps manage your budget but can be cumbersome. If you use a spreadsheet to enter the expenses, it adds the income and expenses for you, and if you follow the instructions given here, it will also tell you how much you have to spend or how much you can save.
Introduction
The household expense worksheet works hand-in-hand with your budget to help you keep track of your monthly household expenses. When you see where your money goes each month, it is easier to cut out extras when you are trying to save for a special project or for retirement.
Format Cells and Set Up
In a worksheet, the rows are horizontal and the columns are vertical. Determine how many weeks you want to show in a worksheet. For long-term planning, you should have 53 columns: one column for each week of the year, plus the first column for descriptions.
If you put a long number in a cell that is too short, Excel changes the numbers to “xxxxx.” Grab the divider line between the columns for each week with your mouse and drag it to the right until the column is about 12 points wide.
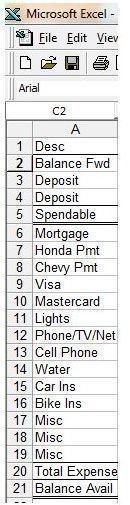
Enter “Desc” in column “A.” In each of the following columns, enter the date for the beginning of the week. If Sunday is the beginning of your week, enter this Sunday’s date, and each Sunday following for 52 weeks or for the length of time for which you are building the worksheet.
In Row 2, enter “Balance Fwd.” This amount will be carried over from the total at the end of the column so that you can keep a running balance from week to week.
Adding Deposits
In Rows 3 and 4, title Column “A” as “Deposit.” If you only have one income going in, you only need to do this for Row 3. Just under Deposits, enter the title, “Spendable.” This is the amount you have each week to spend.
Adding Expenses
Some expenses are weekly and some are monthly. Enter monthly expenses such as rent or mortgage, car payments and credit card payments first. Write the description of each expense in column “A,” starting on Row 3, just under the words “Balance Fwd.”
Just under the “big” expenses, write in the monthly utilities such as lights, phone, cell phone, Internet and cable. Under that, write in your insurance premiums. For the rest of the spreadsheet, add in groceries, clothing, and three to four miscellaneous categories (label “Misc”).
Add Equations
Under the last expense, label Column “A” as “Total Expenses.” Just under Total Expenses, label Column “A” as “Balance Avail.” This is the amount that will be carried up to the top of the next week’s column.
In the row titled “Spendable,” type in the equation to add the Balance Fwd and the Deposit rows: “@sum(b2..b5).” Your equation may be a bit different — the last number, which is the cell number, should be the row and column of the last deposit line.
Test the worksheet by plugging in 1000 for the balance forward on the first week, then 2000 for one of the deposits and 1000 for the each additional deposit. The worksheet should add up the balance forward and deposits and insert the total in the row labeled “Spendable.”
In the row titled “Total Expense,” insert the equation “@sum(b6..b19).” If your expenses fall into a different box, be sure to use that box instead of b19. Fill in some expenses and make sure the spreadsheet properly inserts the total in the “Total Expense” box for the week.
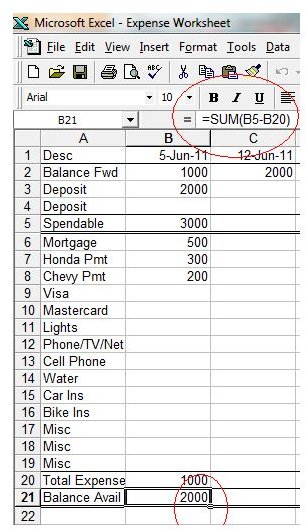
Insert the equation “@sum(b5-b20)” in the “Balance Avail” row. If your expenses are totaled on row 45, the equation would be “b5-b45,” instead of “b5-b20.” The worksheet should subtract your expenses for that week from the spendable. If your spendable was 3000 and your expenses were 1000, the worksheet should show 2000 in the “Balance Avail” row.
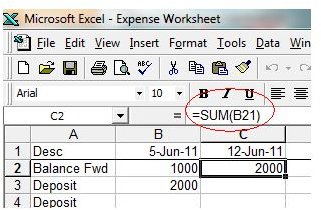
Scroll up to the top of the column for the next week. Insert the equation “@sum(b21) into the “Balance Fwd” row. If your Balance Avail is on row 43, you would enter 43 instead of 21 in the equation. The spreadsheet should insert the number in the “Balance Avail” column into the “Balance Fwd” column for the next week.
Most spreadsheets will convert the format of the formula (equation), but if your spreadsheet does not, reviews your software’s help section on formatting formulas.
Inserting Equations for the Rest of the Worksheet
Now that you have the first row of the worksheet working, you need to copy the equations to the rest of the worksheet. Single click in column C, row 2 to grab the equation you entered for the “Balance Fwd” in the second week. Press CTRL+C to copy the equation. Single click in Column D, Row 2. Hold the left mouse button down and drag it across the entire row to highlight it. Press CTRL+V to paste the formula in the highlighted cells.
Repeat the process for the “Spendable,” “Total Expenses” and “Balance Avail” rows.
Using the Spreadsheet
Fill in the information as you receive deposits and spend money. The household expense worksheet not only shows you how much you are spending, but it helps you keep your budget and discourages going over budget . It also shows you how much money you can save on a weekly basis.
As expenses change, simply add or subtract the row for that expense. Depending on your version or “brand” of the worksheet, it may self adjust or you may need to go in and edit the formulas. To edit a formula, simply retype it with the new cell identifiers.
If you do not have a spreadsheet program, you can easily draw a handwritten worksheet and manually add the columns. You may also download a free spreadsheet program from the Internet.
References and Photo Credits
Photo screenshots by Cayden Conor
References: The author’s personal experience was relied upon for this article. The author uses a version of this household expense worksheet.